This article walks through setting up your local development environment, creating your first Pages site, running it locally, and deploying it to Yext.
Note: This doc assumes you are on the latest version of Pages. See Upgrading to PagesJS 1.0.0 to upgrade before you get started.
Development Dependencies
Before building with Pages, make sure you have the following installed and configured.
1. Sign Up or Log In to Your Yext Account
If you do not have a Yext account, you can sign up for an account here.
2. Install the Yext CLI
You will use this to initialize your site and build it locally. Refer to these instructions regarding installation.
3. Install Git
Refer to these instructions regarding Git installation.
If you already have Git, update to the most recent version by following these directions.
4. Create a GitHub Account
If you don't have a GitHub account, sign up for one here.
Set up your local Git configuration with your GitHub account. Run the following two commands (fill in your own email and name):
git config --global user.email "you@example.com"
git config --global user.name "Your Name"
5. Install a Code Editor
If you don't already have a code editor, we recommend downloading VS Code.
6. Install Node.js and npm
Refer to these instructions. You can confirm you have both by running the following commands in your CLI:
node -vnpm -v
You must be on node version 18 or 20 to work with Pages.
Note: There are occasionally issues installing Node on Apple Silicon Macs when using the Node installer. We strongly recommend installing Node using NVM.
7. Install Deno
You will need Deno v1.21.0 or higher installed on your machine for local development. Refer to these instructions.
8. Install GitHub CLI
Refer to these instructions.
React
Pages supports React 17 and React 18. React is referenced in the package.json of the respective starters and will be automatically installed with npm install once a starter repo is cloned.
Create Your Site
Connect to Your Yext Account
-
Log in to your Yext account and copy your account ID, which is visible in the URL:

- Determine if you are using a
sandboxorproductionenvironment.- If the URL begins with
sandbox.yext.com, you are using a sandbox account. - If you are using a production account, the URL will simply be
yext.com.
- If the URL begins with
-
Connect to your account using the CLI.
- For a sandbox (Playground) account:
yext init -u sandbox <account_id>
- For a production account:
yext init <account_id>
- A new tab will open in your browser asking you to authorize access. Click Authorize. If you are not logged in to your Yext account, you will be prompted to log in.
Run yext pages new
Once connected to your account, navigate to a suitable directory for your Pages project and run:
yext pages new
This command initiates an onboarding flow through which you can name your project, clone a starter repo, and configure a GitHub repository.
To follow along with the example project, respond to the prompts as follows:
- Would you like to create a new repo or link an existing GitHub repo? — Create a new repo
- Which starter repository would you like to use? — Locations Starter (Basic)
- What would you like to call your new Pages repo? — turtlehead-tacos-demo-restaurant-site
-
Would you like to set up a remote GitHub repository? — Y or enter
- This sets up a remote repo and makes deploying your site easy. If you are not logged into GitHub, the command will prompt you to log in via the browser.
-
Would you like to install dependencies? — Y or enter
- This runs
npm iunder the hood and installs all required dependencies.
- This runs
-
Would you like to populate your account with seed data? (Recommended if starting with a fresh account) — Y
- Be careful when adding seed data to an account with existing data, as it may update or delete existing data.
-
Warning: Are you sure you want to overwrite configuration resources for the current configuration? — Yes
- Confirm you are connected to the correct account.
Local Development
Once your project is set up, the starter repository configures two main commands for local development: npm run dev and npm run prod.
npm run dev
cd turtlehead-tacos-demo-restaurant-site
npm run dev
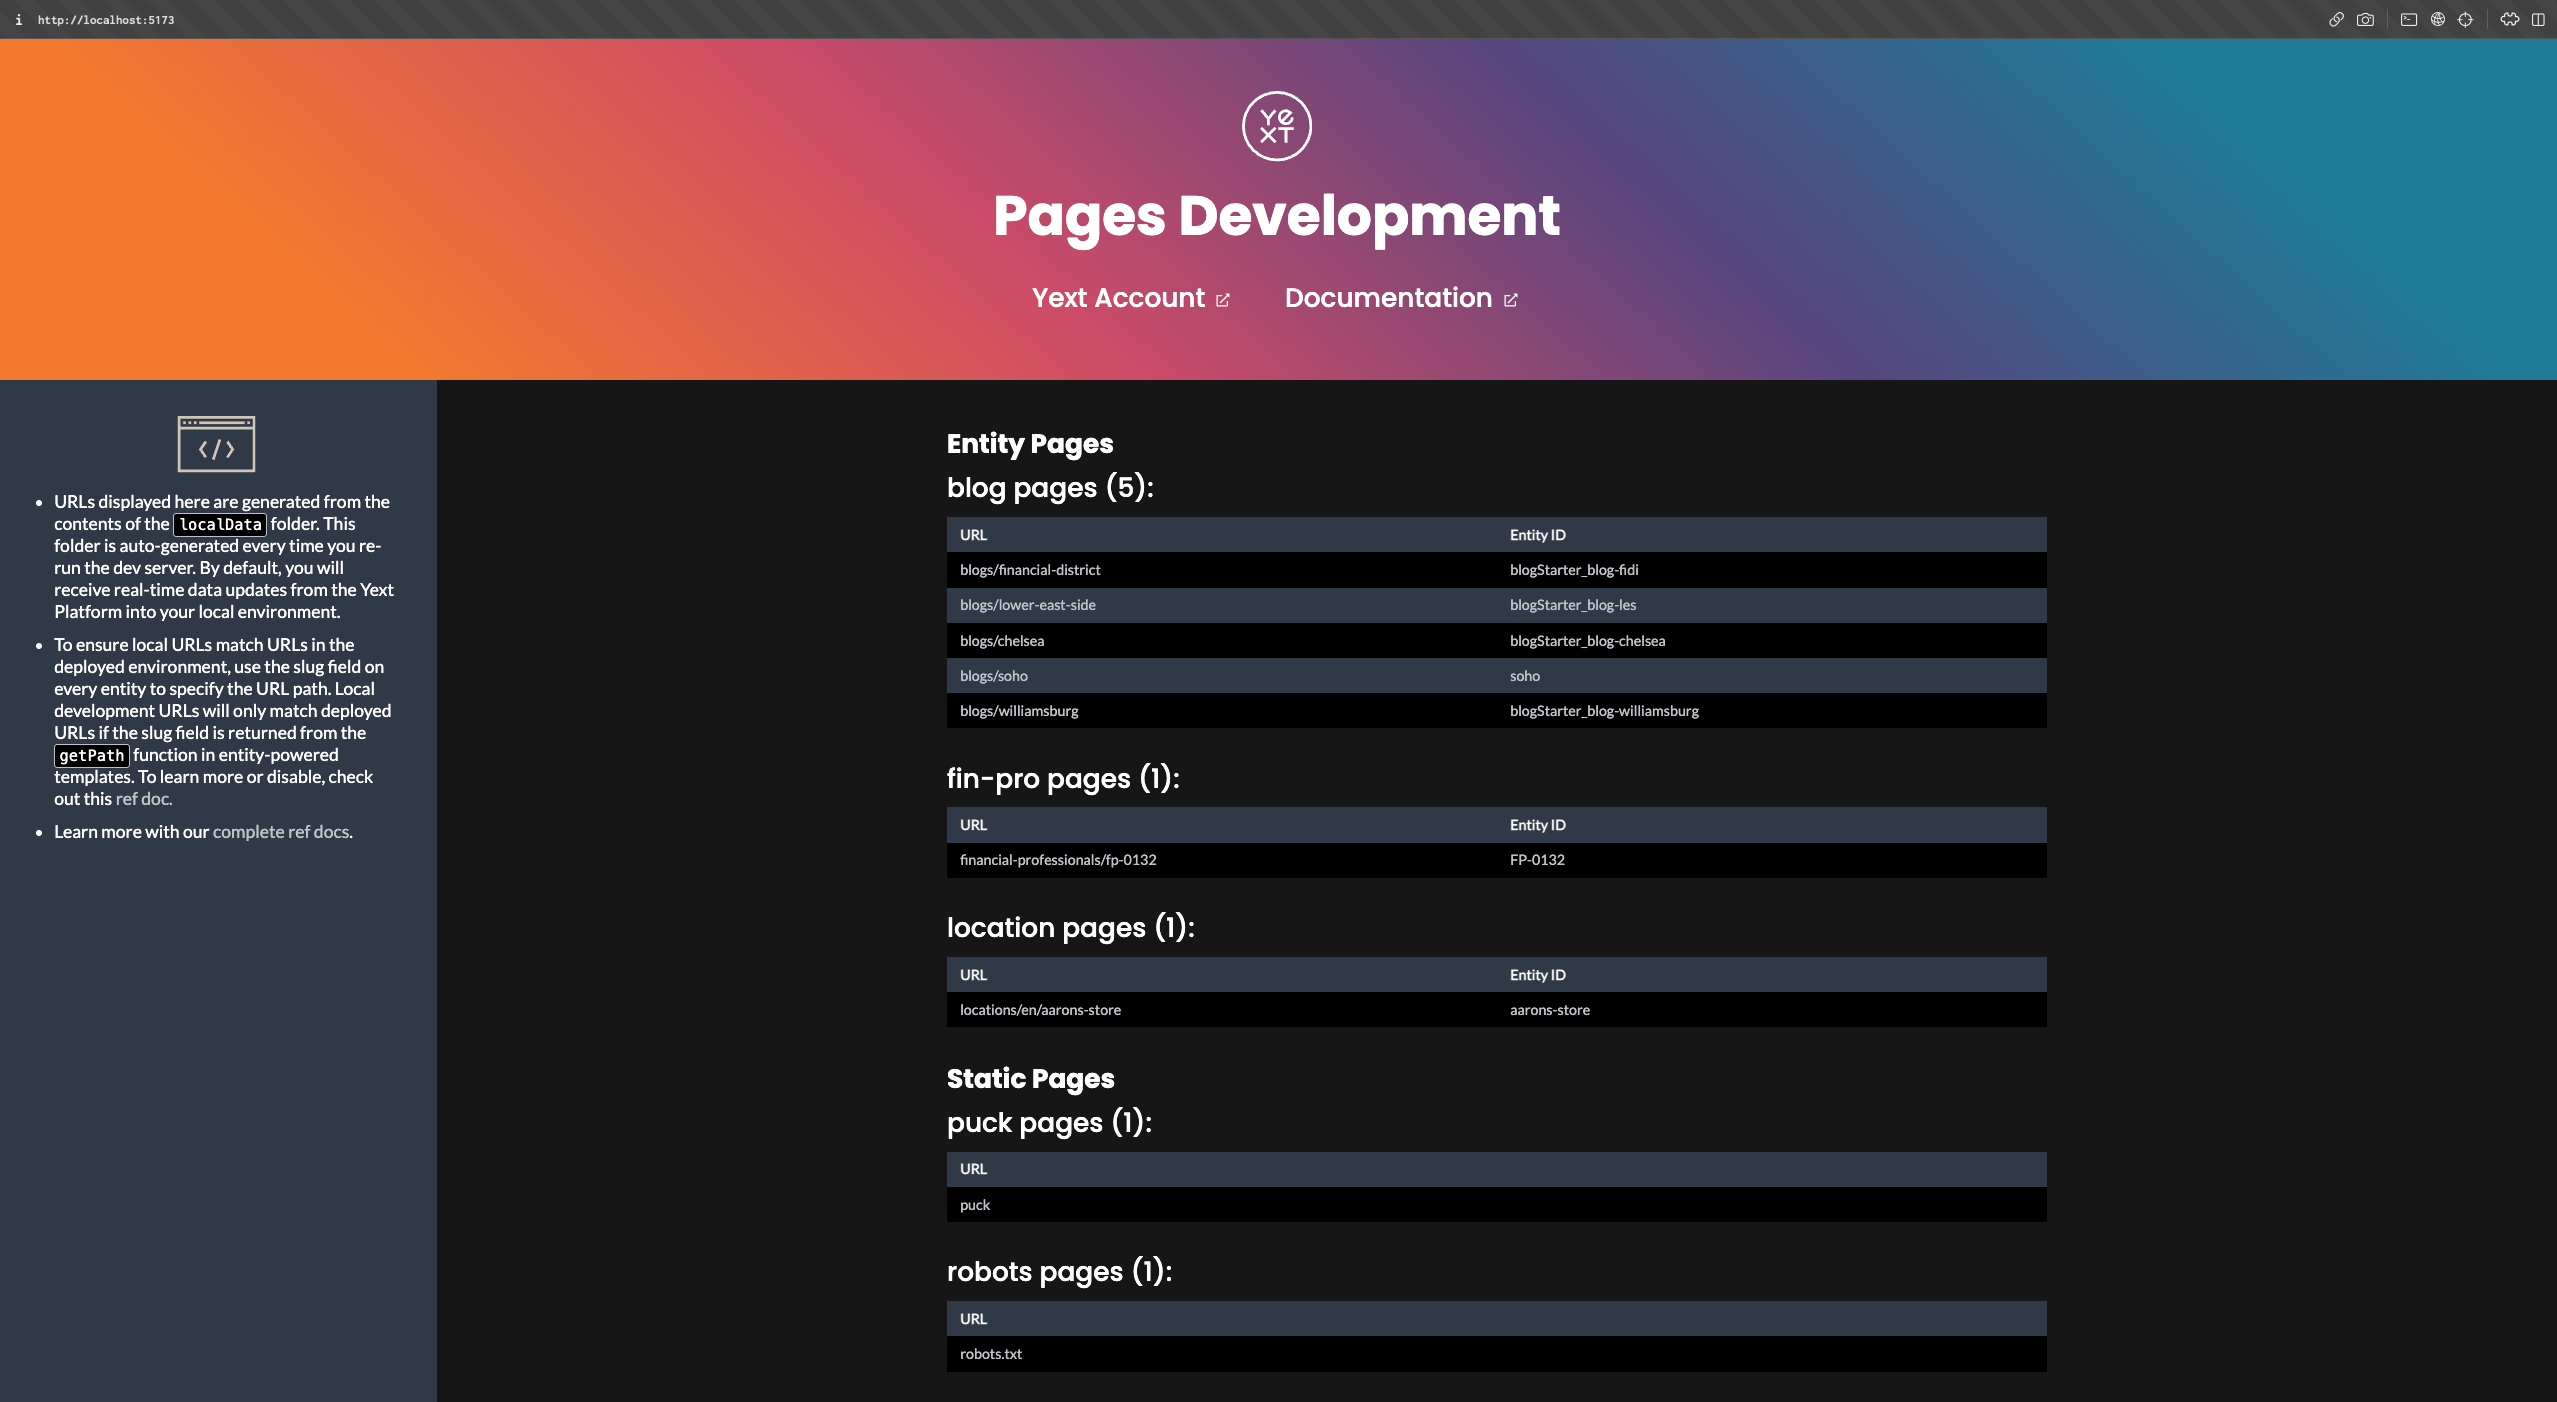
The npm run dev command sets up a connection with your Yext account's Knowledge Graph and spins up a dev server at localhost:5173. The dev server supports hot reloading, so any changes made to your code will be reflected right away.
This command runs in dynamic mode by default, meaning updates to your Knowledge Graph will also be reflected in your local build. Dynamic mode lets you preview how Knowledge Graph field changes appear in your Pages frontend.
If you wish to use only local data for development (without pulling from the Knowledge Graph in real time), use the --local flag:
npm run dev --local
Note: If you ever change your stream configuration, you must kill and restart the dev server so that any new fields can be pulled down from the Knowledge Graph.
Your site will be running locally at localhost:5173. You should see the Pages Development page:
npm run prod
Once you have finished local development and are ready to deploy, run:
npm run prod
This command makes a full production build of your site, mimicking the build environment used in the Yext deployment system, and serves your project at localhost:8000. Hot reloading is not supported in this mode.
While not strictly necessary before deploying, we recommend running npm run prod to confirm your project builds correctly and renders properly before pushing to staging or production.
Entity Pages vs. Static Pages
From the Pages Development screen, you can see there are two types of supported pages: static and entity pages.
Entity pages are powered by Streams, which is the Yext system responsible for delivering data from the Knowledge Graph to your frontend code. An entity template is used to create a page for each eligible entity delivered via stream. Each entity page has the same structure but different data.
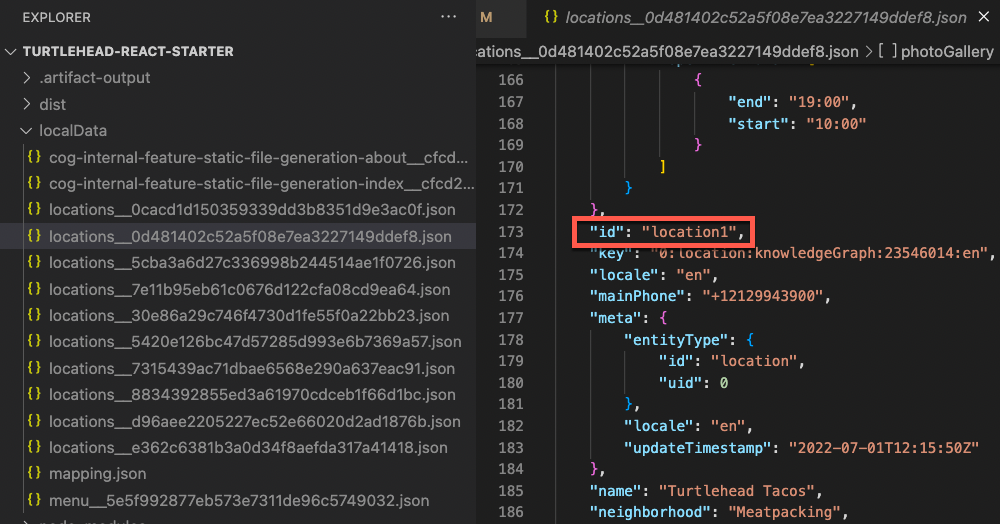
For example, localhost:5173/location1-meatpacking is generated from the entity with ID location1. The location-specific data displayed on the page comes directly from the location1 JSON document in your localData/ folder — a local JSON representation of the data in your Knowledge Graph. The slug field in this document defines the page path.
Static pages are individual, one-off pages (e.g., index, about, privacy policy) that are not powered directly by Streams. You can view and edit the static page at localhost:5173/index.html or at ./src/templates/static.tsx in your repo. Although static pages don't pull from Streams directly, they can still be updated through Global Data.
Deploy to Yext
Once your Pages code is in a GitHub repository, you can connect it to your Yext account and trigger your first deploy.
Prerequisite: You need a GitHub repository with your Pages code in order to deploy.
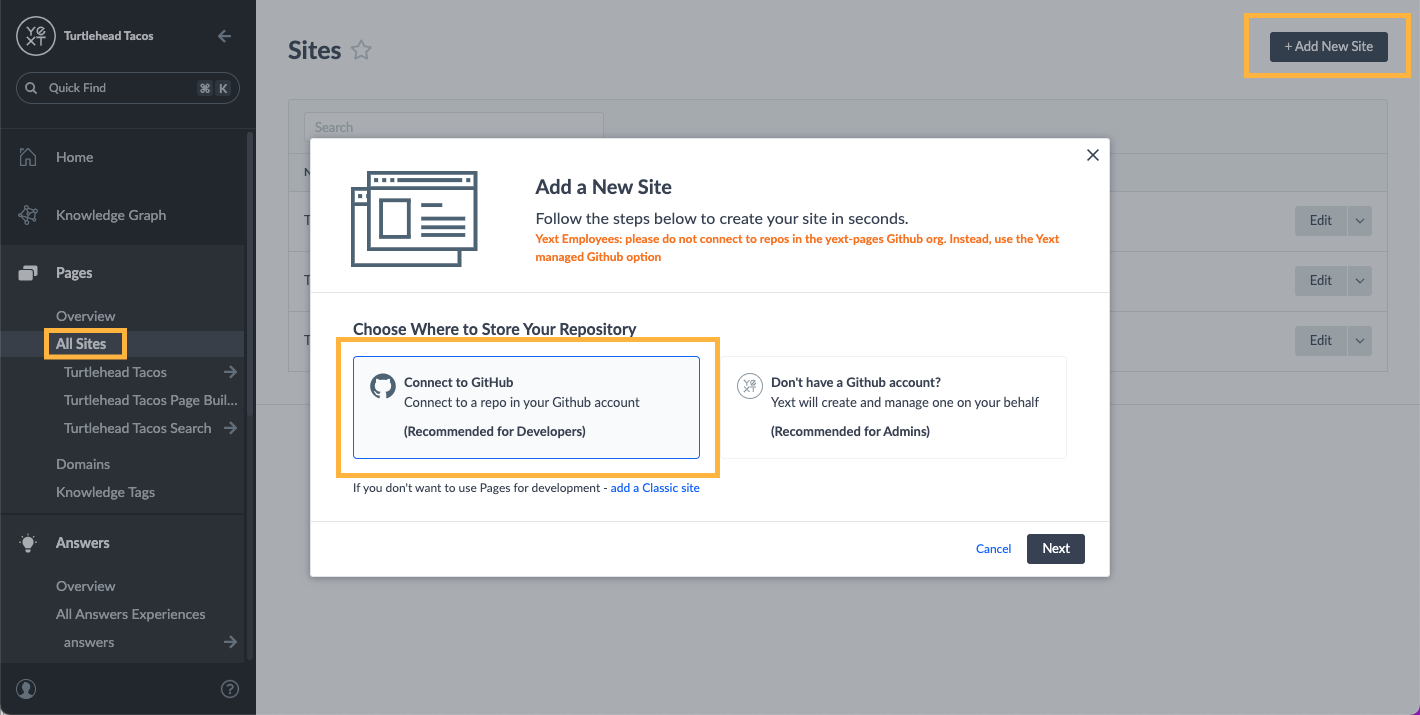
- In your Yext account, navigate to Pages > All Sites and click Add New Site.
-
Make sure the Connect to GitHub option is selected and click Next. Then complete the GitHub authorization flow.
-
After authorization, complete the following steps in the Add a New Site modal:
- Add Site Name — an internal name to identify your site in the Yext platform.
- Select the GitHub account to which you would like to connect.
- Select a repository — this should be the starter repo you created.
-
Select the production branch — this is typically the
mainormasterbranch.
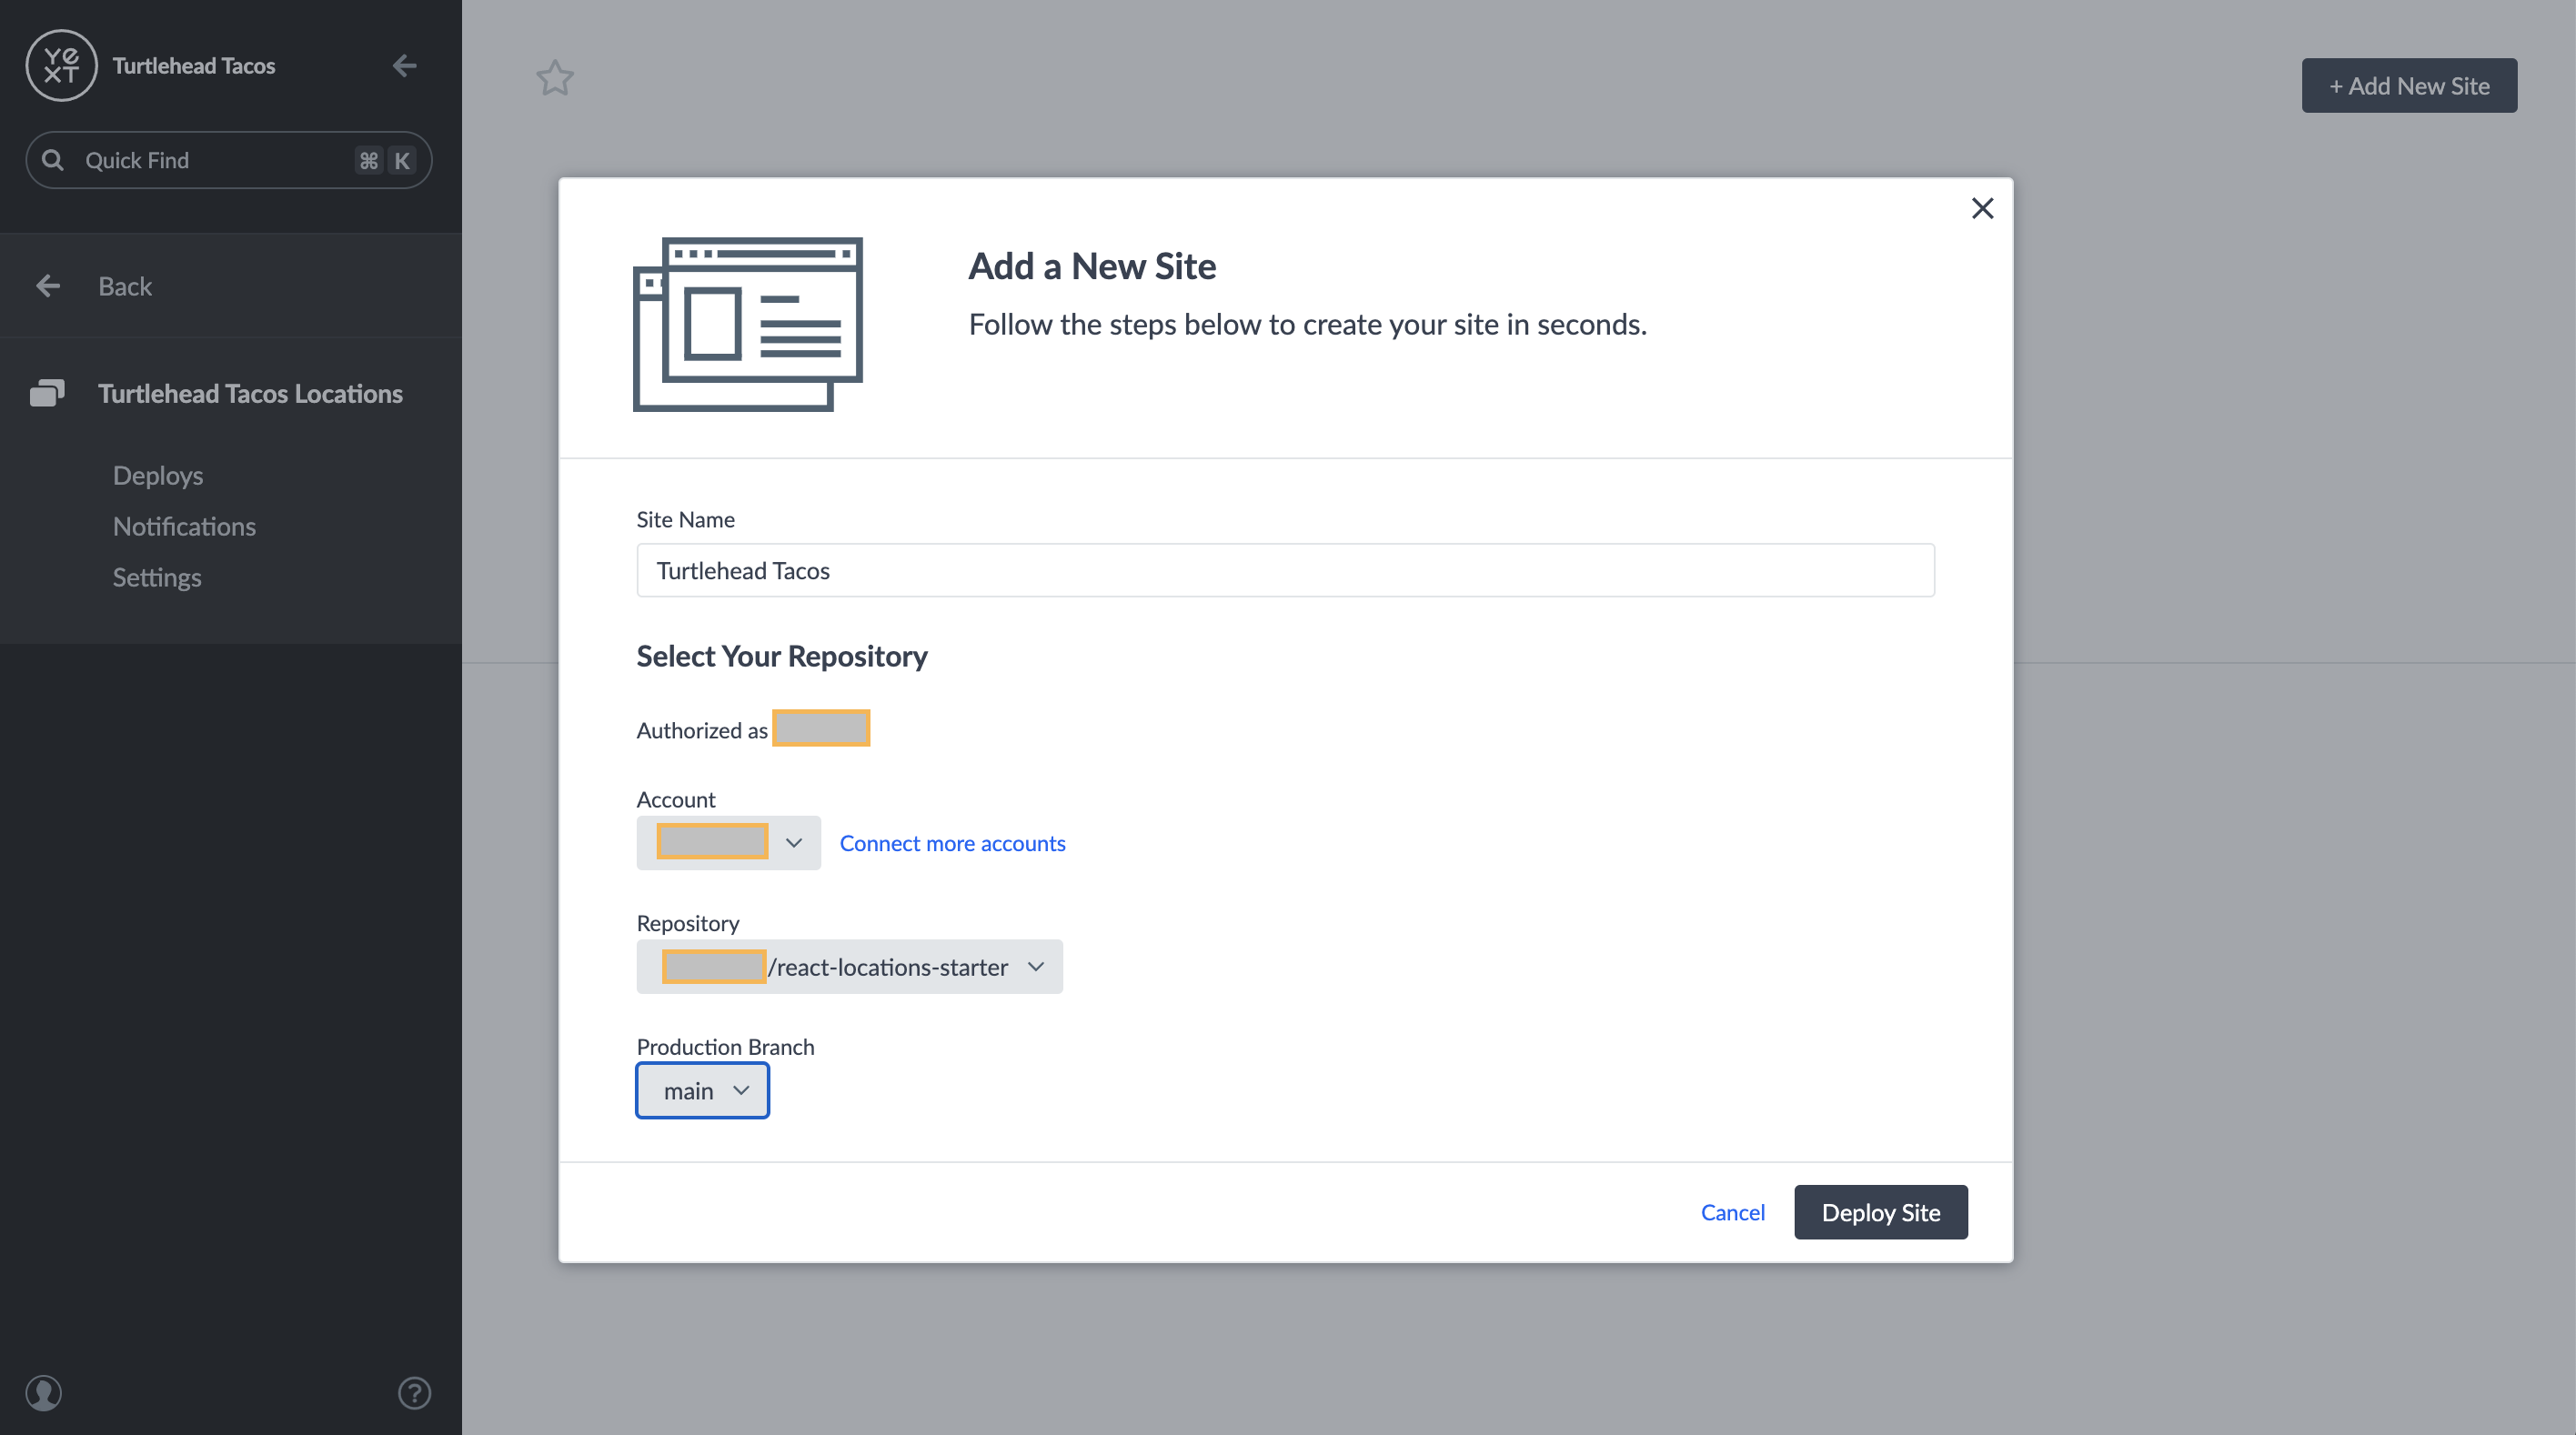
- Click Deploy Site. The Yext system will build and host your site based on the starter code in your GitHub repo and the entity data in the platform.
-
Once your deploy finishes, you'll have two ways to preview:
- Deploy Preview: Click Preview on the right of your deploy.
- Staging link: The most recent deploy is automatically staged. At the top of the screen, click the URL next to the orange "Staging" pill.
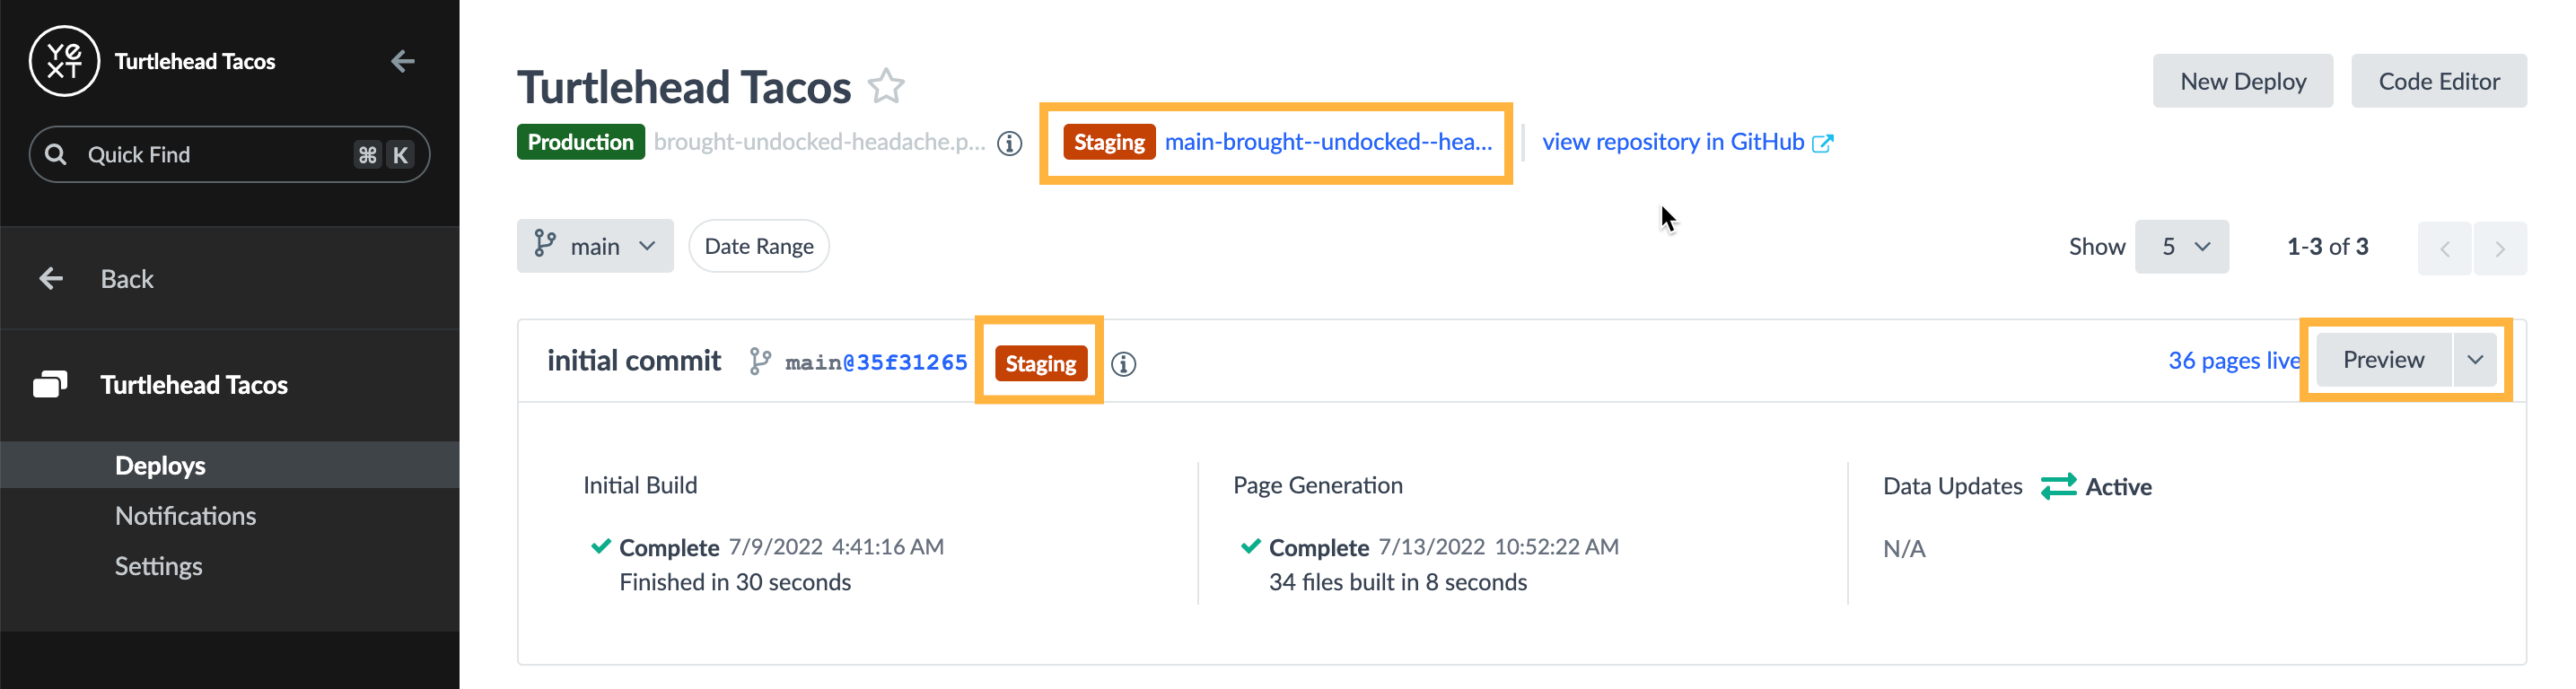
By default, any new push to your GitHub repo will trigger a re-deploy of your site.
Yext Pages CLI Reference
The Yext CLI includes a pages command group for managing a site locally. These commands simulate the build, generation, and serving process that Pages performs, and help pull data from your Knowledge Graph for local development.
yext pages new
Initiates an onboarding flow to set up a new Pages project. Walks through cloning starters, setting up remote GitHub repositories, and other required configuration steps.
This is the first command you should run when beginning a new project.
yext pages build
Triggers a local build by invoking vite build under the hood. PagesJS is powered by Vite, a modern and performant build tool.
This command generates a .artifacts-output and dist directory at the root of your project.
yext pages deploy [flags]
Creates deployments for the corresponding branch and commit specified.
| Flag | Description |
|---|---|
-b, --branch |
Git branch to create a deployment from |
-c, --commit |
Git commit SHA to create a deployment from |
-t, --tag |
Git tag to create a deployment from |
-r, --root |
Path to the repository root where git configuration lives |
-h, --help |
Help for deploy |
yext pages develop [flags]
Builds and serves the site based on the configuration of the specified hostname. Hostname can be omitted to use the repo's default configuration. The output directory will be created if it does not already exist.
| Flag | Description |
|---|---|
--hostname |
Hostname of site to develop |
-l, --localData |
Relative path to directory with data to generate pages for (default: localData) |
-o, --output |
Path to build output directory (default: sites-rendered-output) |
-p, --port |
Port to serve at (default: 8000) |
-r, --root |
Path to the repo root directory |
-h, --help |
Help for develop |
yext pages generate [flags]
Builds and generates the site based on the configuration of the specified hostname. Hostname can be omitted to use the repo's default configuration. The output directory will be created if it does not already exist.
| Flag | Description |
|---|---|
--hostname |
Hostname of site to build |
-l, --localData |
Relative path to directory with data to generate pages for (default: localData) |
-o, --output |
Path to build output directory (default: sites-rendered-output) |
-r, --root |
Path to the repo root directory |
-h, --help |
Help for generate |
yext pages generate-test-data [flags]
Generates test data for local development.
If a streamName is provided, the command generates local data files using actual content from that stream. Otherwise, dummy data is used based on the stream names in the provided config file. The local data directory will be created if it does not already exist.
If featuresConfig or siteStreamConfig is provided, the command uses that content in place of features.json or site-stream.json, respectively.
| Flag | Description |
|---|---|
-a, --allFields |
When true, all Knowledge Graph fields are included in test data instead of being filtered to stream fields |
--entityIds |
Entities to generate test data for |
--featureName |
Feature name to generate test data for |
--featuresConfig |
JSON string to use as the features.json file |
--streamName |
Stream name to fetch data from |
--siteStreamConfig |
JSON string to use as the site-stream.json file |
--hostname |
Hostname of site to generate test data for |
--localData |
Relative path to directory to write generated data to (default: localData) |
--locale |
Locale to generate test data for |
-p, --printDocuments |
When true, generated test data is printed to the console instead of written to the localData directory |
-r, --root |
Path to the repo root directory |
-h, --help |
Help for generate-test-data |
yext pages serve [flags]
Serves the production build of your site. Note: this command will not work if you have not yet built your site locally. Run build, generate-test-data, and generate before running serve.
| Flag | Description |
|---|---|
-f, --files |
Directory of files to serve (default: sites-rendered-output) |
-p, --port |
Port to serve at (default: 8000) |
-r, --root |
Path to the repo root directory |
-h, --help |
Help for serve |
Legacy: Projects Using PagesJS < 1.0.0
If your project uses a PagesJS version less than v1.0.0, it was likely configured using legacy package.json commands. The old dev commands will likely be:
yext pages newnpm run devnpm run build:serve
See Upgrading to PagesJS 1.0.0 for upgrade instructions.