Use the Domains API to manage the relationship between your domains and Pages sites programmatically. The API supports creating, listing, and getting details for domains and domain associations.
Glossary
This glossary of terms can be applied to domains across your account, no matter what product you're using them with and whether you manage domains in the UI or API.
| Term | Description |
|---|---|
| Site | The website built on Yext's Pages product. |
| Domain | A unique name that identifies an address for a resource on the internet. For Pages, this name is what your users will enter to access the contents of your website hosted by Yext. |
| Domain Association | A relationship between a domain and a Yext product, for example Pages. For your Pages site, an association is what glues together the domain and your website. Typically, a domain can only have one domain association relationship, however, a domain set up as a wildcard can have multiple domain associations for different sites. |
| CNAME Record | Also known as a Canonical Name record, this is a record added to your Domain Name System (DNS) registrar that maps an alias to a canonical domain name. For the Yext Domain system, this is the record that will need to be added for the Bridge Domain. |
| TXT Record | A record added to your Domain Name System (DNS) registrar to store text information associated with a domain. For the Yext Domain system, this record is used to verify ownership. |
| A Record | Also known as an Address Record, this is a record in your Domain Name System (DNS) registrar that indicates what internet address (IP address) the domain name should route to. |
| Apex Domain | A domain name that is at the top of the domain name zone and does not have a subdomain. For example, yext.com is an Apex domain, but help.yext.com is not. |
| Wildcard Domain | A domain name that contains an asterisk at its first label and therefore matches any non-existent subdomain. For example, *.yext.com would match help.yext.com, hitchhikers.yext.com, etc. |
| Bridge Domain | A domain provided by Yext, generated uniquely on a per account basis, which is an alias for the domains used to serve the content associated with your domains. To use this, you must CNAME to this domain. |
| Integration Type | The method with which you intend to manage your domain within the Yext system. |
| Certificate Authority | A trusted entity that verifies the identity and authenticity of your website and issues the certificate to permit HTTPS connections. We provide access to two, Let's Encrypt and Google Trust Services, out of the box. |
| Delegated DCV | Also known as delegated domain control validation, if you are using TXT validation, this feature allows you to install a one-time CNAME record for your domain, which allows Yext to handle all future certificate renewals automatically. |
| Destination | This tells the domain system where to find the content to present when a user requests a domain. For example, using Pages as a destination will ensure that a domain always serves associated Pages content. |
| View Mode | A parameter provided to the GET and LIST endpoints for Domains and Domain Associations. This parameter has two options: "full" and "basic". Full will return information about the certificate status and any asynchronous errors with setup. Basic will only return a subset of that information. |
Integrating Domains with Pages
This section walks through connecting domains to your Pages sites and other additional domain settings.
Prior to deployment, your domain must be configured for use.
Each domain you have configured in your account will be visible in the domains table.
Domain Assignment
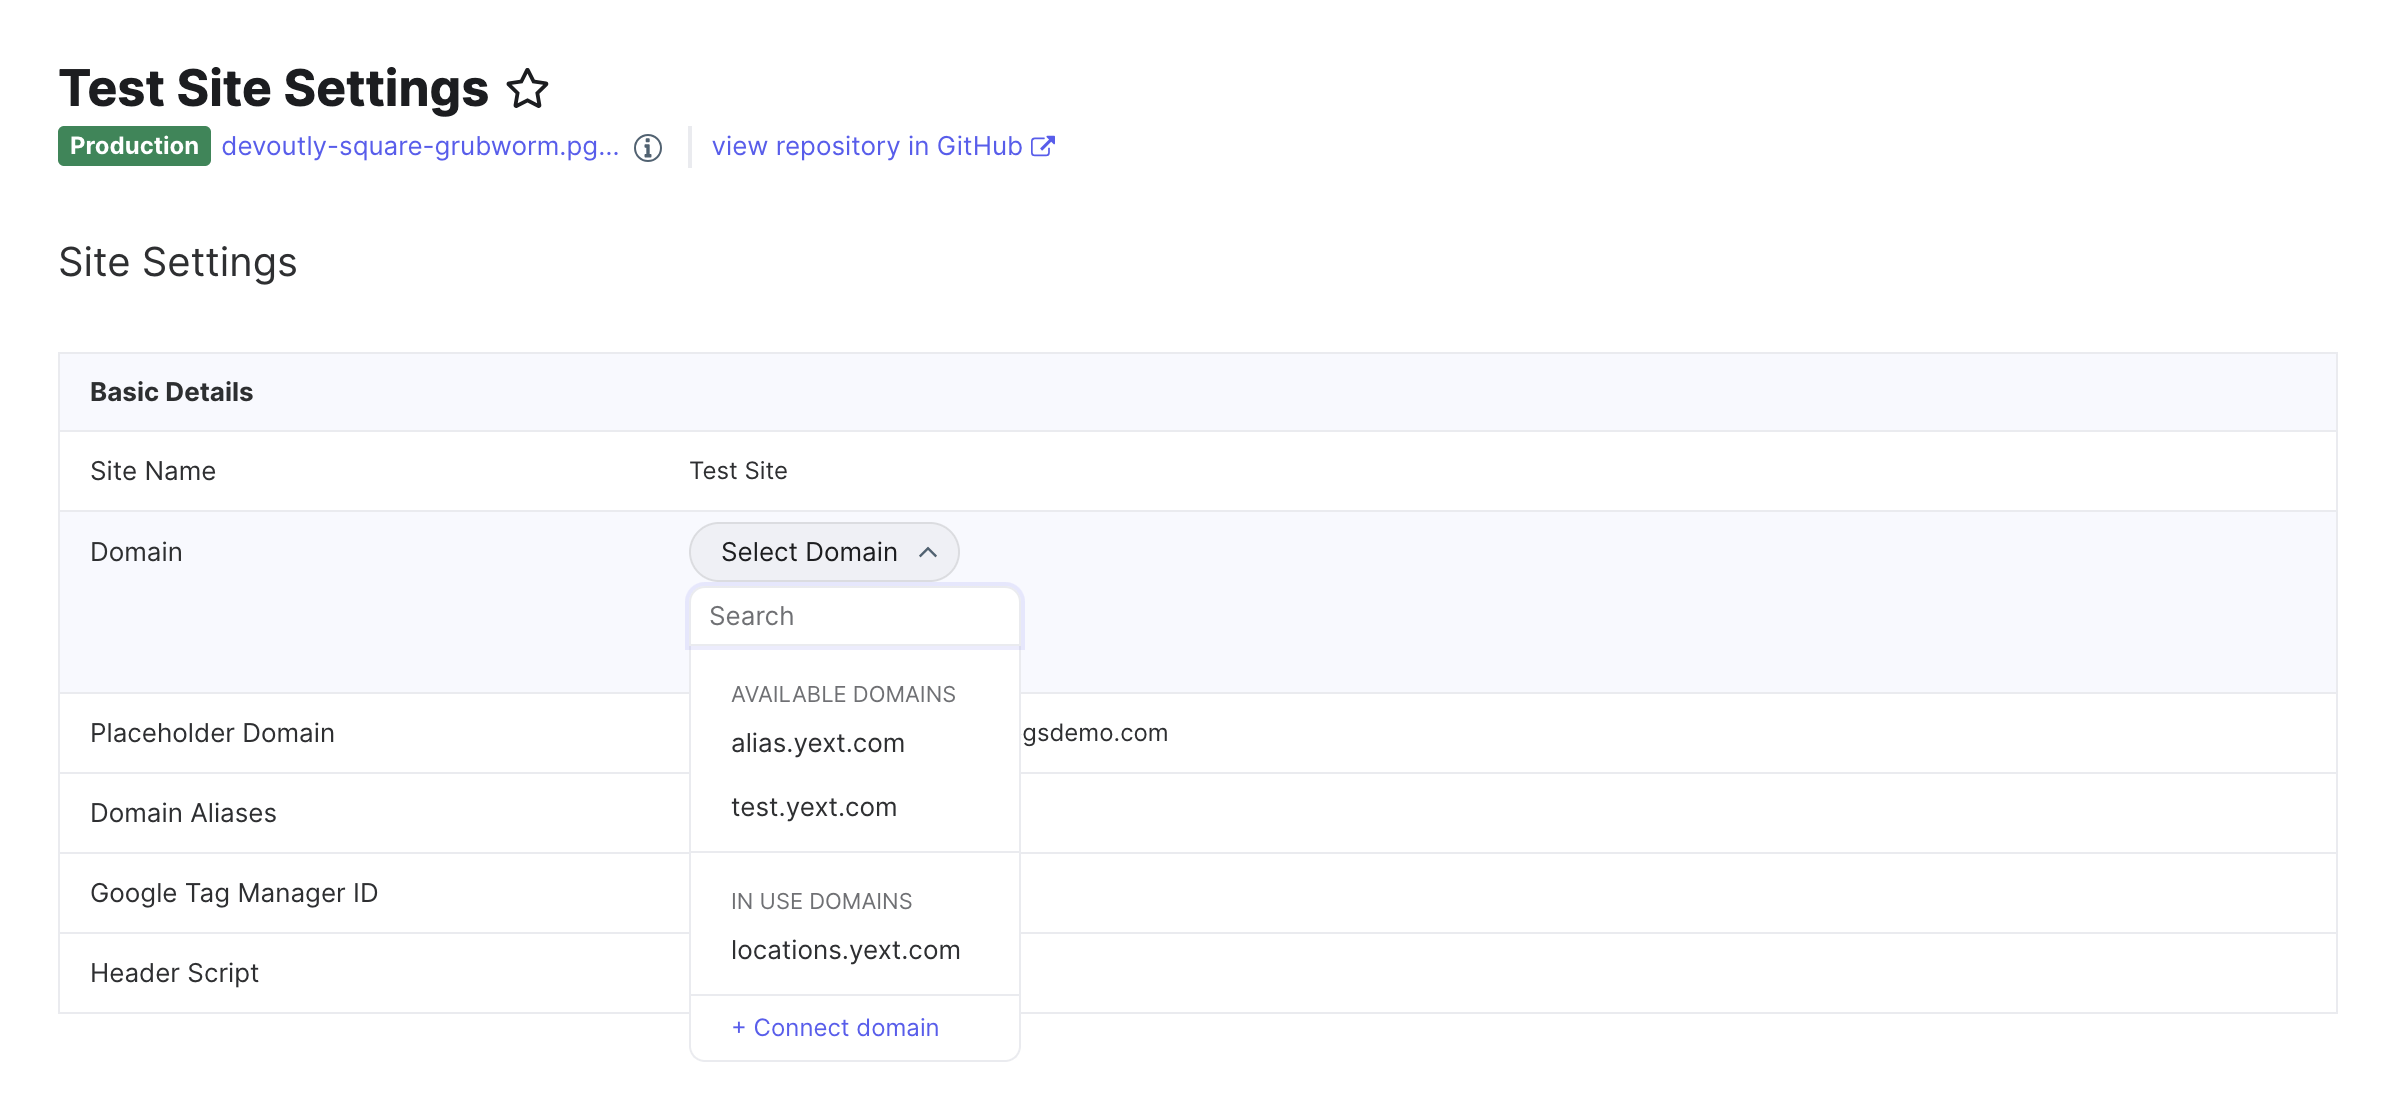
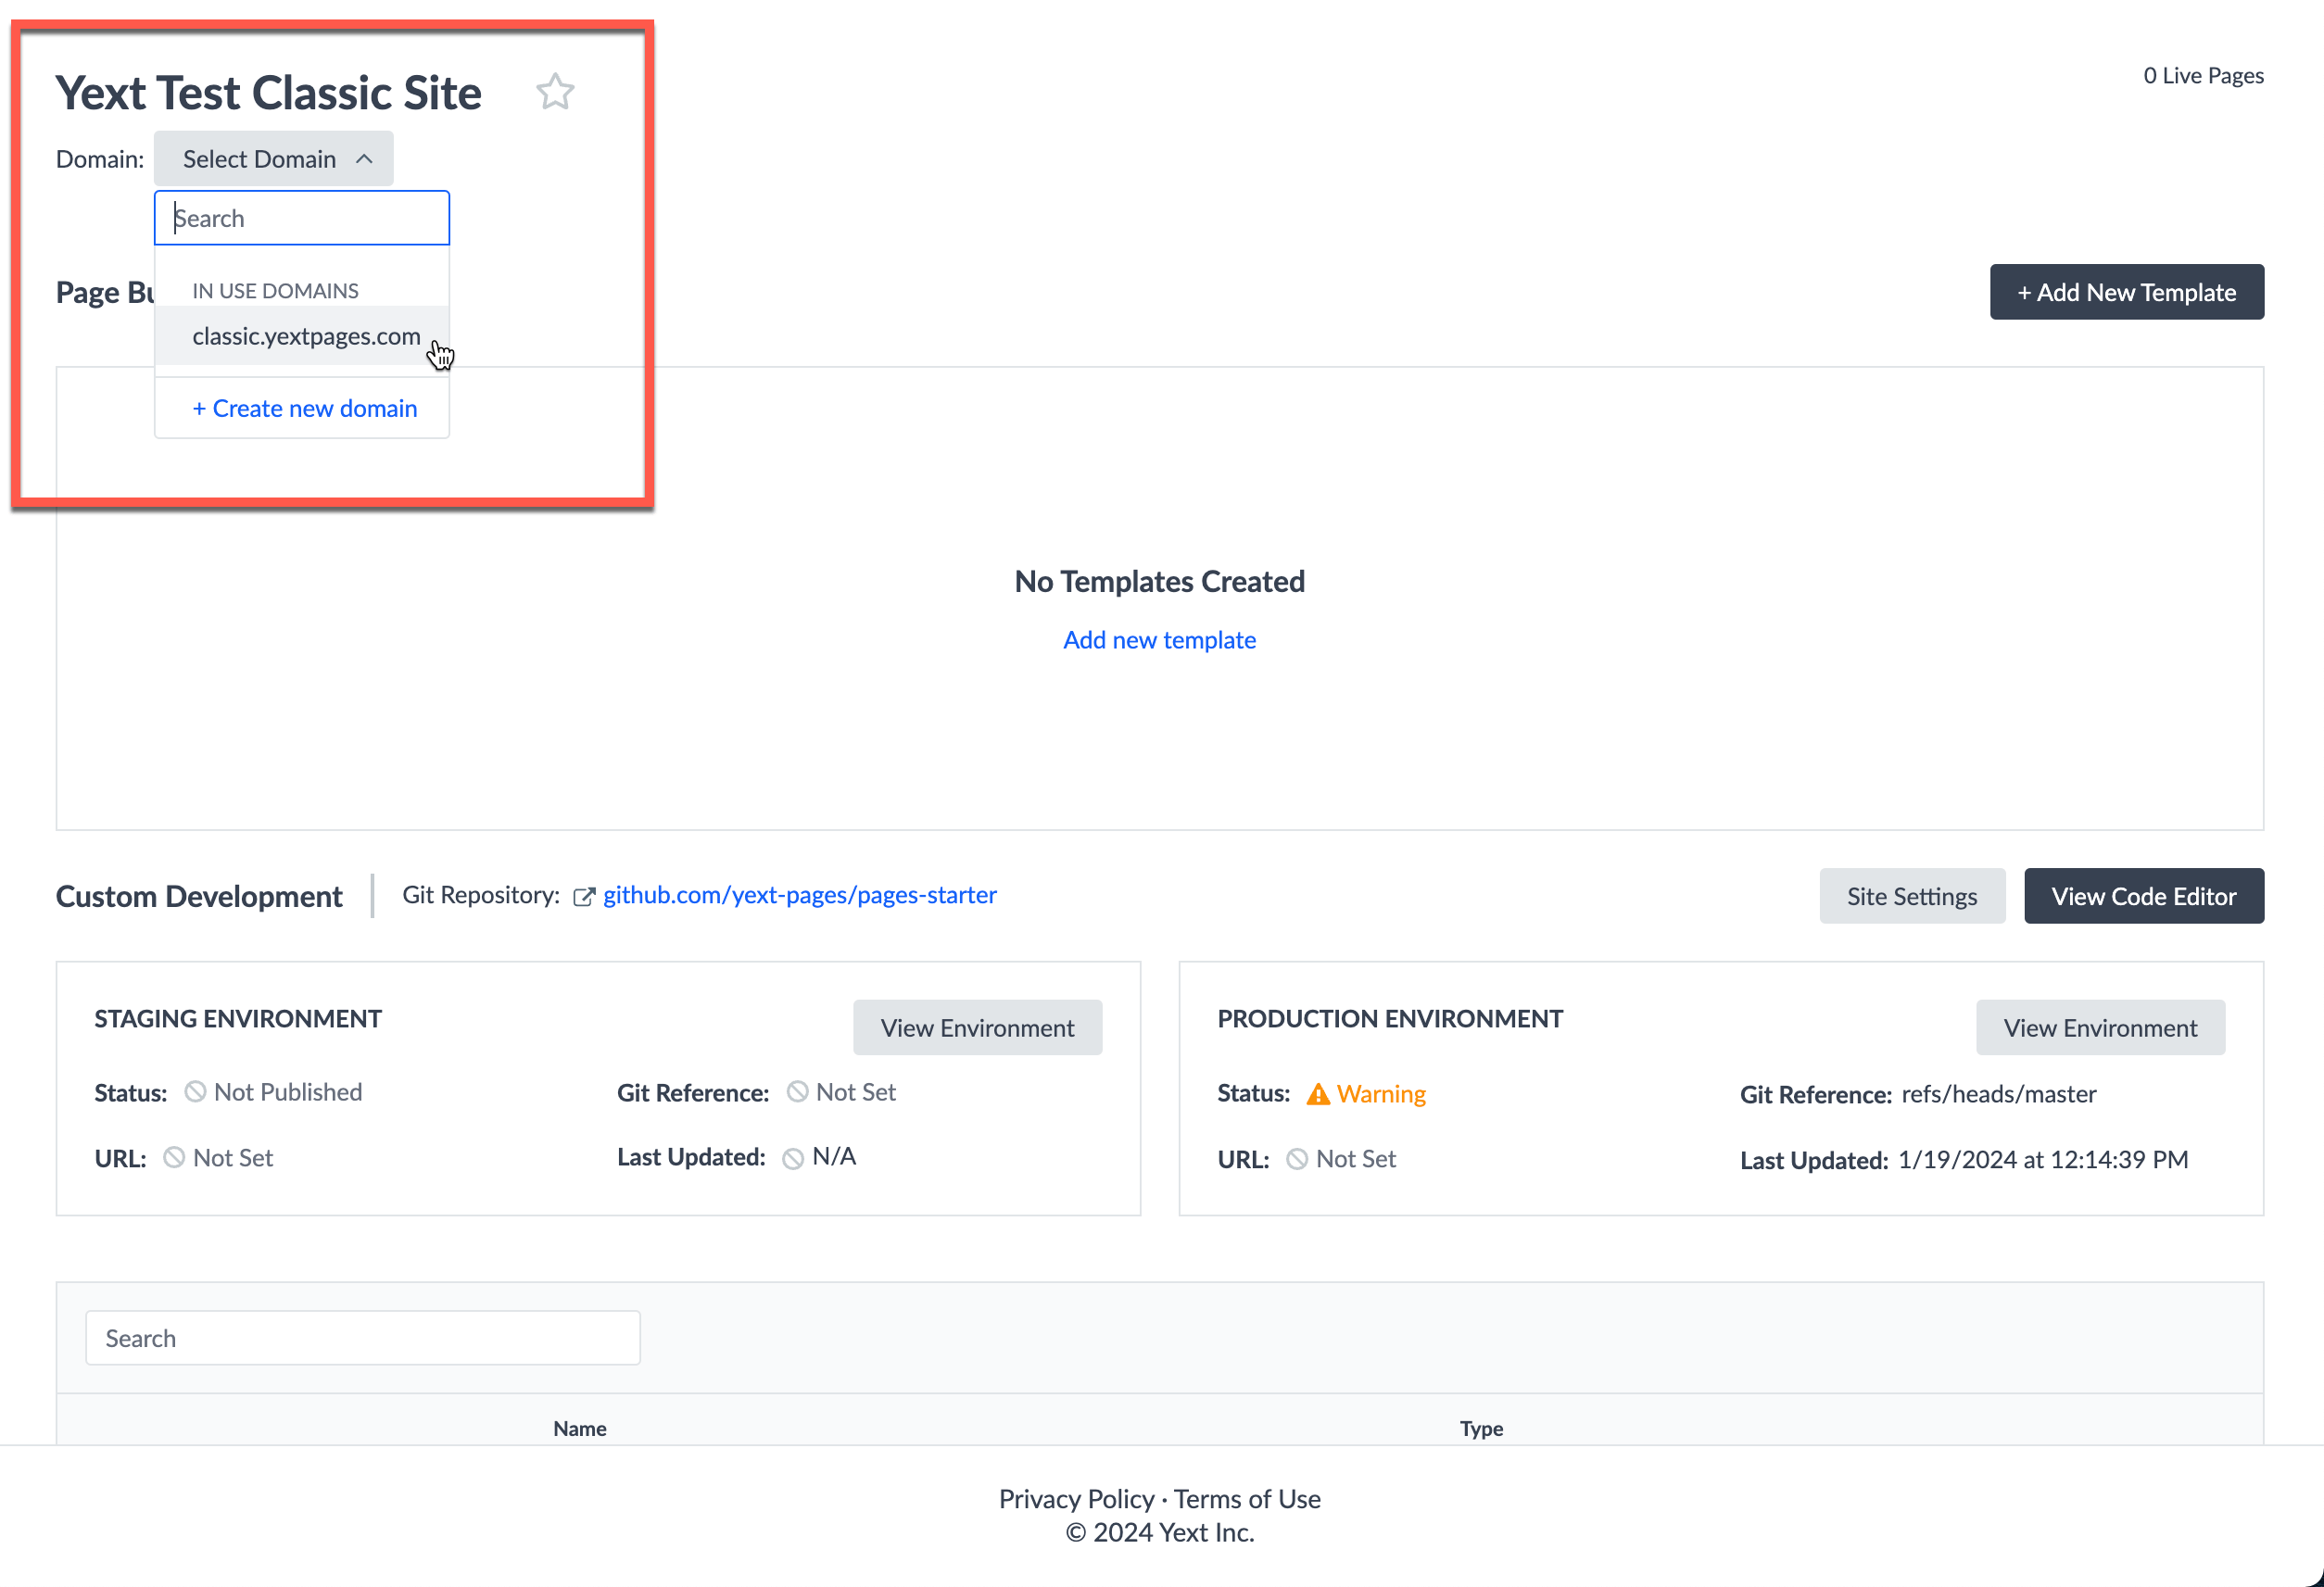
Once you have added a domain to Yext, you can "assign" it to your desired site via Site Configuration. Each domain configured in your account will be available in the Domain dropdown.
To select a domain, simply click on one of the options. This step is necessary before updating your DNS configuration. A successful deployment must be published to production in order to assign a domain.
Placeholder Domain Configuration
When you deploy a website using Yext, by default, we provision you with a "placeholder" production domain. This is a Yext-provisioned URL at [example].pgsdemo.com. This convenience allows you to immediately view your deployed content and share it with your team and stakeholders.
You can customize your placeholder domain at any time directly in the Site Configuration screen of your site as necessary to tailor it to your organization's requirements. This customization is particularly useful for denoting if a website is purely for QA or testing purposes.
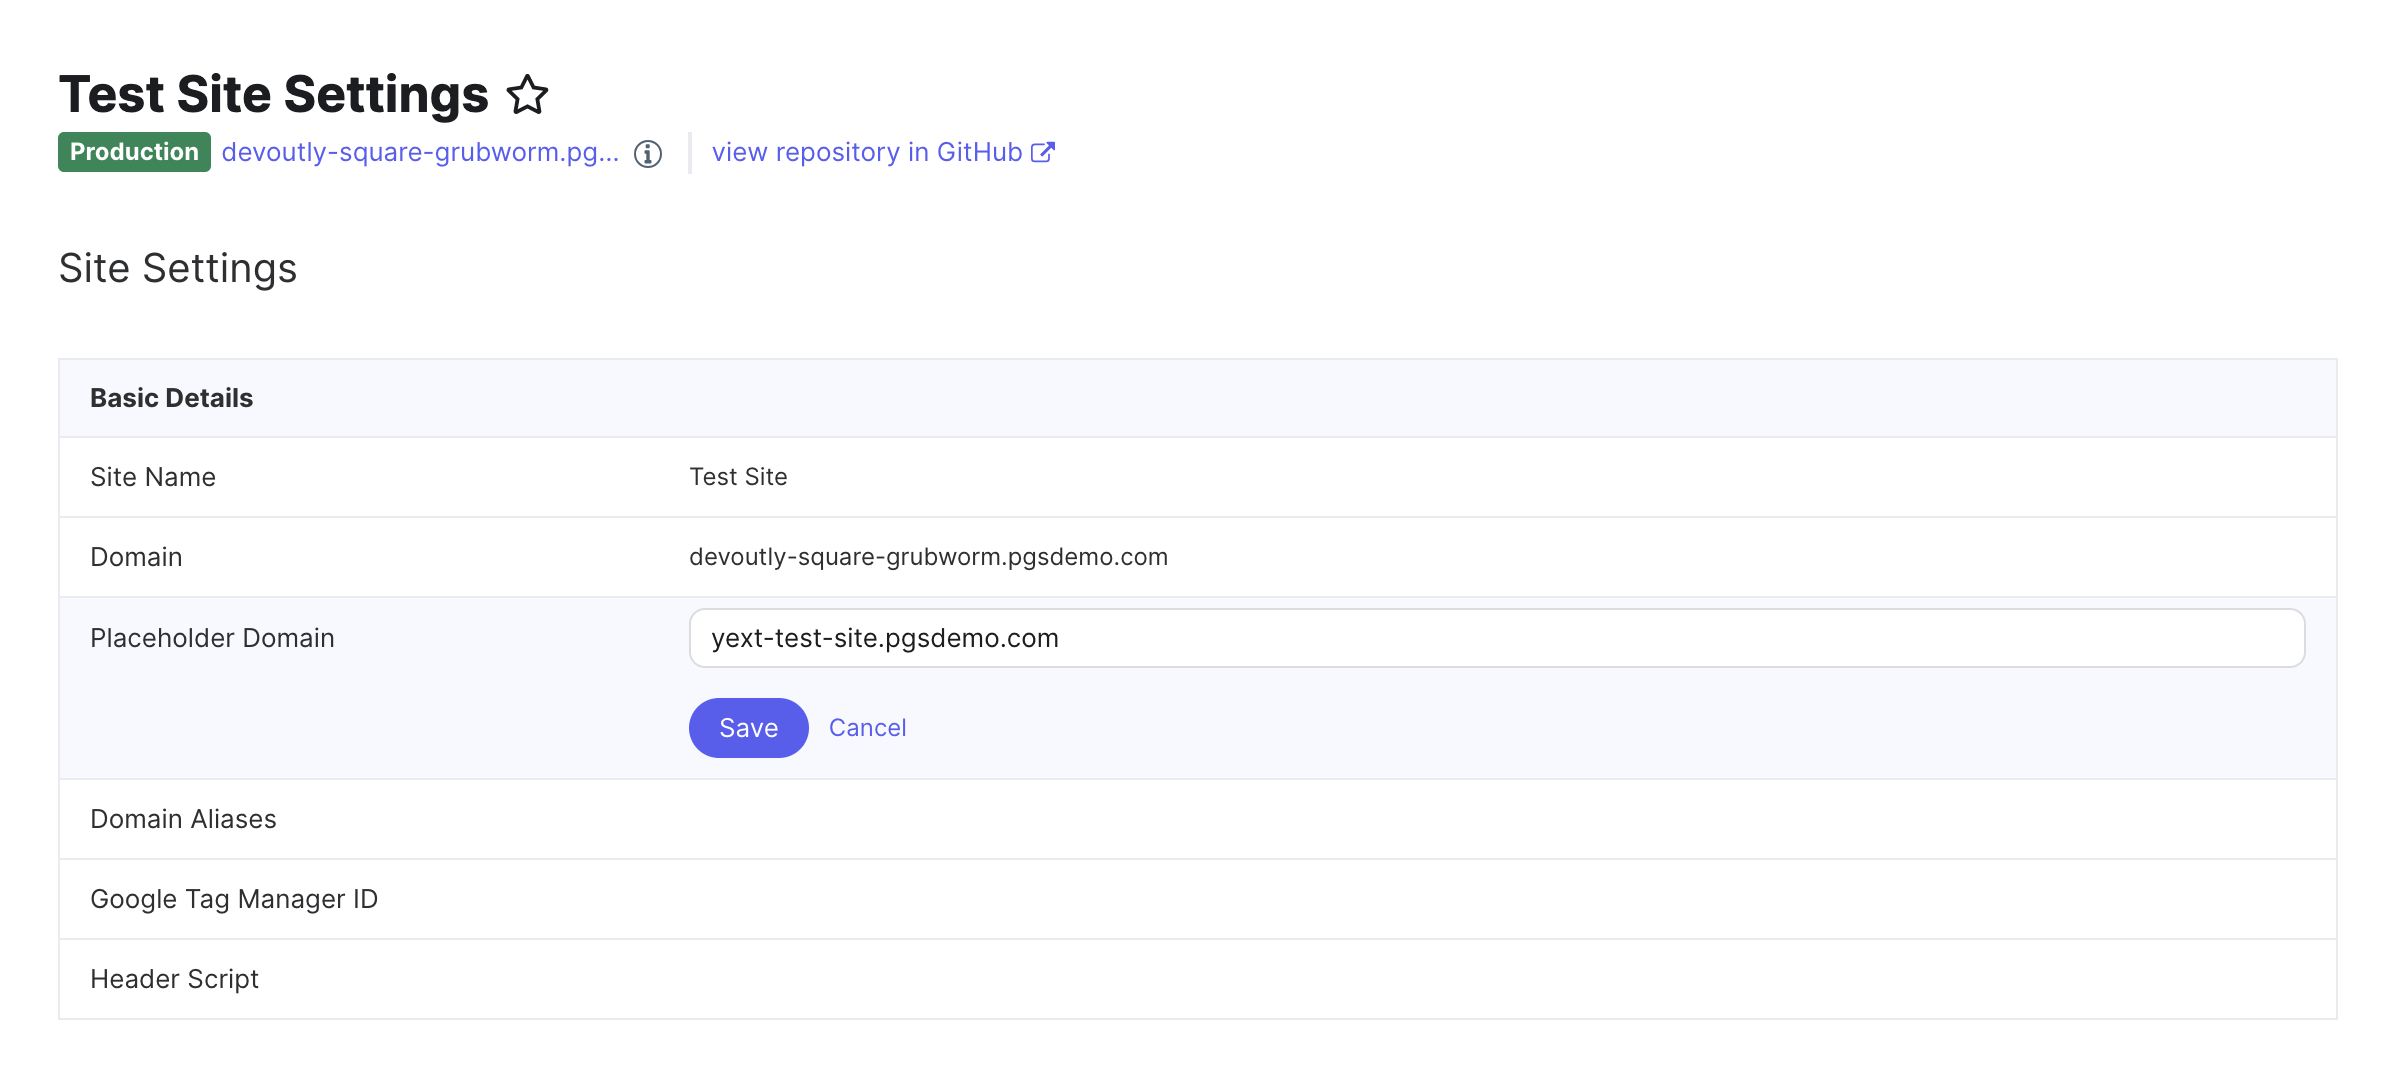
Requirements for the placeholder domain configuration:
- The maximum character length limit is 62 characters.
- It needs to live off of the
.pgsdemo.comwildcard.
Additionally, each branch staging URL is derived from a combination of the production placeholder URL and the name of the branch itself. Due to this combination, it's possible to encounter a staging URL that exceeds the allowed length, resulting in a "This site can't be reached" error. If you encounter this issue, try shortening the length of your placeholder domain.
Domain Aliases
If you want your website to be served at multiple domains, you can configure domain aliases directly within Site Configuration as well. To alias your content, add each alias through the same domain setup options as your primary domain, whether via the UI or API.
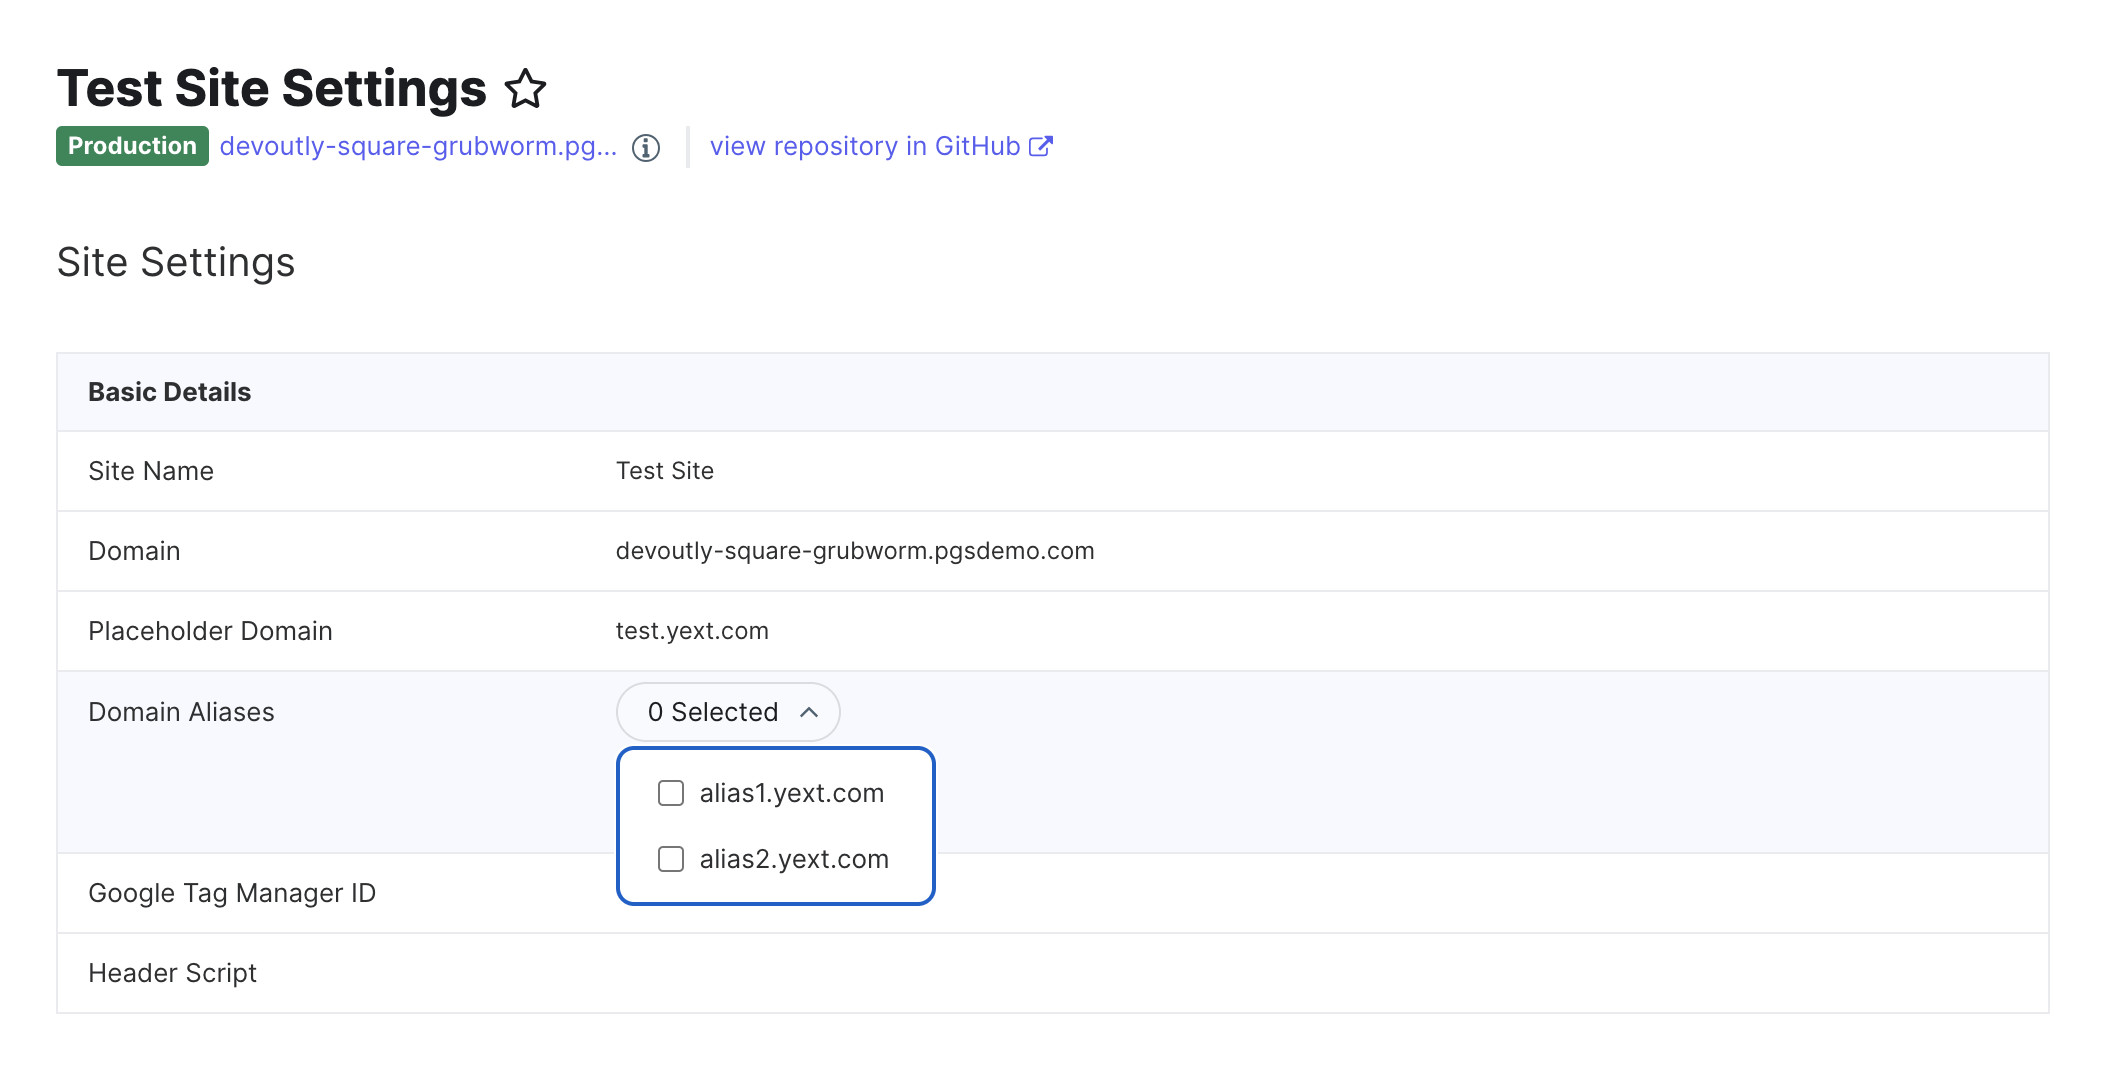
As needed on the frontend, you can programmatically determine whether you are being served content at a primary vs. alias domain by accessing the PRODUCTION_DOMAINS window object.
console.log(window.PRODUCTION_DOMAINS)

// result
{
  "primary": "test.yext.com",
  "aliases": [
    "alias1.yext.com",
    "alias2.yext.com"
  ]
}
Domain Reassignment
If necessary, you can also update your site to deploy your content to a different domain at any time. This is useful in two scenarios:
-
Domain Changes — If you need to update the domain at which your content is served, you can simply assign a different domain to your site. For example, a domain rebrand (
brand.com→rebrand.com) or domain extension update (brand.com→brand.co.uk). - Domain Migrations — Domains that are already in use by another site can be "migrated" to your current site. This is particularly useful if you are rebuilding a Classic Pages site on the new Pages architecture (see the Types of Pages reference document), and need to point the domain to your new site.
To reassign the domain from a Classic Site:
- First ensure that your desired deployment is already published to production!
-
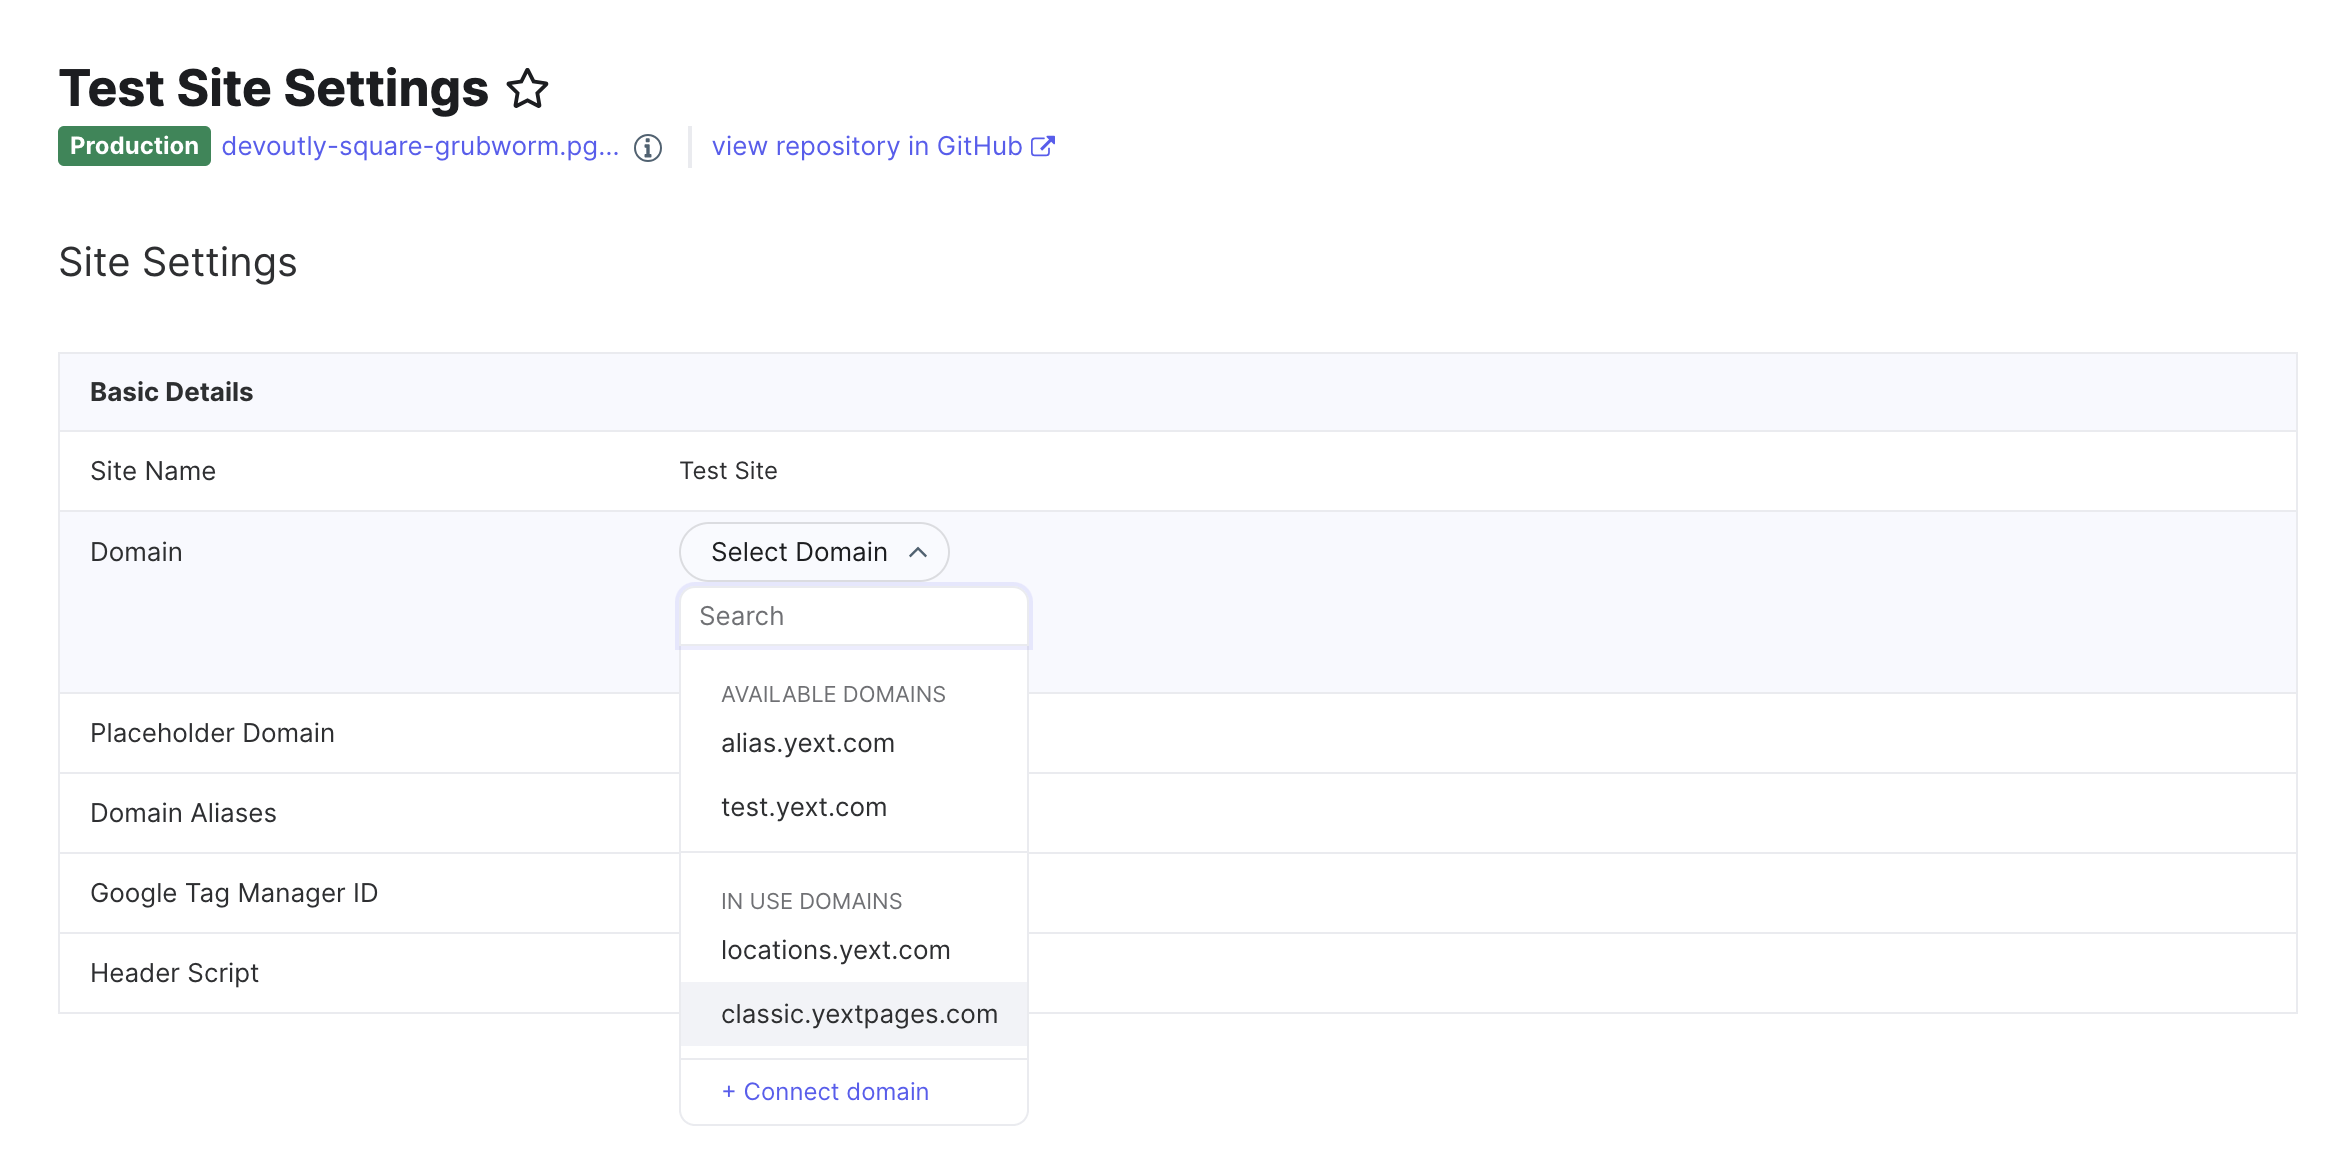
Navigate to the Site Configuration page for your site. Select the desired domain from the domains dropdown; it should be visible under the "In Use Domains" section. Then click "Save".
- You will be prompted to confirm you wish to reassign this domain to your site. Confirm by entering the name of the domain into the text input field, and click "Continue".
- Once you initiate the cutover, Yext will initiate the domain reassignment process on the backend. It may take up to a few minutes before you see content from the new site serving at the domain. While the reassignment is taking place, the content from the Classic site will continue to be served (guaranteeing zero downtime).
-
Once the cutover is complete, the Classic site will no longer be connected to the domain. If you need to revert this operation, you have the ability to select the same domain from the Classic site. Simply select the in-use domain to reassign the domain back to the Classic site. Similar to before, the reassignment process can take up to a few minutes before the Classic content is serving again.
API Example Usage
I have a single domain I want to attach to the site I've built
- Find the site to which you wish to attach the domain and derive the resource identifier. It will be of the format
accounts/<business-id>/sites/<site-id>, where both the business ID and the site ID can be found in the URL for the page:https://www.yext.com/s/<business-id>/yextsites/<site-id>/overview - Send a POST API call to
https://api.yextapis.com/v2/accounts/<business-id>/domainswith the domain setup. For reference, see the expected request information in the Domain: Create endpoint. For simplicity, use the HTTP validation type with managed SSL. - Use the GET API calls to
https://api.yextapis.com/v2/accounts/<business-id>/domains/<domain-id>to get the status of the domain and the ownership verification steps. You can proceed to the next step when the domain is in an ACTIVE state.- During the
PENDING_VERIFICATIONstate, you will need to verify the ownership of the domain through a CNAME record, TXT record, or HTTP validation. - During the
PENDING_CREATIONstate orCREATIONstate, you will need to verify the ownership of the domain to the certificate authority. If the CNAME record was used for ownership verification, no additional steps are needed; you'll just need to wait for verification.
- During the
- Send a POST API call to
https://api.yextapis.com/v2/accounts/<business-id>/domains/<domain-id>/associationsusing the site identifier from step 1. This domain must be set as primary withprimary: truein the request. For more information on making the request, see the Domain Association: Create endpoint. - Now the domain will be serving the content at the site!
I currently have my domain attached to another vendor, but am building a site on Yext. How do I ensure I have a zero-downtime cutover?
- Send a POST API call to
https://api.yextapis.com/v2/accounts/<business-id>/domainswith the domain setup. For reference, see the expected request information in the Domain: Create endpoint. To ensure no downtime, use TXT for the validation method and managed SSL. - Use the GET API calls to
https://api.yextapis.com/v2/accounts/<business-id>/domains/<domain-id>to get the status of the domain and the ownership verification steps. You can proceed to the next step when the domain is in an ACTIVE state and ready to cutover.- During the
PENDING_VERIFICATIONstate, you will need to verify the ownership of the domain through a TXT record or HTTP validation. - During the
PENDING_CREATIONstate orCREATIONstate, you will need to verify the ownership of the domain with the certificate authority. This will include adding the TXT records presented in the hostname validation in the response to the GET requests.
- During the
- Find the site to which you wish to attach the domain and derive the resource identifier. It will be of the format
accounts/<business-id>/sites/<site-id>, where both the business ID and the site ID can be found in the URL for the page:https://www.yext.com/s/<business-id>/yextsites/<site-id>/overview. - Send a POST API call to
https://api.yextapis.com/v2/accounts/<business-id>/domains/<domain-id>/associationsusing the site identifier from step 1. This domain will need to be set as primary withprimary: truein the request. For more information on making the request, see the Domain Association: Create endpoint. - Add the CNAME record from the GET API calls when ready to cutover. There should be zero downtime.
- Now the domain will be serving the content at the site!
I am a reseller and I want to host the sites I have built on a wildcard domain
- Send a POST API call to
https://api.yextapis.com/v2/accounts/<business-id>/domainswith the domain setup. For reference, see the expected request information in the Domain: Create endpoint. As part of this request, the wildcard flag must be set to true and TXT validation is required. For serving the content, you will still need to set up the CNAME from the wildcard. For example, if the hostname isexample.com, the CNAME must be set on the*.example.comrecord. - Use the GET API calls to
https://api.yextapis.com/v2/accounts/<business-id>/domains/<domain-id>to get the status of the domain and the ownership verification steps. You can proceed to the next step when the domain is in an ACTIVE state and ready to cutover.- During the
PENDING_VERIFICATIONstate, you will need to verify the ownership of the domain through a TXT record or HTTP validation. - During the
PENDING_CREATIONstate orCREATIONstate, you will need to verify the ownership of the domain to the certificate authority. This will include adding the TXT records presented in the hostname validation in the response to the GET requests.
- During the
- Find your site that you wish to attach the domain to and derive the resource identifier. It will be of the format
accounts/<business-id>/sites/<site-id>, where both the business ID and the site ID can be found in the URL for the page:https://www.yext.com/s/<business-id>/yextsites/<site-id>/overview. - Send a POST API call to
https://api.yextapis.com/v2/accounts/<business-id>/domains/<domain-id>/associationsusing the site identifier from step 1. The hostname for this request can be anything that is one level above the wildcard hostname. For example, if the wildcard hostname wereexample.com,help.example.comwould be valid for this request, whereasen.help.example.comwould not. This domain must be set as primary withprimary: truein the request. For more information on making the request, see the Domain Association: Create endpoint. - Now the domain will be serving the content at the site! Repeat the preceding two steps for any sites you wish to use with the wildcard.
My security practices only allow me to use Let's Encrypt and DigiCert as Certificate Authorities
- Find your site that you wish to attach the domain to and derive the resource identifier. It will be of the format
accounts/<business-id>/sites/<site-id>, where both the business ID and the site ID can be found in the URL for the page:https://www.yext.com/s/<business-id>/yextsites/<site-id>/overview - Send a POST API call to
https://api.yextapis.com/v2/accounts/<business-id>/domainswith the domain setup. For reference, see the expected request information in the Domain: Create endpoint. For simplicity, use the HTTP validation type with managed SSL. To not use Google Trust and set the certificate authority on the Yext-managed certificate, specifyLETS_ENCRYPTas the certificate authority. - Use the GET API calls to
https://api.yextapis.com/v2/accounts/<business-id>/domains/<domain-id>to get the status of the domain and the ownership verification steps. You can proceed to the next step when the domain is in an ACTIVE state.- During the
PENDING_VERIFICATIONstate, you will need to verify the ownership of the domain through a CNAME record, TXT record, or HTTP validation. - During the
PENDING_CREATIONstate orCREATIONstate, you will need to verify the ownership of the domain to the certificate authority. If the CNAME record was used for ownership verification, no additional steps are needed; you'll just need to wait for verification.
- During the
- Send a POST API call to
https://api.yextapis.com/v2/accounts/<business-id>/domains/<domain-id>/associationsusing the site identifier from step 1. This domain will need to be set as primary withprimary: truein the request. For more information on making the request, see the Domain Association: Create endpoint. - Now the domain will be serving the content at the site!
I have a site, but I want to add other domains that serve the same content
- Find the site to which you wish to attach the domain and derive the resource identifier. It will be of the format
accounts/<business-id>/sites/<site-id>, where both the business ID and the site ID can be found in the URL for the page:https://www.yext.com/s/<business-id>/yextsites/<site-id>/overview - Send a POST API call to
https://api.yextapis.com/v2/accounts/<business-id>/domainswith the domain setup. For reference, see the expected request information in the Domain: Create endpoint. For simplicity, use the HTTP validation type with managed SSL. - Use the GET API calls to
https://api.yextapis.com/v2/accounts/<business-id>/domains/<domain-id>to get the status of the domain and the ownership verification steps. You can proceed to the next step when the domain is in an ACTIVE state.- During the
PENDING_VERIFICATIONstate, you will need to verify the ownership of the domain through a CNAME record, TXT record, or HTTP validation. - During the
PENDING_CREATIONstate orCREATIONstate, you will need to verify the ownership of the domain to the certificate authority. If the CNAME record was used for ownership verification, no additional steps are needed; you'll just need to wait for verification.
- During the
- Send a POST API call to
https://api.yextapis.com/v2/accounts/<business-id>/domains/<domain-id>/associationsusing the site identifier from step 1. This domain must be set as primary withprimary: truein the request. For more information on making the request, see the Domain Association: Create endpoint. - Now the domain will be serving the content at the site!
- For additional domains, follow steps 1–4 again, except that during step 4, set the primary field to
false. Each additional domain added here will be referred to as an alias and will signal to search engines that the canonical domain is the one added in step 4.
I accidentally deleted my domain. Can I get it back?
Each domain is unique for the hostname while it is active. However, if the domain is deleted, just recreate it and follow the same steps. Associations will need to be recreated as well. See the single domain example above.
I've moved to a new account, but my domain is stuck on my old account. How do I move it?
- Create the same domain in the new account with the desired settings using the Domain: Create endpoint.
- Follow all of the verification steps until you are presented with a
MOVE_REQUIREDstate. - At this point, send a PATCH request to the Domain endpoint with the parameter force set to true.
- Now the domain will be moved to this account. Use the domain association endpoint to associate the domain with a new site in the new account.
- The old domain will be left in the old account, but in a verification failed state. This domain can be deleted now. If the operation needs to be reversed, a patch request can be sent to the domain to repeat this process in reverse.
I have a legacy Pages 2.0 domain created prior to this new API. How do I migrate it?
- Use the Migrate Legacy Pages Domain endpoint to kick off the migration process. The hostname at the end should match the domain you want to migrate. If the domain has a Pages CDN integration and domain accessible integration, both will be migrated to the new system.
- All of the sites associated with that domain will automatically pick up on the changes to use the new domains API.
I want to create a Certificate Signing Request for a client for Custom SSL
- Send a POST request to the Managed CSR: Create endpoint to create a managed CSR with all the relevant information.
- Note the managed CSR ID in the response.
- Copy the CSR from the response and unescape the newline characters to turn them into real newlines.
- Provision a certificate with your desired certificate authority. The newlines must be escaped before adding it to the domain.
- Create a new domain with the Domain: Create endpoint. But instead of putting
managed_sslin the body, usemanaged_csrand the fields specified in the Managed CSR section of the Domain SSL Configuration section. The managed CSR ID field should match the managed CSR ID from the response in the first step. - The domain will now be provisioned with the custom SSL.