The Post Feed is a chronological feed for any posting or commenting activity happening on your location listings.
The navigation and use case for this screen depends on whether you have updated to Social or are using basic posting within Listings.
Note: Users need the following permissions (from Account Settings > Roles > Add/Edit a Role) to see the Post Feed screen:
- Social > Page Access > Post Feed: View
Listings vs. Social Use Cases
If you haven’t upgraded to Social, you can locate the Post Feed by navigating to Listings > Post.
If you are using Social, the feed will be located under Social > Post Feed.
This screen allows all users to view any historical posting activity, but depending on your product usage, there may be additional use cases.
Listings Users
If you have not upgraded to Social but still want to utilize basic posting, you can use this screen for the following:
- Create basic posts
- You can add multiple photos and text assets
- With basic posting, you can post to multiple publishers
- Action on basic posts
- View and delete posts
- Comments on posts
- View statuses and error messages
Social Users
If you have upgraded to Social, you should use the other screens under the Social tab in the nav to access advanced features. However, you can use this screen to:
- View social posting and commenting history. Going forward, use the Calendar and Comments screens for new social activity
- We strongly encourage that users only use this page to review previous Social history rather than creating anything new.
- View ineligible locations as indicated by the ineligible error status
Add a Post
The Post feature allows you to make posts on Facebook, Google, Instagram, Apple, and your website, directly from your dashboard.
Note: To post on Apple, you need to link your Apple Business Account to Yext. For full setup steps on how to link your account, visit the How to Link Apple Business Connect Account with Yext guide.
To create a post:
- Click Social in the navigation bar and click Post Feed.
- Click on the + New Post button.
- If applicable, select the locations you would like to post Otherwise, all locations will be selected by default.
- Click on the All Items button and select the desired locations, folders, or labels from the drop-down menu.
- Click Apply.
- Click on the Select Publishers button and check the boxes next to the sites you would like to post to in the drop-down menu.
- Add content to create your post.
- If you are including a URL in your social post, see the expected behavior of each publisher below:
- Instagram: Does not support links in captions so links included in an Instagram post will not be clickable.
- Facebook: Supports links, but behavior will vary. If there is no photo attached to the post, Facebook will display the link with a preview. If a photo is attached to the post, Facebook will display a clickable link with the photo attached, but no link preview.
- Google Business Profile: Supports in-line links, but they will appear as the full link. You can add a Google Call To Action to hyperlink a URL to a Google-supported Call To Action Type.
- Apple: Apple does not support links in the content of the post. To add a link to an Apple Showcase post, you will need to create an Action Link, and then select the Action Link as the Apple Showcase Call To Action Type.
-
To add a photo to the post, click on the + Add Media button, and add your photo using one of the methods.
- Note: If you are posting to Facebook or Instagram, you can select up to 10 photos per post.
- Note: Animated GIFs are not supported. If you add a GIF, it will be uploaded as a static image.
-
To add an Embedded Field to the post, click on the plus sign icon (
) next to the text box. This option is not available for all publishers.
- Note: Character limits differ by site; see the next section of this article for more information.
-
Apple Showcase Posting
-
Add a photo to your post.
- Photos are required in order to post on Apple.
- Your photo must adhere to Apple's photo and text standards.
- Add a headline to your post.
-
Select your desired Call-To-Action Type.
- Note: You can add additional Call-To-Actions by setting up Apple Action Links in the Knowledge Graph. For more information, see the Apple Showcase Posting reference documentation.
-
Add a photo to your post.
- If you are including a URL in your social post, see the expected behavior of each publisher below:
- (Optional) To add an Event, Offer, or Call to Action, to a Google Local Post, follow the steps below accordingly:
- Event & Offer
- Click on the Add Google Event button.
- Add the required event information.
- Note: The Event End Date must be within a year of the posting date.
- If applicable, toggle on the Offer Post and add additional information about the offer.
- Note: Offer posts cannot be combined with Call To Action posts.
- Click Add Google Event.
- Call To Action
- Click on the Add Google Call To Action button.
- Select your desired Call To Action Type.
- Select your desired URL.
- Click Add Google Call To Action.
- Event & Offer
- Click Post Now to publish your post, or click on the drop-down button next to Post Now to schedule the post for a future date and time.
- Note: If you are posting to Apple, click Schedule Post. Apple posts require manual approval by the Apple Maps team and must be scheduled at least 3 days in advance. Once you select your date and time, click Schedule Your Post.
-
Edit a Scheduled Post
- You can edit the content of a scheduled post before the scheduled post date by clicking Edit Post. After making your desired updates, click Save Changes.
Character limits by site
-
Facebook (
): 5,000 characters
-
Google Business Profile (
 ): 1,500 characters
- Instagram (
): 2,200 characters
- Apple(
): 58 characters body, 38 characters headline
-
Your Site (
 ): 5,000 characters
Submitting a Post to the Post Feed
Once you create the content of your post you can either click Post Now to post the content to the selected publishers. Alternatively, you can schedule posts by clicking on the drop-down arrow next to Post Now and clicking Schedule Post.
This will open a pop-up window where you can select the date and time you’d like to schedule your post for. You also have the option to edit the content of a scheduled post by clicking Edit Post.
Deleting and Copying Posts
If you would like to create a post that is similar to a previous post you made, you can click on the three dots next to that post and click Copy in the drop-down menu. This will open the ‘New Post’ flow with the same settings and content of the copied post so you can easily make adjustments to create a new post that way instead of from scratch.
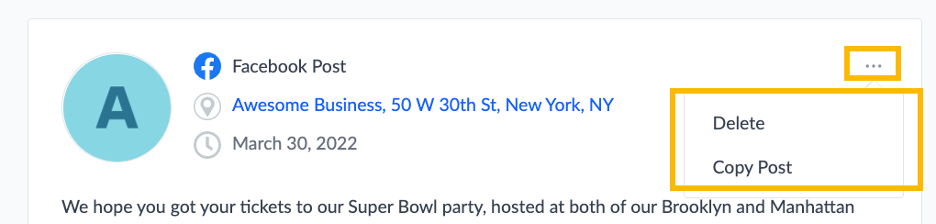
Alternatively, if you need to delete a post you can click Delete in the drop-down menu to delete a post.
Post Engagement and Comments
Each post you create will display on the Posts page in chronological order. If you post the same content to multiple publishers, there will be an individual post object per publisher, so you can see the engagement on each individual post. This will include comments, as well as views and clicks, depending on what the publisher supports. You can also add a top-level comment to your post and reply to comments. However, comments and replies are not available for all publishers.