This reference covers all available data transform options for Yext Connectors, including how to configure conditional execution for any transform.
Conditional Transform Execution
For any transform, you can optionally specify one or more conditions that must be met for the transform to execute on a given row. If a condition is not met, the transform is skipped for that row.
What "not executing" means:
- For transforms that overwrite data in existing columns (e.g., Fix Capitalization): the existing cell value is preserved.
- For transforms that create a new column (e.g., Add Column, Split Column): the new column's cell will be blank for that row.
Conditions can be applied to all built-in transforms except Ignore Columns and Filter Rows.
Adding Conditions
One or more conditions can be added per transform. If multiple conditions are specified, all must be joined by the same operator (either AND or OR).
For each condition, specify:
- Input column header — can be the same column the transform is applied to, or any other column in the dataset.
- Comparator — e.g., Contains, Greater Than, Equals, Is Blank, Is Not Blank.
- Comparison value — a static value or an embedded column reference (not required for "Is Blank" / "Is Not Blank").
Examples
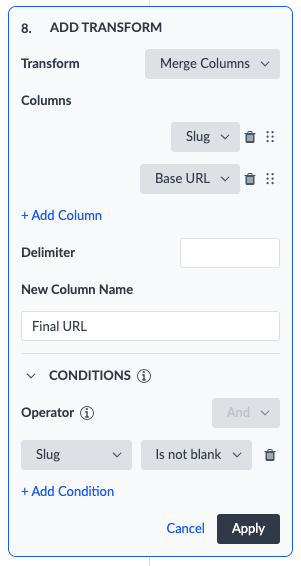
Merging Values
Merge Slug with Base URL to create Final URL — only if Slug is not blank:
| Slug | Base URL | Final URL |
|---|---|---|
| /product1 | https://www.mystore.com | https://www.mystore.com/product1 |
| (blank) | https://www.mystore.com | (blank) |
| /product2 | https://www.mystore.com | https://www.mystore.com/product2 |
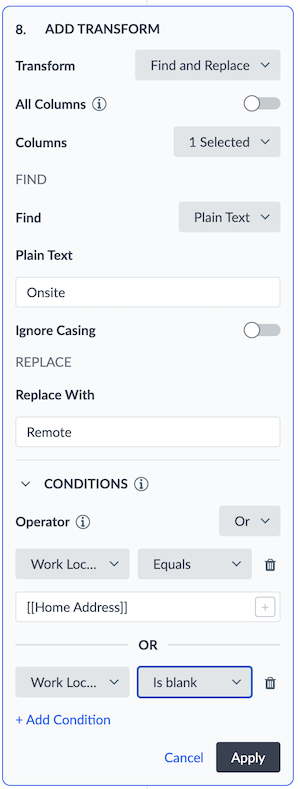
Replacing Values
Replace "Onsite" with "Remote" in the "Name" column — only if Work Location equals Home Address, OR if Work Location is blank:
| Name | Work Location | Home Address |
|---|---|---|
| Jenny Smith - Remote | 123 Main St., New York, NY | 123 Main St., New York, NY |
| John Doe - Onsite | 222 1st. Ave, New York, NY | 15 E. 2nd St., New York, NY |
| Sally Joy - Remote | (blank) | New York, New York |
Add Column
Adds a column to the dataset with a repeating value you specify. Enter a name for the column and the value to apply — it will be the same for every row.
Apply Template Fields
Applies fields and values from an entity template to connector columns. You must have at least one entity template in your account.
Select the desired template, then choose which fields to add and map each to a column header. Fields can be auto-mapped to existing column headers or mapped to new ones. You don't have to apply all fields on the template.
Template field values reflect the template's current values at the time the connector runs. If new fields are added to the template after the transform is configured, they must be manually added to the transform — they won't be added automatically.
Field Limitations
The following cannot be applied via a connector:
- Entity Relationships
- Folders
- Categories
- Linked Accounts
- ECLs
- Rich Text v1 (Legacy Rich Text) fields
To include Rich Text (v1) fields, migrate them to Rich Text (v2) first. See the Migrate Legacy Rich Text Fields and Field Types guide.
Check Entity Existence
Adds a column indicating whether each row's entity already exists in the Knowledge Graph. Returns true for existing entities and false for new ones, based on the Entity ID.
Specify which column contains the Entity ID, and provide a name for the new boolean column (e.g., "Entity Already Exists").
Convert to Rich Text
Converts HTML or Markdown data into AST JSON format. Select the columns to convert (or toggle "All Columns"), then choose the input format (HTML or Markdown).
Duplicate Column
Creates a copy of a column with the same data. Select the input column and provide a name for the new column header.
Useful when data needs to be mapped to two different entity fields, or when you need to preserve the original value while manipulating the duplicate.
Extract Text
Extracts text from a column based on matching characters or an offset. Provide a name for the new column, then configure:
Operation:
- All Text After
- All Text Before
- Some Text After (subset)
- Some Text Before (subset)
Extract From:
- First Instance of Matching Text
- Last Instance of Matching Text
- Offset From Beginning
- Offset From End
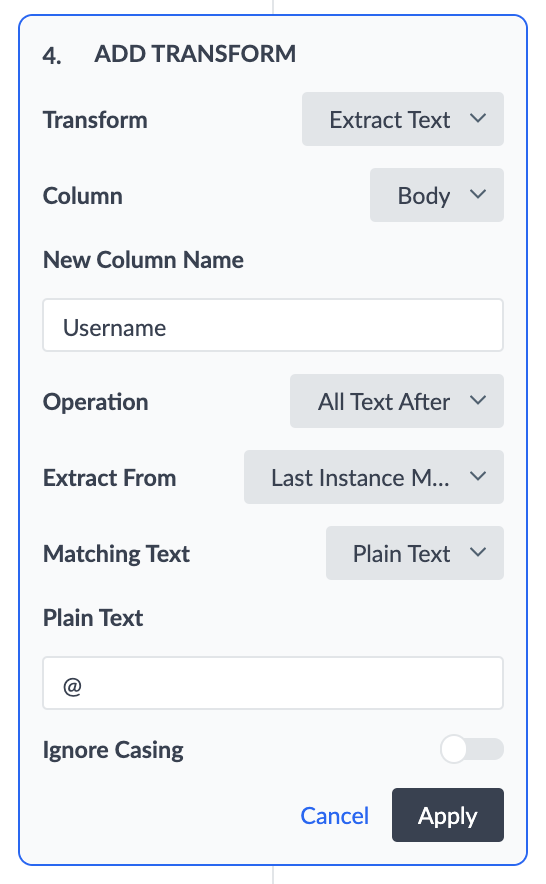
Example 1 — Extract username from email: To do this you can use the ‘All Text Before’ Operation where the ‘Extract From’ setting is the ‘First Instance of Match Text’, and the matching text is ‘@’.
| Name | Username | |
|---|---|---|
| Marty Morris | mmorris@turtleheadtacos.com | mmorris |
Example 2 — Extract store ID from URL path: Use the offset option where the Extract Option is ‘All Text After’ and your Extract From setting is ‘Offset from Beginning’ and the Offset Length is 20.
| Name | Address | Relative URL | Store ID |
|---|---|---|---|
| Turtlehead Tacos | 123 Main Street | /turtleheadtacos/ca/store12 | store12 |
Find and Replace
Two options are available:
Find and Replace
Replaces all instances of one or more text strings with a single replacement value.
Multiple "Find" rules are OR-joined and executed in this order:
- Plain text rules (longest to shortest)
- Regex rules (in listed order)
Each row can only match one rule and be replaced once.
Multi-Find and Replace
Executes multiple find-and-replace operations in a single transform. Supports multiple "Find" rules per "Replace" value, following the same execution order as above.
"Find" rules cannot be repeated across operations, and each value can only be replaced once.
Shared considerations for both types:
- Blank cells: A blank "Find" value replaces empty cells; a blank "Replace" value clears matched cells.
- Spaces: Leading and trailing spaces are trimmed from both "Find" and "Replace" values.
- Casing: Case-insensitive by default; toggle on for case-sensitive matching.
-
Special characters: "Replace" values are treated as literal strings by default. Optionally treat
$and/as special characters (executed per the Java Replace function).
Limits: Up to 500 key-value pairs per operation; up to 100 characters per key and value.
Fix Capitalization
Converts text in selected columns to one of:
- All Caps
- All Lower Case
- Proper Case (capitalizes the first letter of every word)
Note: Proper Case does not capitalize words separated by hyphens (e.g., "to-go" becomes "To-go", not "To-Go").
Fill in Empty Cells
Replaces blank cells with a specified value. Select one or more columns (or "All Columns" to include future columns automatically), then specify the fill value, which can be static or embed a column header reference.
Note: If embed syntax references a non-existent column header, it will embed the value of a matching field on the entity instead.
Filter Rows
Removes or keeps rows based on filter criteria. Available criteria:
- is blank / is not blank
- equals / does not equal
- contains / does not contain
- greater than / greater than or equal to
- less than / less than or equal to
Multiple criteria can be combined using AND or OR conditionals (all criteria in a transform must use the same conditional type). Meaning, you can exclude products that are both out of stock and do not have an associated product SKU. Or, you can exclude any products that are either out of stock or missing a product SKU.
Example: To exclude out-of-stock products, filter where "In Stock" equals "No":
| Product Name | In Stock | Product SKU |
|---|---|---|
| T-shirt | Yes | 123456 |
| Tank top | Yes | |
Format Dates
Use this transform to convert the format of your input date value into the format compatible with the Knowledge Graph.
First, select the column(s) to transform.
Then, choose whether to auto-detect the input date format. If you use the auto-detect functionality, then the system will attempt to match each value in each row to a format.
The benefits to auto-detecting the date format are:
- The input format of each value does not have to be the same. This means that a single transform can be used to clean multiple columns and/or rows that have varying data formats.
- You do not need to know how to write a format using the Java DateTimeFormatter notation.
However, if your format is extremely custom and the system is not able to successfully auto-detect the format, you will need to manually specify the format. To do this, select the date format that matches the input dates. If none of the options match, select “Custom” and enter a java.time.format.DateTimeFormatter compatible format string.
The transform will convert all inputs into the Knowledge Graph date format. That way, when mapping to a date field type, your date format will be valid.
For example, if your input dates are of the format 29-09-2022, using the auto-detect functionality, or selecting dd-MM-yyyy, will convert all dates into the Yext-compatible format: yyyy-MM-dd, or 2022-09-29.
Format Times
Use this transform to convert the format of your input time value into the format compatible with the Knowledge Graph.
First, select the column(s) to transform.
Then, choose whether to auto-detect the input time format. If you use the auto-detect functionality, then the system will attempt to match each value in each row to a format.
The benefits to auto-detecting the time format are:
- The input format of each value does not have to be the same. This means that a single transform can be used to clean multiple columns and/or rows that have varying data formats.
- You do not need to know how to write a format using the Java DateTimeFormatter notation.
However, if your format is extremely custom and the system is not able to successfully auto-detect the format, you will need to manually specify the format. To do this, select the date format that matches the input times. If none of the options match, select “Custom” and enter a java.time.format.DateTimeFormatter compatible format string.
The transform will convert all inputs into the Knowledge Graph time format. That way, when mapping to a time field type, your time format will be valid.
For example, if your input times are of the format 9:01:09 PM, select h:mm:ss a, and the transform will convert all times into the Yext-compatible format.
Function on a Row
The Function on a Row transform allows you to invoke fully custom Typescript functions to manipulate data in the Connector.
Function on a Row Transforms provide utmost flexibility in that they can accept multiple columns as inputs, and return outputs to multiple columns, for a given row in the Connector. This transform is especially useful for the the following use cases:
- Additional data (for each row) needs to be fetched from an API call and appended to the row as multiple new columns
- The output value of a column depends on the value of multiple input columns
Function on a Row Transforms expect a single object as the input data type, and an array of objects (with a maximum of 5 objects), or a single object as the output.
If the output type returned does NOT match that of one of the supported types, the Transform will fail to execute.
Input
| Type | Object |
|---|---|
| Example Function Definition | myObject: {id: string, name: string} |
| Example JSON | {id: “123”, name: “john”} |
| Behavior | The data from columns mapped to input keys will be used to construct the argument JSON |
Output
| Type | Object | Array of Objects | Undefined |
|---|---|---|---|
| Example Function Definition | Promise<{description: string, date: number}> | Promise<{description: string, date: number}[]> | undefined |
| Example JSON | {id: “123”, name: “john”} | {description: “Connectors help you manipulate data”, date: 01/01/2023} | |
| Behavior | The output object represents a single row of data, which will replace the existing row in the table for each execution | The output object represents a list of rows, whereby the first item will replace the existing row in the table for each execution. If the array is empty, the existing row will be removed from the table. |
A blank response will remove the existing row from the table. |
So, your function might look like the following:
 export function myCustomTransform(rowObject: {inputCol1: string, inputCol2: string, inputCol3: string}) : Promise<object[]> {
  /** TODO: write transform logic */
  return
     [
     {outputColName1: string1, outputColName2: string2},
     {outputColName1: string1, outputColName2: string2}
     ];
 }
To learn more about Function Development with Yext, check out our Get Started with Yext Functions guide.
The Connector will make a separate function call for each row in the Table. Based on your transform’s configuration, the system will construct the input object and parse the output for each function invocation.
First, you’ll need to specify the Plugin and Function that the transform should invoke.
You’ll then need to map the data in the Connector to the function’s inputs and outputs. Specifically, a Column Header in the Connector can be mapped to a “key” in your function. Essentially, your typescript function should be written to expect a structured object. The purpose of this mapping process is so that the system can correctly construct an object using the Connector data to match the structure the function expects as an input.
Inputs
Map each input key in the function to a Column Header in the Connector. The value for that key (that the function is invoked on) will be the value in the input Column Header for each row.
- Input Keys cannot be repeated and should not contain special characters nor spaces
- If an input key in your function is NOT mapped to any Column Header, it’s value will be sent as “undefined”
- If an input key is provided that does not match that of an input key in your function, the function will likely produce an error (or however the function is written to respond to an invalid input)
Outputs
Map each output key in the function to a Column Header in the Connector. The value returned for each key will populate the value of that column for the given row. Output values can overwrite the data in an existing column (i.e by mapping to an existing Column Header) or can populate an entirely new column by clicking to “+Add Column”.
- If an output key is specified in the config but is NOT actually returned from the function, the data in the column of the specified Column Header will be cleared.
Clear Column Values Setting (Default = FALSE)
By default, any Column Headers that are not specified as an output key will be preserved. This means that the function’s output is NOT considered comprehensive row data.
- If new rows are created from the function invocation, the new rows will have data in all other columns populated
Optionally, you can toggle this setting to TRUE, which means that any columns not mapped to an output key will be removed from the table. Setting this toggle to “TRUE” would be useful in the case where the output of the function is expected to be comprehensive row data.
Connector Limitations:
- We will only allow each function invocation to last 10 seconds. After 10 seconds, the given row will result in an ETL diagnostic.
- A maximum of 5 rows (5 items in the output array) can be generated and returned by a single function invocation. If more than 5 items are returned, an ETL diagnostic will occur for the given input row.
As a reminder, ETL diagnostics details are available in the etl_diagnostics.csv file). These errors result in the input row being dropped from the run if in Default Mode, or in the entire run failing if run in Comprehensive Mode (see more information about Run Modes here)
Example
I have rows of data that each contain data for a movie. I want to use a function to get the data for the top 3 actors of for each movie, and create rows for each actor. The end goal is to create actor entities
Original Table (This is a Single Row → the Function would execute the same way on EACH ROW)
| Full Name of Movie | Release Month | Entity ID |
|---|---|---|
| Step Brothers | July | 123 |
Final Table (Clear Column Values = TRUE)
| Full Name of Movie | Entity ID | Release Month | Actor Name | Actor ID | Color |
|---|---|---|---|---|---|
| 123 | Will Ferrell | 123 | Blue | ||
| 123 | John C. Reilly | 321 | Red | ||
| 123 | Adam Scott | 111 | Orange |
Final Table (Clear Column Values = FALSE, default)
| Full Name of Movie | Entity ID | Release Month | Actor Name | Actor ID | Color |
|---|---|---|---|---|---|
| Step Brothers | 123 | Will Ferrell | 123 | Blue | |
| Step Brothers | 123 | John C. Reilly | 321 | Red | |
| Step Brothers | 123 | Adam Scott | 111 | Orange |
Function
export async function getActors( movie :
     {name: string, id: string}
      ) : Promise<object[]> {
    /** For the Movie name and ID, fetch the data for the top 3 actors
        Construct an Array of objects, where each object is the data for an actor
        Return the Actor Data and Movie ID, do not return the Movie Name
     */
    return
           [
             {name: name, id: id, actorName: generatedActorName1, actorId:
              generatedActorId1, color: generatedActorFavColor1},
             {name: name, id: id, actorName: generatedActorName2, actorId:
              generatedActorId2, color: generatedActorFavColor2},
             {name: name, id: id, actorName: generatedActorName3, actorId:
              generatedActorId3, color: generatedActorFavColor3},
          ]
}
Transform Configuration to Achieve the Final Result
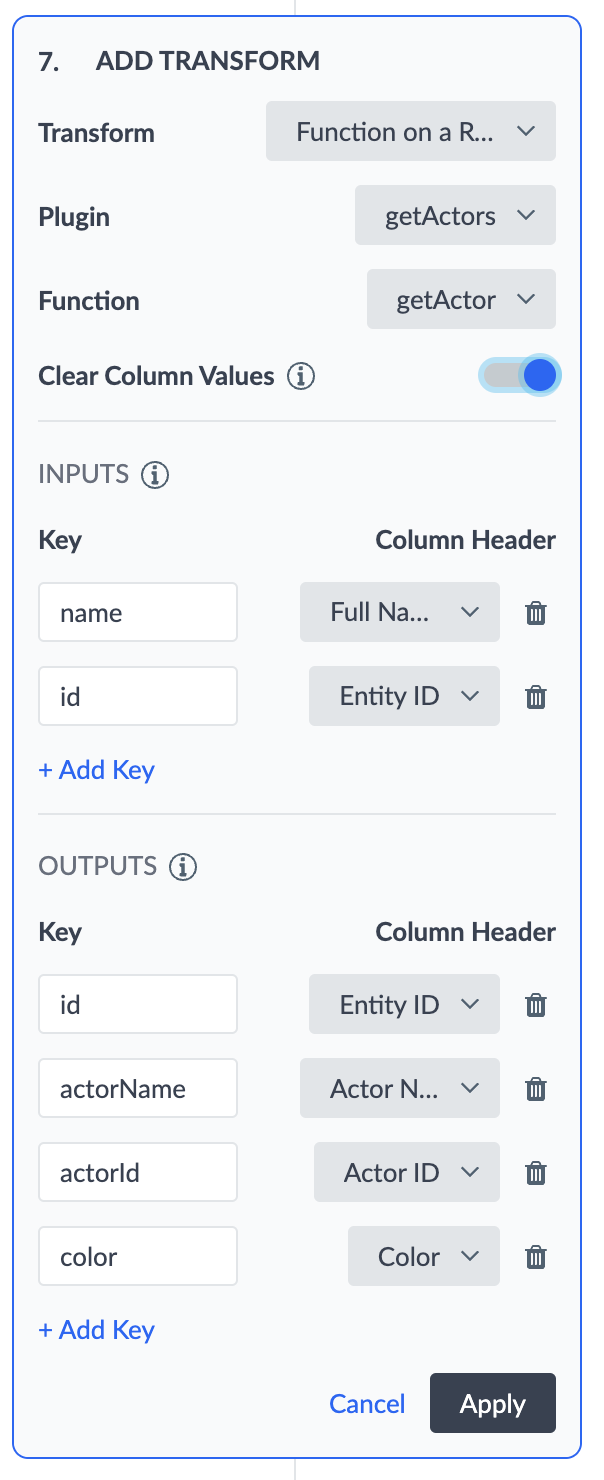
Input Mapping Code Representation
[{“functionKey”: “name”, “columnHeader”: “Full Name”}, {“functionKey”: “id”, “columnHeader”: “Entity ID”}]
Output Mapping Code Representation
[{“functionKey”: “id”, “columnHeader”: “Entity ID”}, {“functionKey”: “actorName”, “columnHeader”: “Actor Name”}, {“functionKey”: “actorId”, “columnHeader”: “Actor ID”}, {“functionKey”: “color”, “columnHeader”: “Color}]
JSON Data Constructed to be sent in a Single Invocation (as per the Provided Configuration)
Input:
{“name”: “Step Brothers”, “id”: “123”}

Output:
[
{id: “123”, actorName: “Will Ferrell”, actorId: “123”, color: “blue”},
{id: “123”, actorName: “John C. Reilly”, actorId: “321”, color: “red”},
{id: “123”, actorName: “Adam Scott”, actorId: “111”, color: “orange”}
]
Function on a Single Cell
Functions are custom transforms. You can create a fully customized Function in TypeScript.
Function on a Cell Transforms will expect a single generic function signature, outlined below in TypeScript.
 export function myCustomTransform(cellValue: string): string {
  /** TODO: build transformed cell */
  return cell;
 }
When creating a Function on a Cell Transform, you must specify which Columns in the Table that you would like to transform. The Connector system will make a separate function call for each Cell in each specified Column in the Table, hence the singular string argument and expected return value.
After creating a custom function, you can then select the function in the Transform UI as you would select a built-in transform.
To learn more about creating functions, visit the Get Started with Yext Functions guide.
Get Entity Field Data
Fetches existing field data from entities in the Knowledge Graph. Configure:
- The column containing Entity IDs (can include linked entity IDs)
- Optionally, a column containing locale codes for multi-language profiles
- One or more fields to fetch, and the destination columns for the returned data
Returned data formats:
| Field/Data Type | Format |
|---|---|
| Option fields | API name of field and options |
| List fields | Comma-separated list |
| Rich Text fields | JSON Abstract Syntax Tree (AST) |
| Entity Relationship fields | Entity ID |
| Entity labels | Display name |
| Entity folders | Folder path |
Limitations
- Getting data from the following fields and field types is not supported:
- Categories
- Google Attributes
- Linked Accounts
- Struct fields
- List of struct fields
- Photo fields
- Video fields
- Maximum fields to fetch per transform: 50
Ignore Columns
Removes specified columns from the preview table. Filtered columns are no longer visible in the UI or available for subsequent transforms and field mapping.
Map Publisher Categories
Use this transform to set the Yext Category ID for entities created by pulling data from Google Business Profile.
When fetching location data from Google Business Profile to create entities in Yext, the Google API will return the Google category IDs for your locations. In order to create location entities in Yext, those Google category IDs must be mapped to the corresponding Yext Category IDs.
Select the column (or columns) to apply the transform, or select “All Columns” to automatically apply the transform to any new columns added in the future. The transform will return the mapped Yext category IDs.
If your cells contain lists of category IDs, the transform will ingest the entire list and return the transformed list.
Merge Columns
This transform will merge columns together with an optional delimiter. To do this, you select the columns you want to merge from the drop-down menu. The order of the columns you select will determine the order of the merged data.
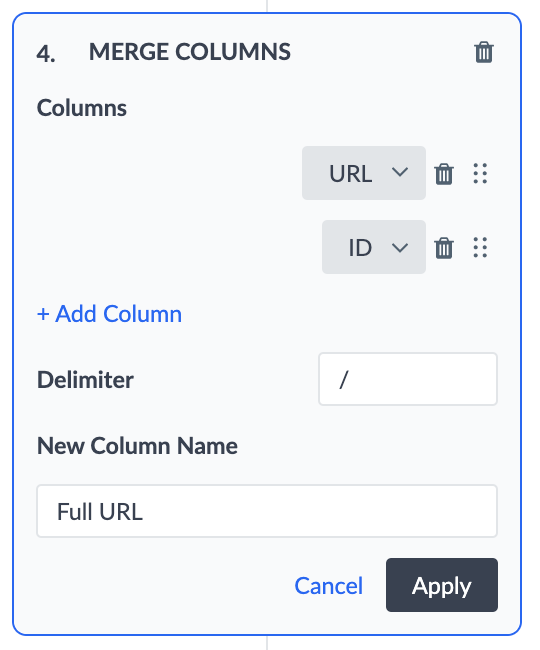
For example, if you have a column with the URLs from the main domain of your page, and you have a separate column for your Store IDs, you can merge the columns to create the store specific URLs.
To do this, you would merge the URL column with the Store ID column, and use ‘/’ as the delimiter. This would add ‘Full URL’ as a new column to the below dataset.
| Location Name | URL | Store ID | Full URL |
|---|---|---|---|
| Turtlehead Tacos | https://turtleheadtacos.com | store12 | https://turtleheadtacos.com/store12 |
Normalize Address
Formats data into the address fields required by the Knowledge Graph. Handles three use cases:
- Split address information contained in a single string into its respective fields (e.g.,
61 9th Ave, New York, NY 10011is split into the below subfields):- Address Line 1: 61 9th Ave
- City: New York
- State/Region: NY
- Postal Code: 10011
- Country: US
- Fill in missing fields for a partial address (contained in multiple columns for the respective address fields). E.g., given an Address Line 1 value of
61 9th Aveand a City value ofNew York, the transform will fill in the following subfields:- State/Region: NY
- Postal Code: 11205
- Country: US
- Populate Address fields (Address Line 1, City, State/Region, Postal Code, Country) given a latitude/longitude pair mapped to the Display Coordinate (
displayCoordinate) field.
Remove Characters
Trims spaces and removes unwanted special characters, numbers, or spaces from selected columns.
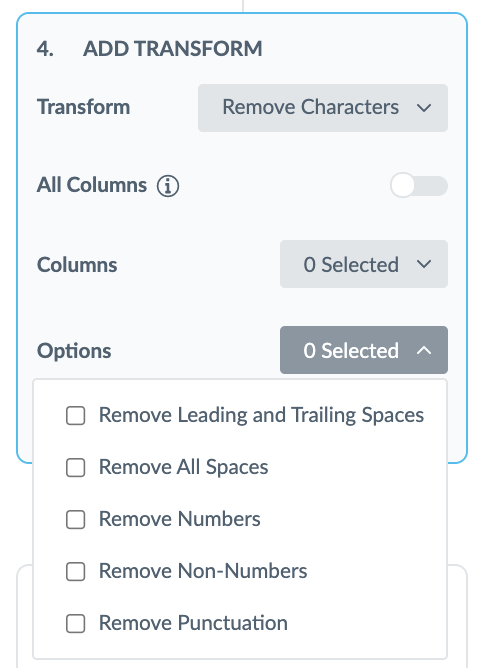
Example: Remove the leading / from year values like /2013 → 2013
| Location Name | Year Established |
|---|---|
| Turtlehead Tacos | /2013 |
| Turtlehead Tacos | /2005 |
| Turtlehead Tacos | /2014 |
Split Column
Splits a column into multiple new columns at each occurrence of a specified delimiter.
- The original column is not modified; only new columns are created
- If fewer new columns are specified than delimiter occurrences, the column won't split at subsequent occurrences
- If more new columns are specified than occurrences, the extra columns will be blank
Example: Split a "Menu Items" column (delimited by /) into Drinks, Breakfast, and Lunch columns:
| Name | Menu Items | Drinks | Breakfast | Lunch |
|---|---|---|---|---|
| Turtlehead Tacos | coffee, tea, OJ/breakfast burrito, pancakes/tacos, taco salad | coffee, tea, OJ | breakfast burrito, pancakes | tacos, taco salad |
Split Into Rows
Splits column values into separate rows based on a delimiter. All other column values repeat for each new row created.
If multiple columns are selected, the final row count is based on the column with the most delimiter occurrences. Columns with fewer occurrences will have blank cells for the remaining rows.
Example: Split a "Doctor" column (comma-delimited) into individual rows per doctor:
Before:
| Doctor | Hospital | Specialty |
|---|---|---|
| Dr. Cutler, Dr. Smith, Dr. Finjap | MGH | Cardiology |
After:
| Doctor | Hospital | Specialty |
|---|---|---|
| Dr. Cutler | MGH | Cardiology |
| Dr. Smith | MGH | Cardiology |
| Dr. Finjap | MGH | Cardiology |