To use OAuth 2.0 as an authentication method for APIs in the Connectors framework, you must link an account and authenticate with the API's provider. Any providers not supported out of the box can be added as a custom provider. This includes less-common providers, or providers that require a custom setup such as a business-specific authorization URL.
Use this guide to add a new custom provider and link one or more accounts to it, then use those accounts to create Pull from API Connectors with OAuth 2.0 authentication.
Recommended Use Cases
If your data lives within an API that requires OAuth 2.0 authentication, you can generate a token that we can pass to the API by linking your account to Yext. Although we host a suite of built-in providers to add linked accounts, Custom Providers will come in handy when your specific provider is not supported, and you’d like to make an authenticated API call in a Pull Connector.
Some common providers with an OAuth flow that require this include:
- Shopify
- ServiceNow
- Zendesk
Because the authorization URL and token URL are account-specific (i.e., www.yourInstanceURL.service-now.com/oauth_oauth.do is required, rather than using a generic www.service-now.com/oauth_oauth.do authorization URL endpoint), you’ll need to create your own developer apps in these provider accounts. When you create the app within your provider, you’ll generate a client ID, client secret, and specific authorization and token endpoints to be provided to Yext.
Step 1: Add a New Custom Provider
Prerequisites: Set Up an App in Your Provider Account
Before configuring the custom provider in Yext, create a developer app within the provider to obtain the following:
- Client ID and Client Secret
- Authorization URL and Token URL
- Any desired scopes
This process differs by provider. Consult your provider's authentication setup guide for details.
Note: If your provider requests a redirect URL during app configuration, use
https://www.yext.com/s/linkAccount.Currently, only Authorization Code and Client Credentials are supported as grant types. If your provider uses a different flow (e.g., Implicit or Password Credentials), you will not be able to configure a custom provider.
Defining a Custom Provider
Creating a new Custom Provider can be done from the Linked Accounts Landing Page, where you can find all other Provider and Linked Accounts Settings. You can find the Linked Accounts Page by navigating to Knowledge Graph > Configuration > Data Ingestion & Processing > Linked Accounts. (Note that this page is different than the Linked Accounts Page found under Account Settings, which is explicitly for Listings.)
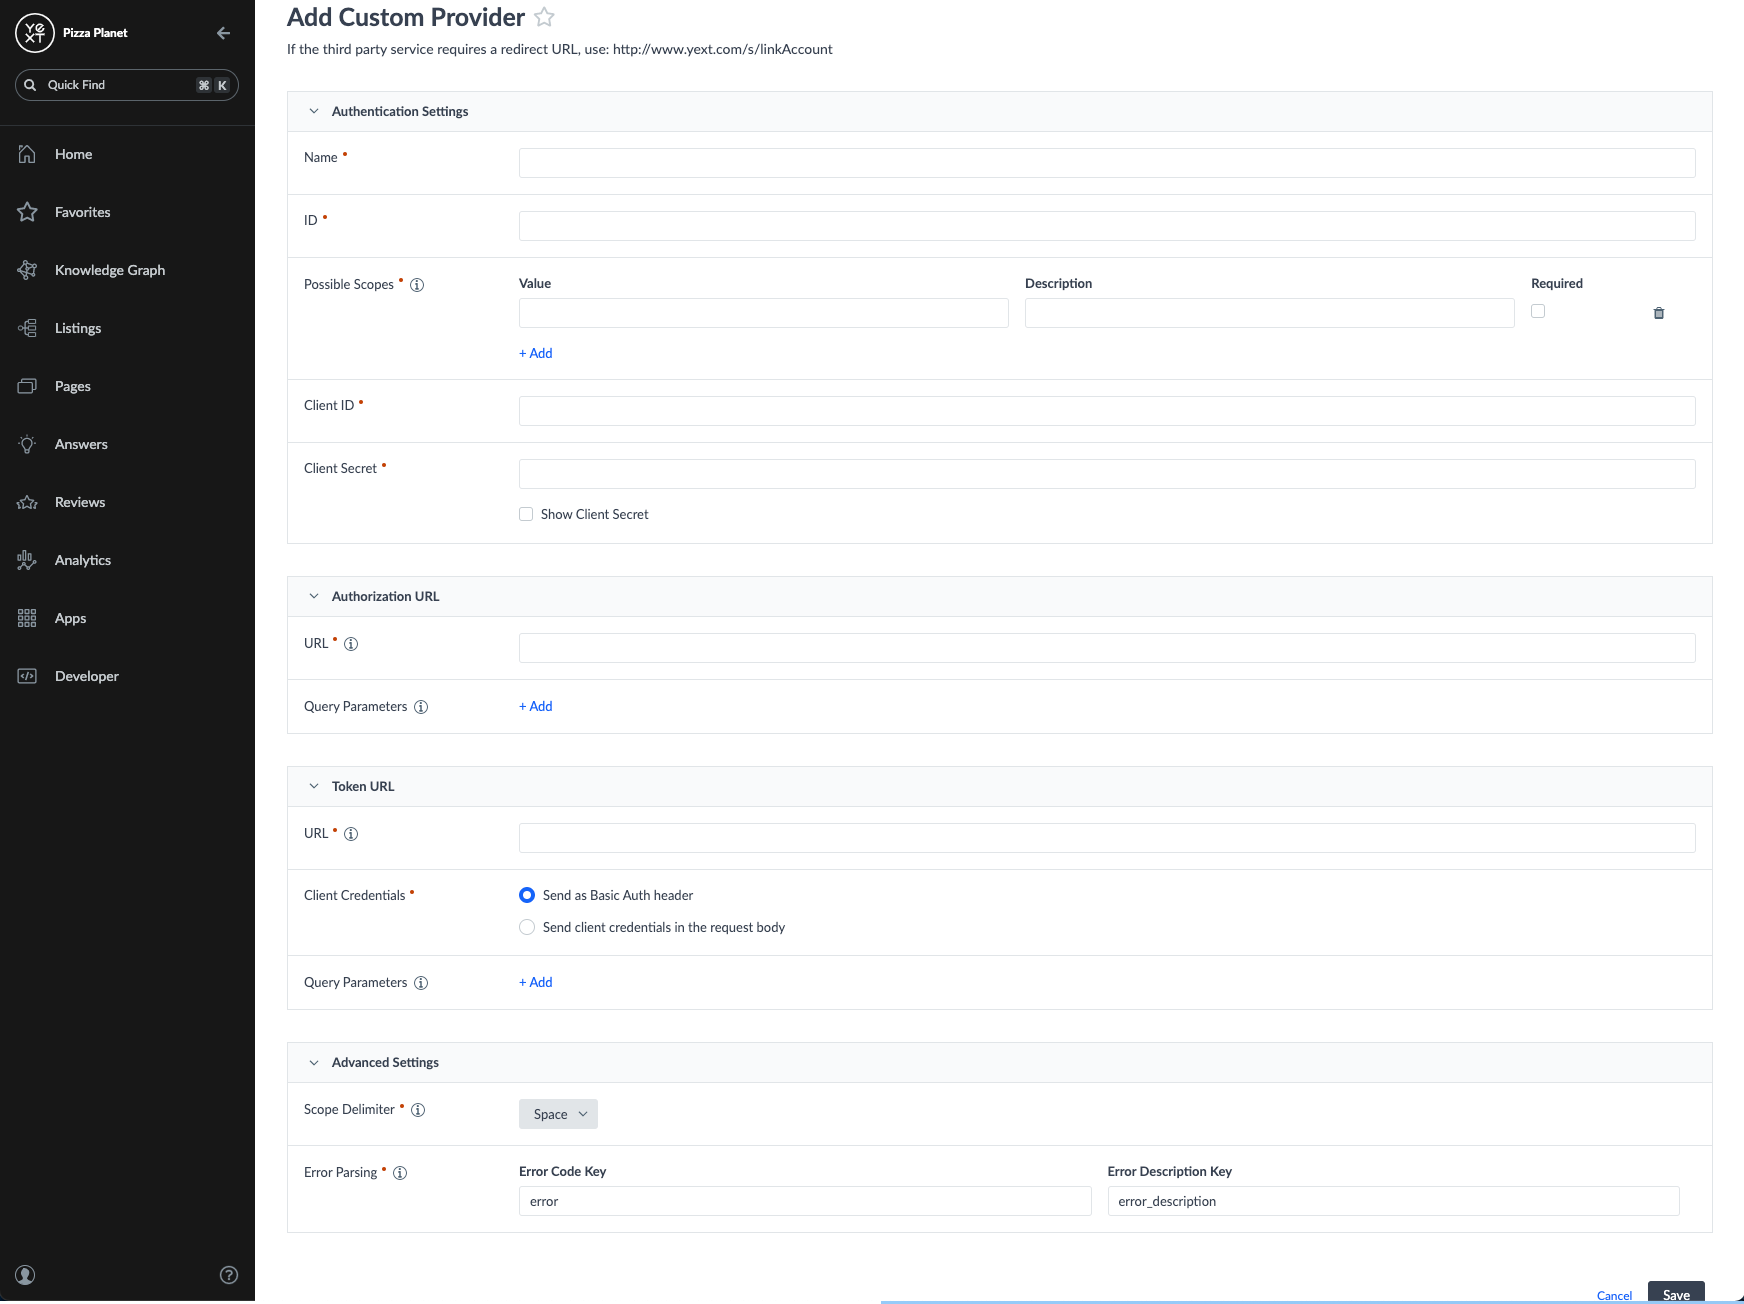
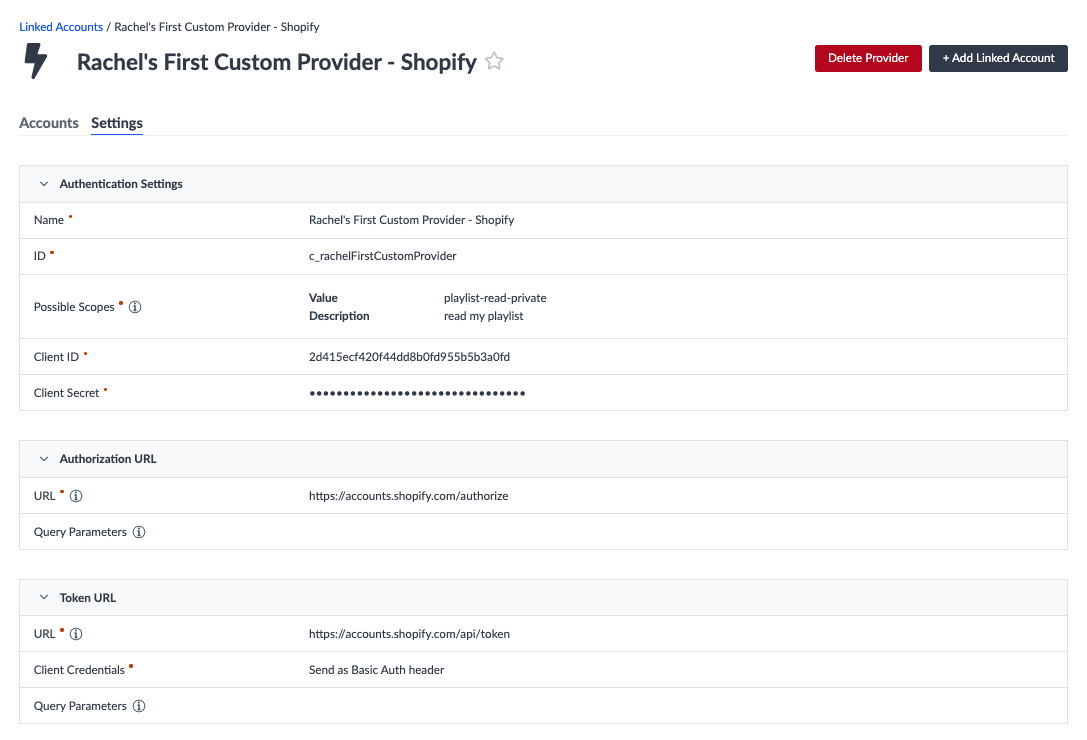
To add your Custom Provider, click +Add Custom Provider in the upper right hand corner. To define your custom provider settings and establish an OAuth connection between the provider and Yext, you’ll need to fill out the following key details:
- Grant Type
- Select either Authorization Code or Client Credentials based on the grant type that your specific provider requires.
- Name
- Provide a unique name that will be used to reference your Custom Provider, such as Shopify.
- ID
- Provide an ID used to reference your provider via the API. This ideally will match the name of your provider, and must be preceded by
c_, for example,c_shopify.
- Provide an ID used to reference your provider via the API. This ideally will match the name of your provider, and must be preceded by
- Possible Scopes
- Add a list of possible scopes that the application can request the user to grant upon linking an account. For each provided scope, you can:
- Optionally provide a description, so that users can understand the requested permissions and data that each scope would allow the app to access.
- Designate whether it is always required when requesting the access token, or if the user is allowed to optionally not pass the scope along with the request for a specific linked account. Information on required scopes is provider specific, which you can likely find with your provider’s authentication setup guide.
- Add a list of possible scopes that the application can request the user to grant upon linking an account. For each provided scope, you can:
- The following items apply only to the Authorization Code grant type. If you are not using the Authorization Code grant type, skip to Step 6.
- Client ID (this should be taken directly from the app created in your provider account)
- Client Secret (also taken from the app created in your provider account)
- Authorization URL Settings
- Authorization URL, which is the endpoint used to get an authorization code to access the protected resource
- Any query parameters to be sent along with the request
- Token URL Settings
- Provide the following information to configure the token URL:
- Token URL, which is the endpoint used to fetch an access token and refresh tokens from the provider
- Client Authentication credential location – indicate whether the client ID and secret should be passed in the request body or as a Basic Auth header
- Any query parameters to be sent along with the request
- Provide the following information to configure the token URL:
- Scope Delimiter
- You must specify the delimiter used to separate each scope if returned in the response. The supported delimiter(s) should be found in your provider’s authentication guidelines. If left unset, a space will be used by default.
- Error Parsing
- Provide the configuration used to find the errors to parse in the response. For the Error Code Key and Error Description Key, provide the respective JMES paths to get the keys from the response. If left unset, error and error_description will be used by default.
Once you have provided all of the above configuration settings, click Save.
Note: The “State” parameter will automatically be passed by our system in the initial request. “State” is a string used to prevent cross-site request forgery, such that the value sent in the request must match the value received in the response.
Step 2: Add a Linked Account
Once your custom provider is defined, add one or more linked accounts for it. You can add a linked account from any of the following locations:
- Linked Accounts page: Navigate to Knowledge Graph > Configuration and click + Add Linked Account for your provider.
- Provider landing page: Click + Add Linked Account in the upper right corner.
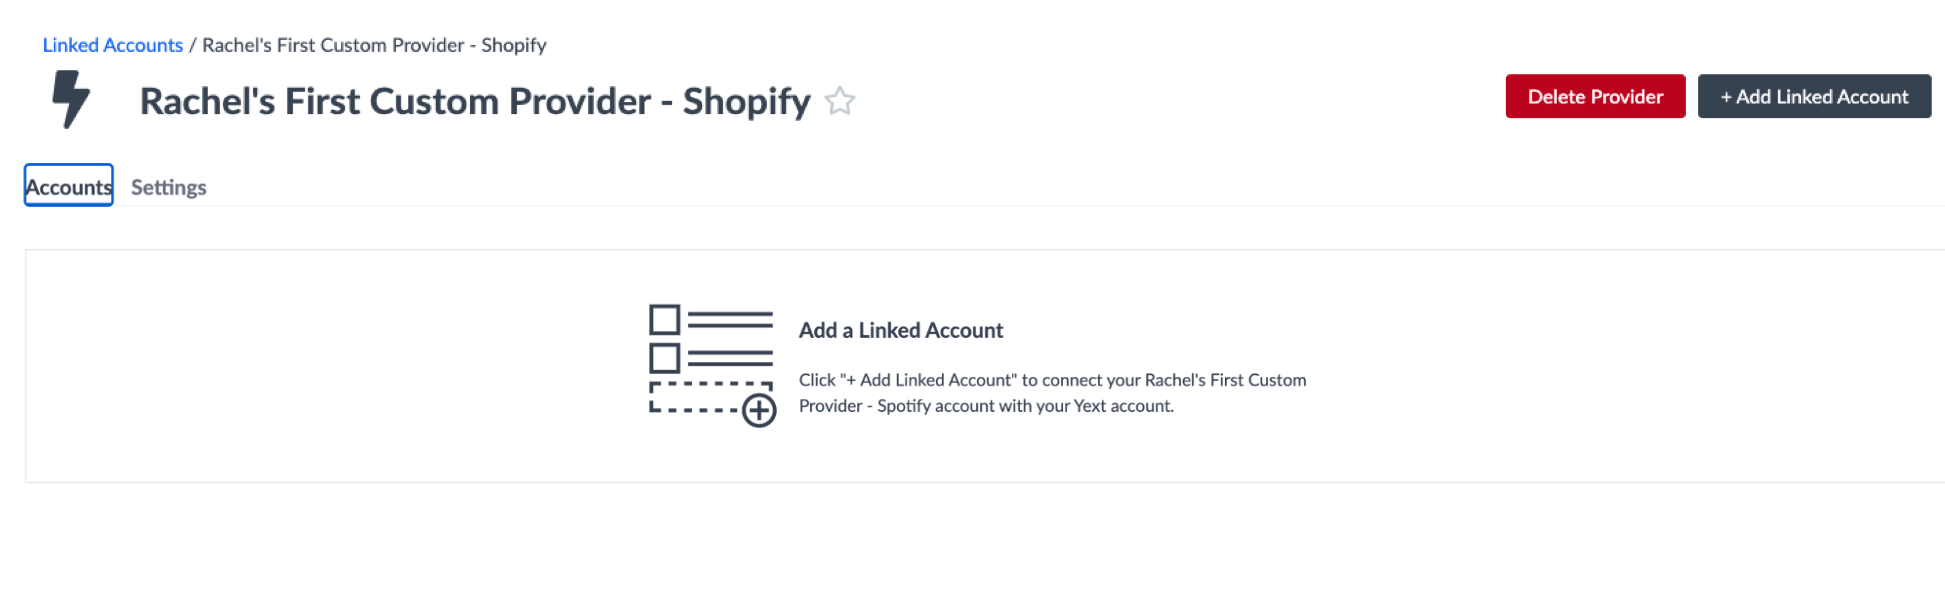
- Within a connector: When configuring a Pull from API Connector and selecting OAuth as the authentication method, choose + Add Linked Account from the dropdown.
You will then be presented with a modal to add a linked account and select the scopes that you wish to request.
Authorization Code Grant Type
- Select at least one scope, and then click Link.
- You will likely be prompted by the provider to log into your account and grant access for Yext to access your app.

Client Credentials Grant Type
- Select a scope.
- Provide the Client ID and Client Secret of the app in your third party account.
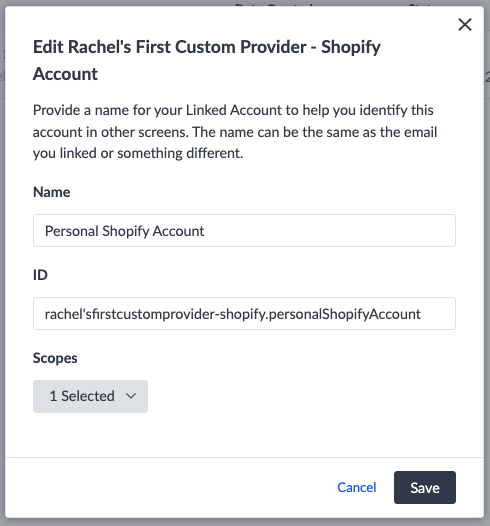
Provide Name and ID
Once the authentication setup is complete, you’ll need to provide a specific name and ID for your Linked Account. You may want to use the email you linked as the Name, with the email preceded by the provider ID for the Linked Account ID. For example, you might name your Linked Account jsmith@shopify.com, with the ID shopify.jsmith@shopify.com. Any name used to identify the linked account will work.
Now that you have successfully linked an account for your custom provider, you can use the account in a Pull from API Connector to authenticate an API request.
From the Connector setup flow, choose OAuth as your authentication method, and you should now be able to see and pick from any Linked Accounts of your Custom Provider (as well as from any Linked Accounts of a Built-in Provider).
Note: The generated access token will be sent by our system as a Request Header in the API request, prefixed with “Bearer”. So for example, the key of the Request Header is “Authorization”, and the value might be “Bearer 123”.
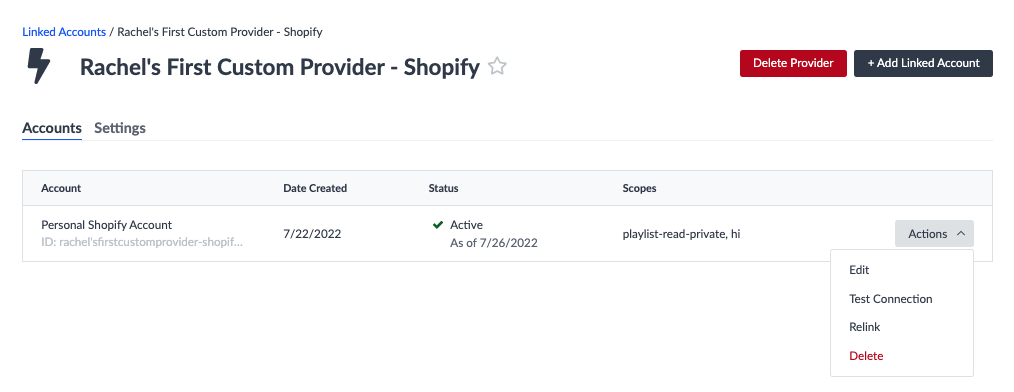
Step 3: Manage Existing Custom Providers and Linked Accounts
From the Linked Accounts Page, you can navigate to your Custom Provider’s landing page to manage the provider and Linked Accounts. You can also choose to delete the provider, but note that all associated information and Linked Accounts would also be deleted and that the action cannot be undone.
From the Settings tab, you can make any changes to your Custom Provider’s configuration.
From the Accounts tab, you can see a list of all Linked Accounts associated with your Custom Provider. For each, you can choose to Edit the account by changing the name and/or ID or the requested scopes. You can also test the connector, relink the account (with the same scopes or different scopes), or delete the Linked Account entirely.