Yext has two methods to pull data from Olo into Yext Content: the Olo Menu App and the Olo Restaurant Connector. These pull menu data and restaurant data, respectively, from a brand's Olo account. You can then distribute this information to power accurate data across Yext products such as Listings, Pages, and Search.
Prerequisite: Both the Menu App and Restaurant Connector require access to your Olo Vendor Export. If you have not yet requested access, complete Step 1 before proceeding. If you have already installed either app, you can skip Step 1.
Step 1: Request Vendor Export on Olo
Olo's Vendor Export provides an overview of a brand's location and menu information. Both Yext Olo apps use this export to pull restaurant and menu data. Note that menu items are pulled into Yext as ECLs, not entities.
- Email your Olo CSM to request access to your brand's vendor export, with your Yext CSM cc'd. In this email, also ask for your Olo Internal Name, which is required during app installation.
- The Olo CSM will confirm that you have signed a waiver authorizing your data to be sent to Yext. If not, they will send a waiver for you to sign and return.
- The Olo CSM works with the Olo API support team to grant the Yext partner project access to your vendor export.
- Once the Olo CSM confirms that vendor export access has been granted (typically within a day or two), you are ready to install the app.
Note: Whenever you add a new restaurant to your Olo account, notify your Olo CSM so they can add the location to the Yext Partner Project. If the location is not added, menu and location data for that restaurant will not be accessible.
Step 2: Install the Olo Menu App
The Olo Menu App creates an integration with your Olo brand and imports the menus associated with each of your locations as ECLs. ECLs live under Knowledge Graph > Menus, not Knowledge Graph > Entities. Because this app is not built within the standard Yext connector framework, you cannot edit which menu fields are ingested.
Note: The Olo Menu App will not erase or overwrite any menus you have already created in Yext. It will create additional menus and update them based on changes made in Olo. To avoid publishing duplicate menus, delete or disassociate any prior menu data from your Yext locations before installing the app.
- Confirm that you have been provisioned access to your brand's Olo Vendor Export (Step 1).
- Before downloading the app, ensure that the restaurants' External Reference IDs in Olo (not to be confused with Vendor IDs) are stored either in the Entity ID field or a custom field on your restaurant or location entities. This allows the connector to match Olo menus to the correct restaurants in Yext.
- Navigate to the App Directory and locate the Olo Menu App.
- Review the app listing and click Launch, then Install on Yext.
- Enter your Olo Internal Name(s). If you have multiple brands, enter them as a comma-separated list (e.g.,
firstbrand, secondbrand, thirdbrand). - Enter your Olo ID field: the field on your restaurant or location entities that contains the External Reference ID for the corresponding Olo location. This is required to associate menus with locations and publish them to Listings.
- Specify whether to publish menus and whether to hide pricing.
- If you do not select "publish menus," imported menus will not be associated with the corresponding restaurants in Yext.
- Click Save. After about 15 minutes, your Menu ECLs will be pulled into the platform.
Step 3: Install the Olo Restaurant Connector
The Olo Restaurant Connector pulls restaurant data from Olo. You can use it to either bring in new entities or update existing ones.
Add New Entities Using Olo Data
- Confirm that you have been provisioned access to your brand's Olo Vendor Export (Step 1).
- Navigate to the App Directory and locate the Olo Restaurant Connector.
- Review the app description, installation instructions, and integration details.
- Note: The fields listed on the App Directory listing include only the custom fields the app adds to the account. A number of built-in Yext fields are also mapped but are not listed there.
- Click Install, then Install On Yext, then Authorize.
- Enter your Internal Name(s) and click Import Restaurants to automatically install and run the connector.
- Confirm the correct Internal Name with your brand point of contact or Olo CSM.
- You will be redirected to the Connectors overview page. Click View next to your Olo Restaurant Connector.
- Wait a few minutes and refresh the page. You should see a summary of the entities pulled in.
Update Existing Entities with Olo Data
Before starting, review these considerations:
- The connector is pre-configured to update Restaurant entities. Updating Location entities requires a slightly different setup (detailed in Step 10 below).
- There must be a field in the Olo API response that matches the Entity ID in Yext. The best options are typically the
idorextrefproperties. See the Supported Fields reference for the full list of available fields. - Entity ID, Name, and Address are required fields in the connector. If all your restaurants share the same name in Yext, you can use an Add Column transform to map a static name to every entity.
Steps:
- If updating Restaurant entities, confirm that your restaurant Entity IDs in Yext do not match your restaurants' Vendor IDs in Olo. If they do match, running the connector will immediately overwrite Yext data with Olo data for those entities.
- If updating Location entities, ID matching is not a concern.
- Navigate to the App Directory and locate the Olo Restaurant Connector.
- Review the app listing and click Install, then Install On Yext, then Authorize.
- Enter your Internal Name(s) and click Import Restaurants.
- This run will import a duplicate set of restaurant entities, which you will delete in the next step.
- Click View next to your Olo Restaurant Connector. Wait a few minutes and refresh.
- Go to the Knowledge Graph and delete the entities you just imported. Sort by Date Added to isolate the newly added restaurants.
- Return to the Olo Restaurant Connector and click Edit.
- If your pre-existing entities are Location entities, go to the Map Data step, switch the entity type to Location, and click Remove Mappings and Change Entity Type when prompted.
- In the Map Data step, map only the fields you want to bring in from Olo. Entity ID, Name, and Address are required. Mapping any fields you don't want updated will cause data to be overwritten.
- Click Save. On the next connector run, only the mapped fields will be updated on your entities.
Filter to a Subset of Restaurants
To import some but not all restaurants:
- After installing the connector but before running it, click Edit Configuration on the Connector overview page.
-
In the second-to-last step, click Add Transform and select Filter Rows. Configure the condition to filter your restaurants.
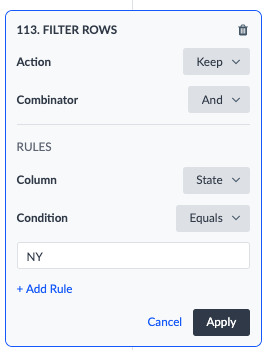
For example, to import only restaurants in New York, filter where the
statefield equalsNY. - Click Apply, save the connector, and click Run.
Supported Fields
Olo Menu App
| Olo Field | Yext Field |
|---|---|
restaurant.id |
Menu ID |
restaurant.name |
Menu Title |
category.id |
Section ID |
category.name |
Section Name |
category.description |
Section Description |
product.id |
Menu Item ID |
product.name |
Menu Item Name |
product.description |
Menu Item Description |
product.cost |
Menu Item Price |
option.name |
Menu Item Option Name |
option.cost |
Menu Item Option Price |
Olo Restaurant Connector
| Olo Field | Yext Field |
|---|---|
id |
Entity ID |
name |
Name |
brand |
Brand |
storename |
[unmapped] |
telephone |
Main Phone |
streetaddress |
Address > Line 1 |
crossstreet |
[unmapped] |
city |
Address > City |
state |
Address > Region |
zip |
Address > Postal Code |
country |
Address > Country Code |
latitude |
Latitude |
longitude |
Longitude |
utcoffset |
[unmapped] |
url |
Website URL > URL |
mobileurl |
Mobile URL |
distance |
[unmapped] |
extref |
External Reference ID |
advanceonly |
Advance Ordering Only |
advanceorderdays |
Days to Order in Advance |
supportscoupons |
Supports Coupons |
supportsloyalty |
Supports Loyalty |
supportedcardtypes |
Payment Options |
supportsmanualfire |
Payment Options |
candeliver |
Delivery Services |
canpickup |
Pickup Available |
supportscurbside |
Curbside Pickup |
supportsdispatch |
Supports Dispatch |
supportsdinein |
Supports Dine-in |
deliveryarea |
Delivery Area |
minimumdeliveryorder |
Minimum Delivery Price |
minimumpickuporder |
Minimum Pickup Order |
maximumpayinstoreorder |
Maximum Pay In-store Order |
deliveryfee |
Delivery Fee |
supportstip |
Supports Tip |
supportsspecialinstructions |
Supports Special Instructions |
specialinstructionsmaxlength |
Supports Special Instructions |
supportsguestordering |
Supports Online Ordering |
supportsfeedback |
Supports Feedback |
supportssplitpayments |
Supports Split Payments |
isavailable |
Is Available |
customerfacingmessage |
Customer Facing Message |
supportsdrivethru |
Supports Drive-thru |
calendar |
Hours |
calendar |
Delivery Hours |
calendar |
Takeout Hours |
calendar |
Pickup Hours |
calendar |
Drive-Through Hours |
FAQ
How often does each connector refresh data? Both connectors automatically run daily, between 2am and 4am Eastern Time.
Can I force a run of either connector? You cannot force a run of the Restaurant Connector or change the time at which it runs. You can force a run of the Menu Connector:
- Navigate to Apps > Your Apps > Olo Menu Connector > Launch.
- Click Install on Yext, then Edit.
- Click Save without making any changes. This will trigger a run.
Will running the connector delete or overwrite existing data in Yext? Neither connector deletes data. The Restaurant Connector will overwrite entity data for any entity IDs that match Olo Vendor IDs. To prevent this, either change entity IDs in Yext to avoid automatic matching, or unmap the fields you don't want overwritten in the final connector step. The Menu Connector will not overwrite existing menus, but will create new ones, which can result in duplicates. Delete or disassociate existing menu data before installing the Menu App to avoid this.
Can I bring in only specific fields from Olo? Yes. In the Map Data step of the connector, unmap all fields except the ones you want to import. If mapping specific fields to pre-existing entities, ensure that the IDs in Olo match your Yext entity IDs first.
Some entities failed to import. What should I do? Navigate to Content > Connectors > View Connector and click Download Results next to the most recent run. Open the Entity Diagnostics file for details on why specific items failed. Common causes are incorrectly formatted phone numbers or addresses on the Olo side.
Can the Menu Connector bring in multiple menus for a given restaurant? No, this is not currently supported.
I added a new restaurant to Olo but it's not appearing in Yext. Why? Your Olo CSM must grant the new location access to the Yext Partner Portal. This step is required for every new restaurant within your brand.
The connector is running but bringing in no entities. Why? This is usually caused by one of two issues:
- The wrong Olo Internal Name (also called Brand ID) was entered during installation. It should be all-lowercase with no punctuation or spaces. Confirm the correct value with your Olo CSM.
- The connector cannot find a match between Olo restaurants and Yext entities. The Menu Connector matches based on Olo's external reference ID, while the Restaurant Connector matches based on vendor ID.
How does Yext handle menu items that are 86'd in Olo? Menu items marked as 86'd (temporarily unavailable) in Olo will still be pulled into Yext. Review your 86'd items in Olo and ensure any items you don't want displayed on publishers are not included.