This reference covers the Rich Text (v2) and Markdown field types, including supported formatting, storage format, importing and exporting content, and how to migrate from Legacy Rich Text (v1).
Note: If you are importing rich text content on an ongoing basis from an external source, use the Markdown field type rather than Rich Text (v2). Rich Text (v2) is primarily intended for authoring directly in the platform.
Rich Text (v2)
The Rich Text (v2) field type offers a WYSIWYG editor with support for a wide variety of formatting.
Supported Formatting
| Format | Notes |
|---|---|
| Bold, Italic, Underline | |
| Headings | H1 through H6 |
| Text Color | Supports custom color palette |
| Text Highlight Color | Supports custom color palette |
| Bulleted List | Supports nested bullets |
| Numbered List | Supports beginning at arbitrary numbers |
| Strikethrough | |
| Superscript, Subscript | |
| Hyperlink Text | |
| Image Upload and Hyperlink | Use the Yext Image Uploader to upload an image and link text to it using the returned Yext-hosted URL. |
| Quote | |
| Horizontal Line | |
| Code Snippet | |
| Code Block | |
| Tables | |
| Undo/Redo | |
| Text Alignment | |
| Clipboard Support | Copy and pasting from most rich text editors preserves formatting. Note: formatting is not preserved when pasting from Google Docs due to a known issue with Lexical's Content Security Policy handling (details here). Workaround: paste into Word first, then into the rich text field. |
Storage Format
Rich Text (v2) stores content as a JSON Abstract Syntax Tree (AST), based on Lexical.dev. Most modern rich text editors use an AST because it makes working with formatted content in code simpler and allows the supported formatting to expand over time.
Because the storage format is an AST, importing and exporting requires processing to and from the AST format.
Object Structure
In code interfaces, Rich Text (v2) fields are represented as a structured object with a json sub-property containing the AST. As of Summer 2023, an html sub-property is also stored. Example:
{
  "id": "product-1",
  "name": "Product 1",
  "c_richTextv2Description": {
    "json": {
      "root": {
        "children": [
          {
            "children": [
              {
                "detail": 0,
                "format": 1,
                "mode": "normal",
                "style": "",
                "text": "bold text",
                "type": "text",
                "version": 1
              }
            ],
            "direction": "ltr",
            "format": "",
            "indent": 0,
            "type": "paragraph",
            "version": 1
          }
        ],
        "direction": "ltr",
        "format": "",
        "indent": 0,
        "type": "root",
        "version": 1
      }
    }
  }
}
If a plaintext sub-property would be useful, reach out to your account team.
Importing Content
To import content into a Rich Text (v2) field, you must supply a valid JSON AST. Converting from HTML or Markdown to AST can be lossy.
Yext supports native transformation from HTML or Markdown to the Rich Text AST in the Connectors framework. See the Convert to Rich Text transform for details.
If importing via the Entities Management API directly, use Lexical's library to convert: Markdown to AST or HTML to AST.
Limitation: There are no Yext-provided tools for converting content from HTML or Markdown to AST via the API directly.
Exporting and Rendering Content
To render Rich Text (v2) content on a website, it must be converted to HTML. Yext provides a React component for this in the @yext/pages-components library, which abstracts away AST processing.
Streams (Pages, Search, Content API):
Request the HTML conversion by using [richTextv2Field].html (or [richTextv2Field["html"]]). Requesting [richTextv2Field] alone returns the AST.
Note: you cannot include both the top-level field and its subfields in the same stream. If you want HTML, only include [richTextv2Field].html.
Entities API:
Use the convertRichTextToHTML=true query parameter to return HTML instead of the AST (default).
Markdown
The Markdown field type offers a Markdown editor with a side-by-side rendered view.
Supported Formatting
The Markdown field type supports any formatting that is valid in GitHub-Flavored Markdown (GFM) or HTML (since HTML can be included in Markdown directly as markup). This makes it the most flexible option.
Warning: Markdown inherently allows arbitrary HTML to be stored. Yext does not filter content on ingestion. If you retrieve data as Markdown and do your own HTML conversion, use a library that prevents malicious scripts from executing. Read more here.
Storage Format
Content is stored as GitHub-Flavored Markdown. HTML can be included directly as markup.
Object Structure
Markdown fields are represented as a structured object with a markdown sub-property. As of Summer 2023, an html sub-property is also stored. Example:
{
  "id": "product-1",
  "name": "Product 1",
  "c_markdownDescription": {
    "markdown": "**bold text**\n\n"
  }
}
If a plaintext sub-property would be useful, reach out to your account team.
Importing Content
No conversion is needed to import content into a Markdown field. Because the field accepts both Markdown and HTML as plain strings, any text can be stored without conversion. This makes it well-suited for ingesting formatted content from external source systems.
When rendering stored content in Entity Edit, Yext uses rehype to sanitize HTML and prevent malicious scripts from executing.
Limitation: There are no Yext-provided tools for stripping inline CSS when importing HTML to a Markdown field.
Exporting and Rendering Content
To render Markdown content on a website, it must be converted to HTML. Because GFM is a standard format, many well-maintained libraries handle this conversion. For JavaScript frontends, Yext recommends ShowdownJS with the "flavor" set to GFM.
Yext also provides a pre-built React component for sanitizing and rendering GFM in the @yext/pages-components library.
Streams (Pages, Search, Content API):
Request the HTML conversion by using [markdownField].html. Requesting [markdownField] alone returns Markdown.
Entities API:
Use the convertMarkdownToHTML=true query parameter to return HTML (default is false, returning Markdown).
Migrating from Legacy Rich Text (v1)
Legacy Rich Text (v1) fields still exist in the Knowledge Graph and can still be edited manually and read or written to by integrations. However, you can no longer create new Legacy Rich Text fields. Yext recommends all users migrate existing Legacy Rich Text fields and field types to either Rich Text (v2) or Markdown using the Fork Fields flow.
Note: If you are a Listings-only customer that does not use Legacy Rich Text, no action is required.
Migration Overview
The migration process involves three main areas:
- Fork any custom field types that use Legacy Rich Text subfields to a new type
- Fork any custom Legacy Rich Text fields to a new type
- Update any references to Legacy Rich Text fields in Pages, Search, Connectors, or other integrations
Forking only needs to be done for existing fields. All new fields and field types now use Markdown or Rich Text (v2) by default.
Step 1: Fork Custom Field Types
If you have custom field types that use Legacy Rich Text as a subfield type, fork them first. You cannot fork individual fields to a custom field type until a compatible forked field type exists.
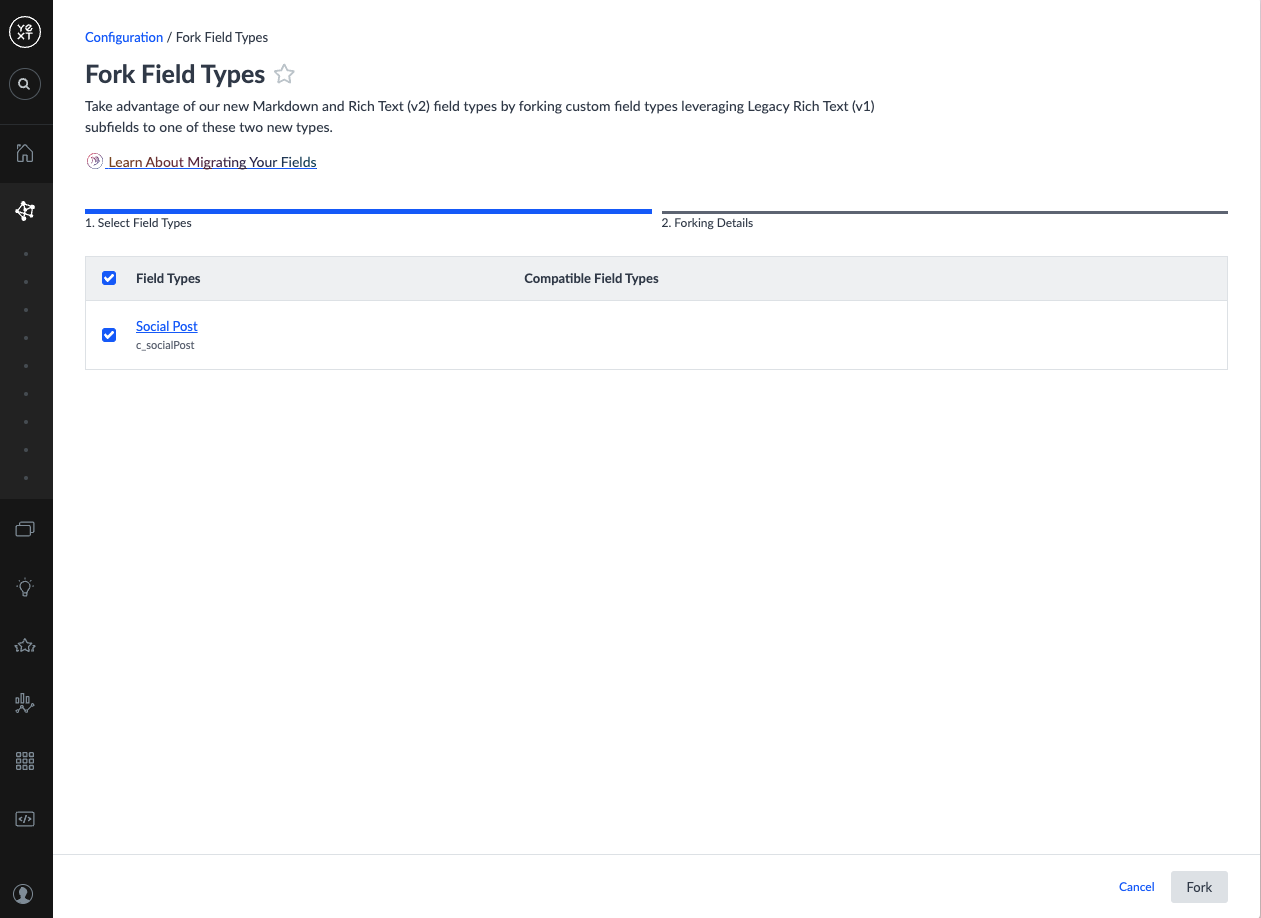
- Navigate to Knowledge Graph > Configuration > Fork Field Types.
- If no custom field types appear in the table, skip to Step 2. If field types are listed, select the checkboxes next to the ones you want to fork and click Fork.
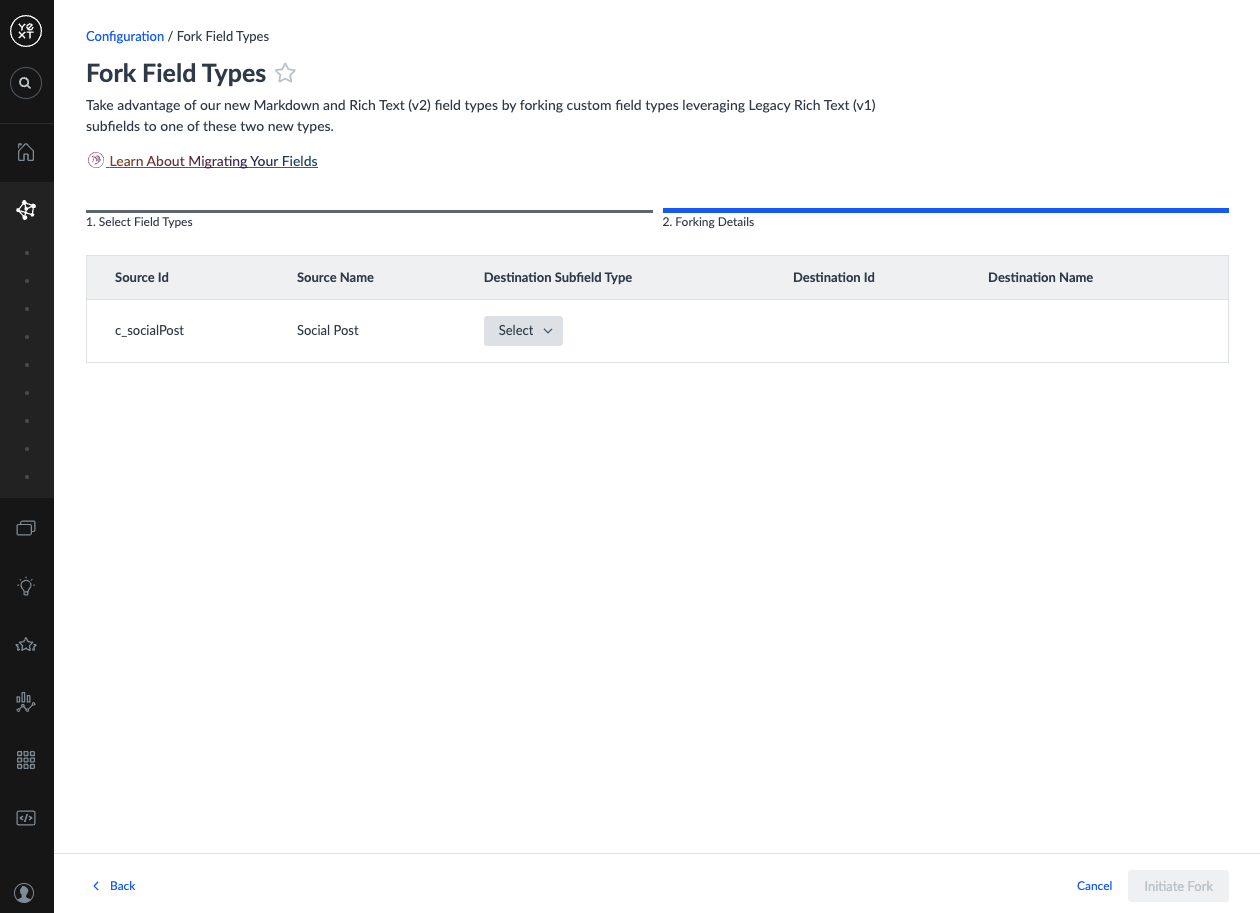
- In the Forking Details step, populate the Destination columns for each field type:
| Column | Definition | Notes |
|---|---|---|
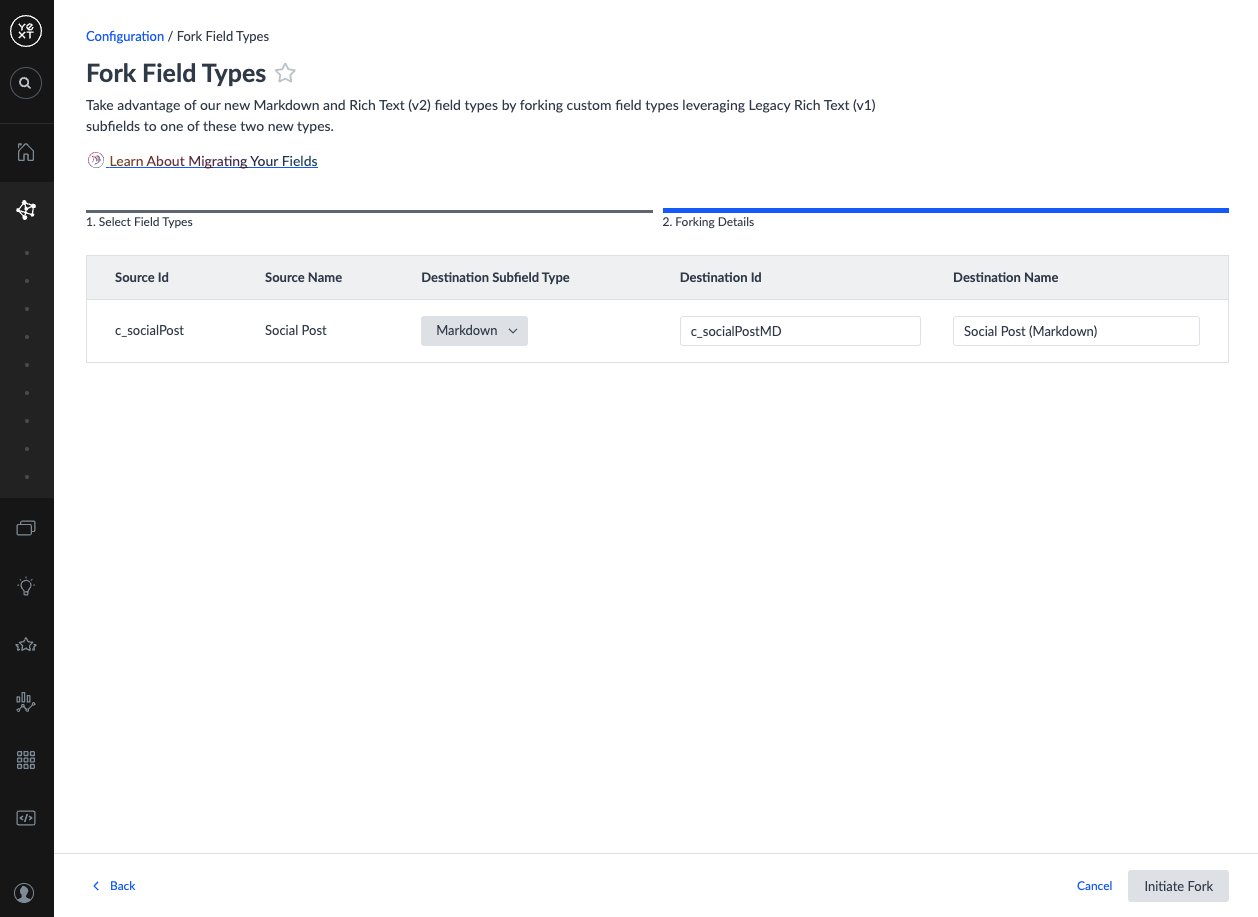
| Destination Subfield Type | The new type for the Legacy Rich Text subfields | The Destination ID and Name inputs become available after selecting a subfield type. |
| Destination ID | The ID of the new field type to create | Pre-populated based on the subfield type and source ID. Must be unique and contain no special characters. |
| Destination Name | The name of the new field type to create | Pre-populated based on the subfield type and source name. Must be under 64 characters and contain only alphanumeric characters, _, -, (, ), and spaces. |
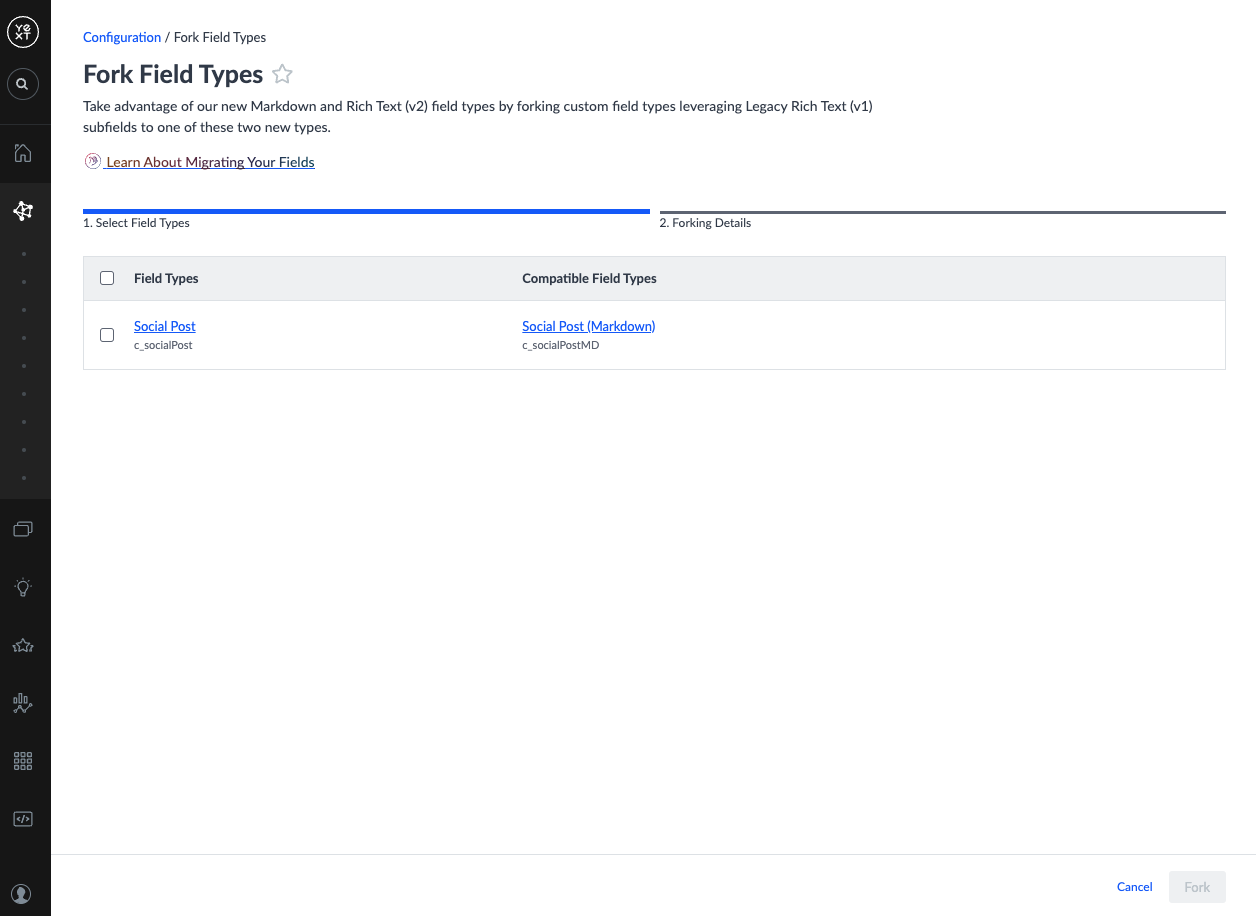
- Click Initiate Fork. You will be returned to the Fork Field Types screen. Your legacy field types will still appear, but the new compatible field types will now show in the Compatible Field Types column.
Maintaining compatibility: Making breaking changes to the source or destination field type (deleting either, or adding a subtype to the source) will cause them to become incompatible. You can re-run the Fork Field Types flow if this happens, but it will create another new field type.
Discontinue source field types: To ensure the old field types are no longer used, rename them to append "Legacy," "Deprecated," or "Do Not Use." Deleting source field types is irreversible and not recommended.
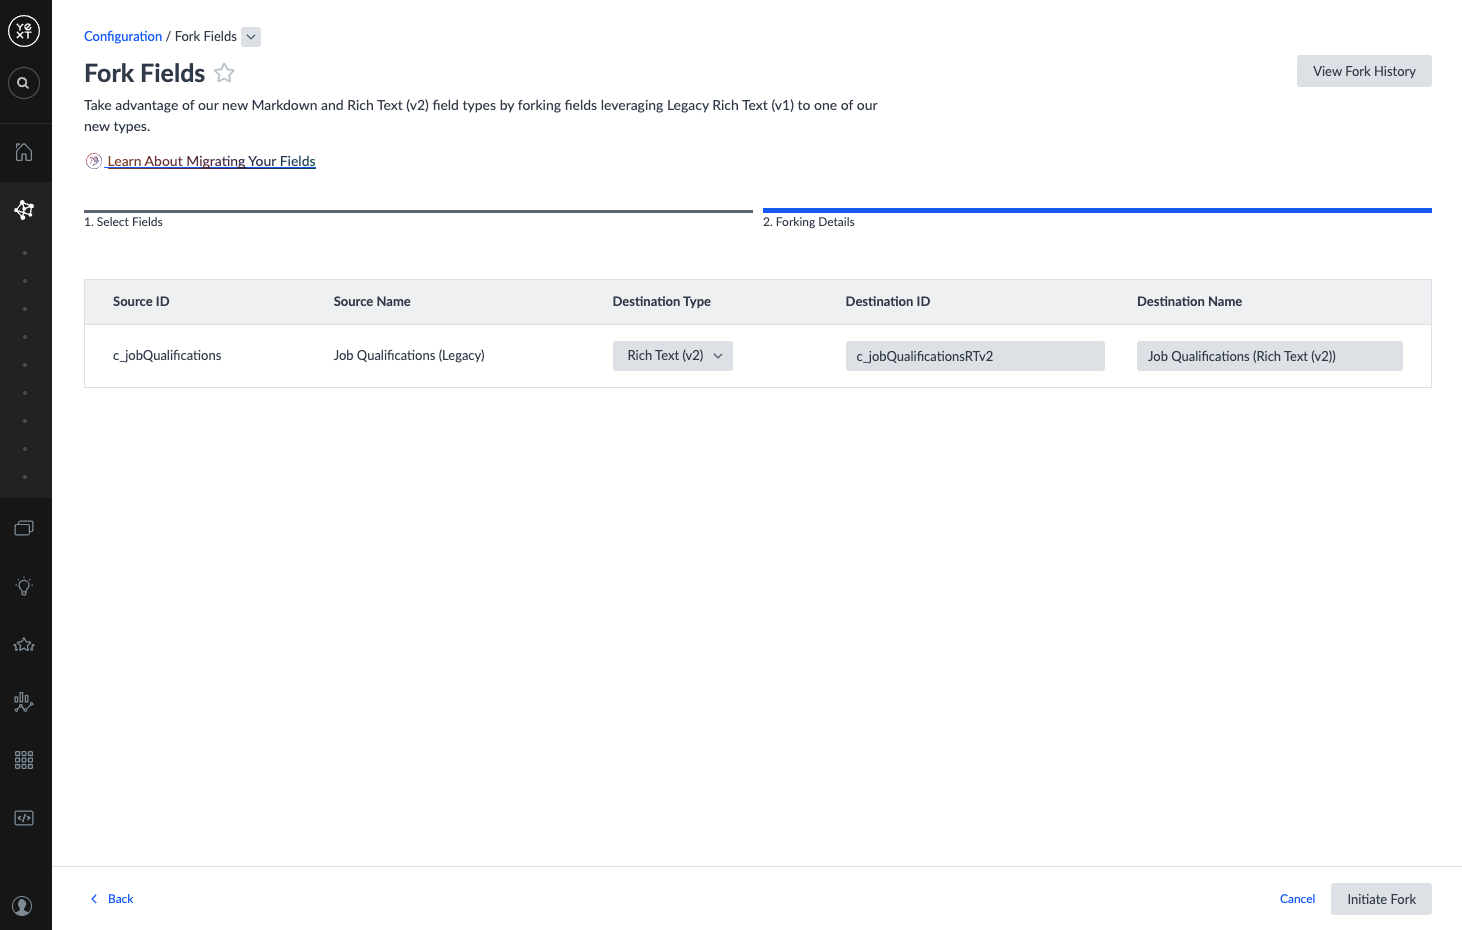
Step 2: Fork Fields
- Navigate to Knowledge Graph > Configuration > Fork Fields.
- Select the checkboxes next to the fields you want to fork and click Fork.
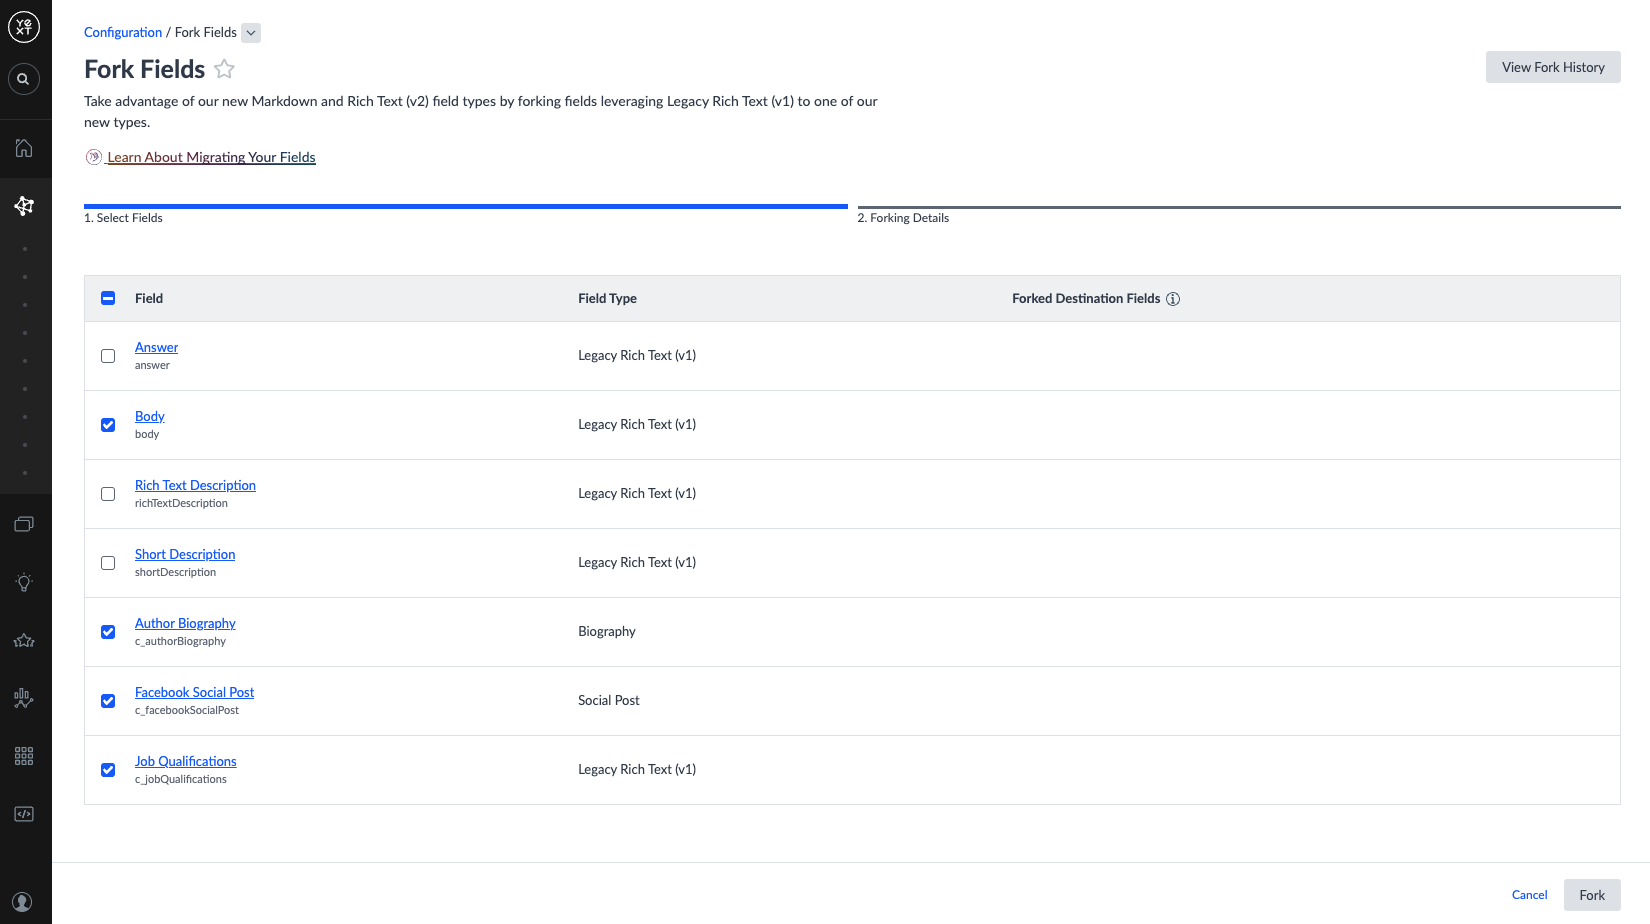
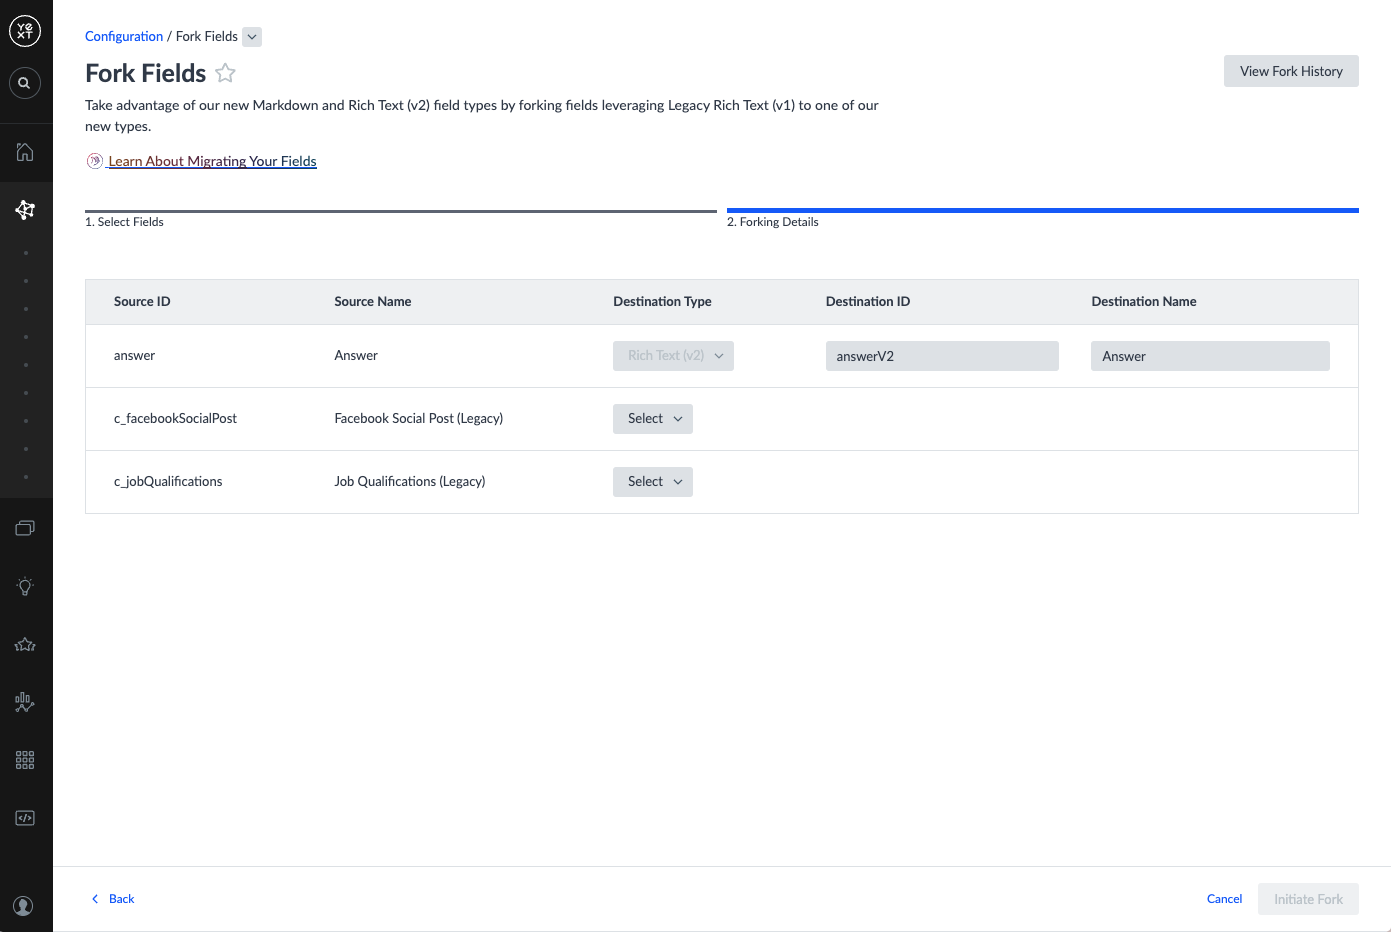
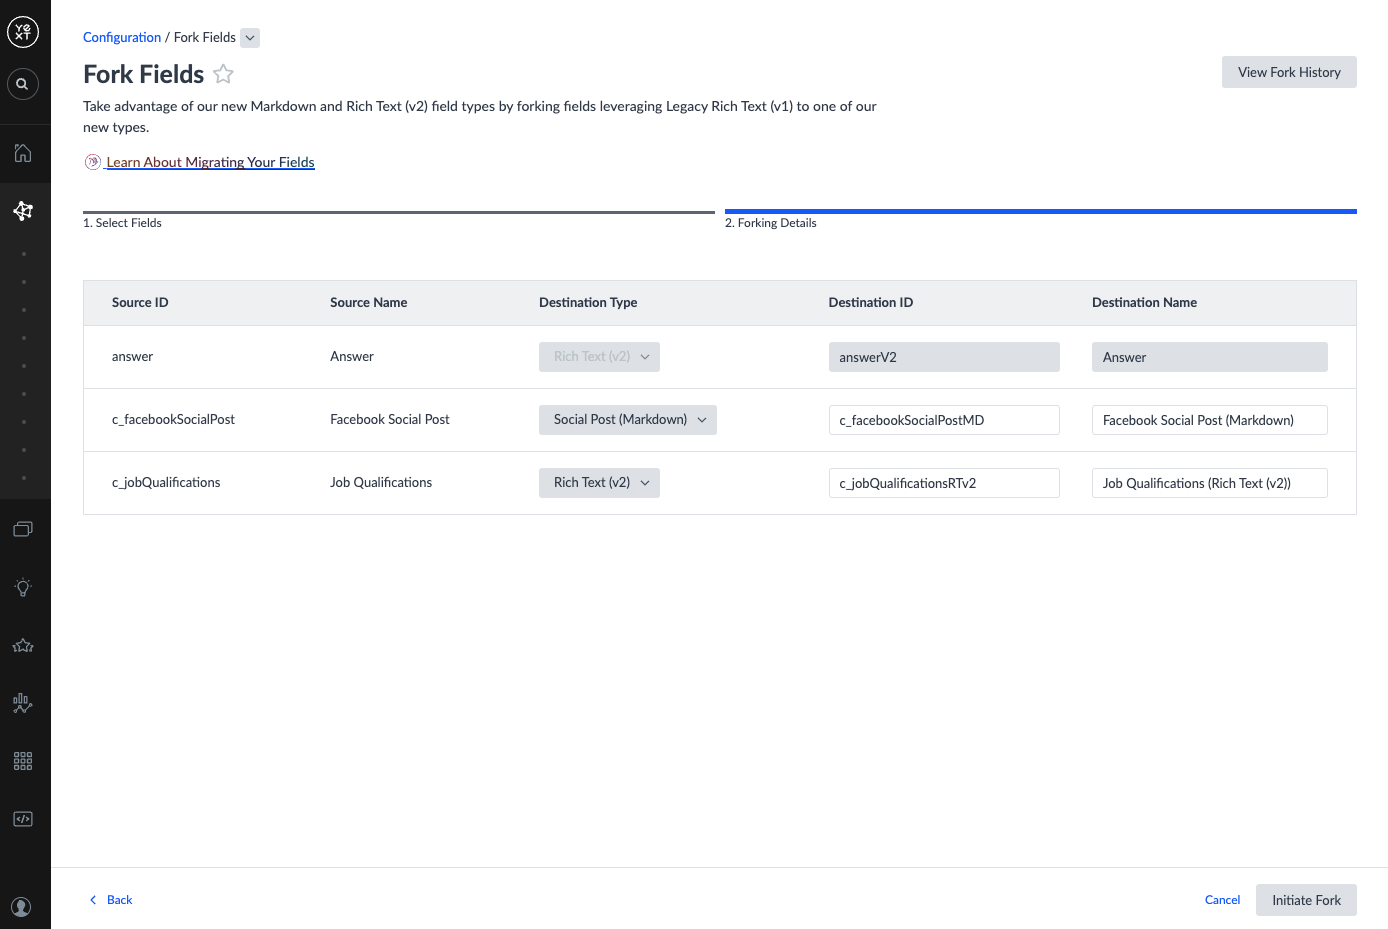
- In the Forking Details step, populate the Destination columns for each field:
| Column | Definition | Notes |
|---|---|---|
| Destination Type | The field type to fork to | For Legacy Rich Text (v1) fields: choose Markdown or Rich Text (v2). For custom field type fields: choose from compatible types created in Step 1. If the compatible type is not yet available, return to Step 1. |
| Destination ID | The ID of the new field to create | Pre-populated. Must be unique and contain no special characters. |
| Destination Name | The name of the new field to create | Pre-populated. Must be under 50 characters and contain only alphanumeric characters, _, -, (, ), and spaces. |
Built-in fields: Several built-in Legacy Rich Text fields already have corresponding new built-in fields. Select them from the list to migrate content — the ID and name will be pre-populated and cannot be edited.
| Existing Built-In Field | Entity Type | New Built-In Field |
|---|---|---|
Answer (answer) |
FAQ | Answer (answerV2) |
Rich Text Description (richTextDescription) |
Product | Description (richTextDescriptionV2) |
Short Description (shortDescription) |
Help Article | Short Description (shortDescriptionV2) |
Body (body) |
Help Article | Body (bodyV2) |
- Click Initiate Fork.
Step 3: Check Fork Status
After initiating a fork, you will be redirected to Fork Fields History. Do not edit data in the field being forked while the fork is In Progress, as this will cause data conversion errors.
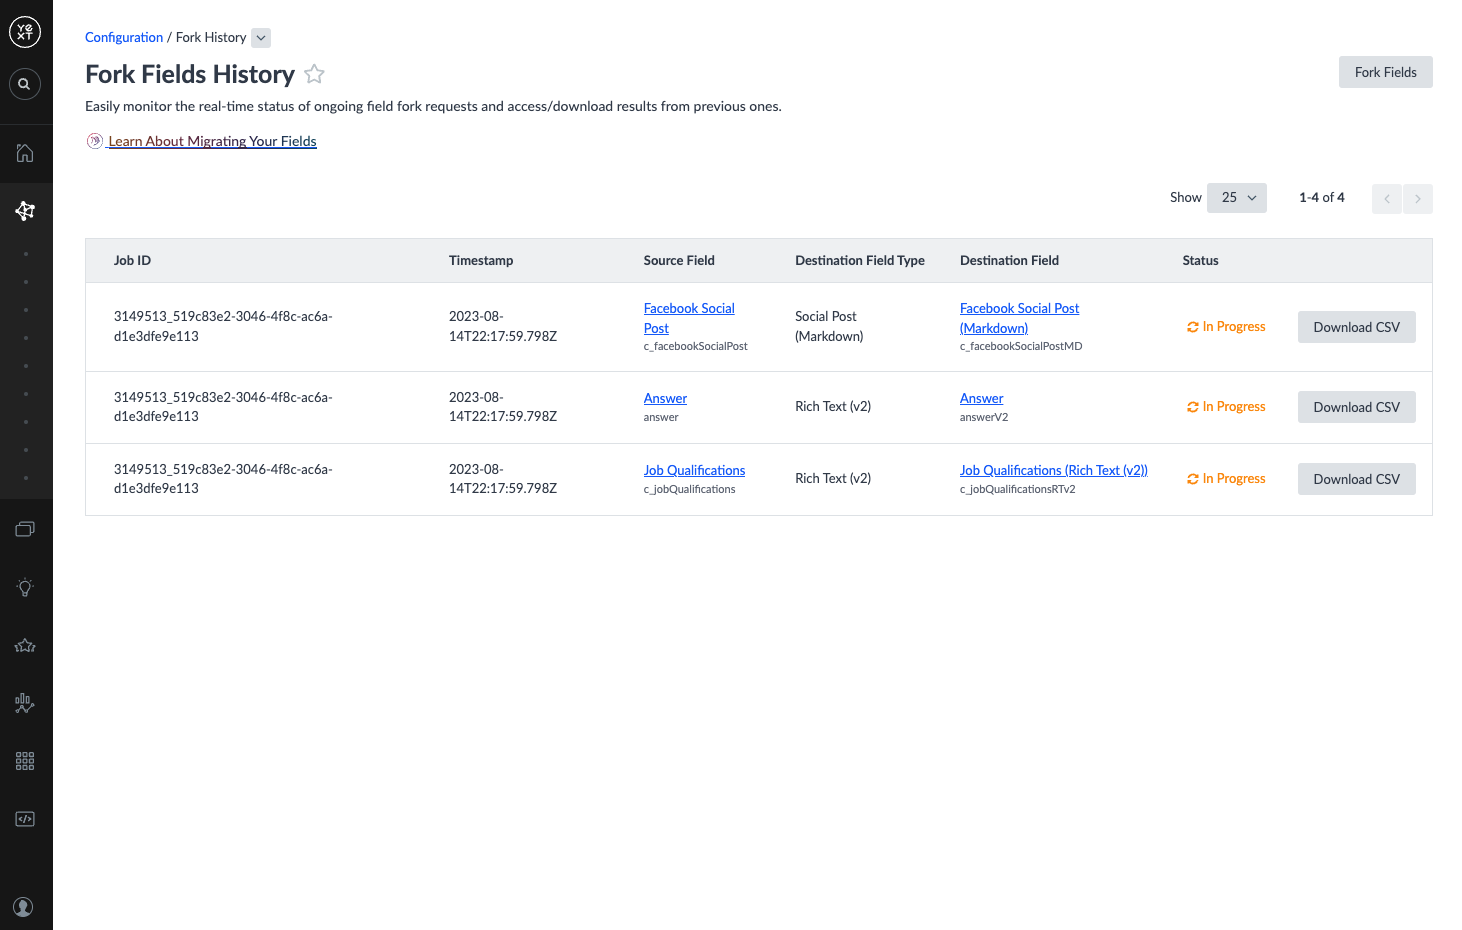
| Status | Description | Next Steps |
|---|---|---|
| In Progress | The system is creating the new field and converting data. | Wait for a final status. |
| Complete | The new field was created and data successfully migrated. | Continue with the transition steps below. |
| Complete with Errors | The new field was created, but some data failed to migrate. Your original data is still in the Legacy Rich Text source field. | Click Download CSV to review errors, make corrections, then refresh the field. |
| Failed | The new field was not created. Your original data is still in the Legacy Rich Text source field. | Click Download CSV to review errors, then run the fork again. |
Refreshing Fields
Refresh a forked field to pull the latest data from the source field, re-convert it, and apply it to the destination field. Use this when:
- A forked field has a status of Complete with Errors
- Data in the source field was edited after it was forked
- Navigate to Knowledge Graph > Configuration > Fork Fields.
- Select the fields to refresh and click Fork.
- Choose the Destination Type. This time, the ID and Name inputs will be grayed out — no new fields will be created, only data will be refreshed.
- Click Initiate Fork.
Step 4: Transition to New Fields
The following items are not updated automatically when a field is forked and must be updated manually:
| Item | Updated Automatically? | Action Required |
|---|---|---|
| Entity field configurations | No | Reconfigure under Knowledge Graph > Configuration > Entity Types > Field Configuration |
| Entity templates | No | Reconfigure under Knowledge Graph > Configuration > Entity Templates |
| Embedded fields | No | Update any references to the source field that are embedded in Page Builder or within the body of another field |
| References to other embedded fields | Yes | Embedded field references within the source field are migrated automatically |
| Field validation | Yes | Validation rules are carried over automatically |
| Translations | No | Reconfigure under Knowledge Graph > Configuration > Fields |
| Field computations | No | Reconfigure under Knowledge Graph > Configuration > Fields. Note: Markdown fields support computed field values; Rich Text (v2) does not. |
| Upstream integrations | No | Update Connectors, API calls, and upload configurations to reference the new field |
| Downstream integrations | No | Update Search, Pages, and API integrations to reference the new field |
Discontinue Legacy Fields
Once the fork is complete, stop editing data in the legacy source fields. If a source field is edited after forking, the new field will not pick up the change automatically — you will need to refresh the field.
To prevent users from accidentally editing legacy fields:
- Remove field permissions (View, Request Edit, Edit)
- Rename the field to append "Legacy," "Deprecated," or "Do Not Use"
- Hide it in a collapsed section via entity field presentation
- Toggle off Visible on Add in the field configuration
Deleting Legacy Rich Text fields is irreversible and not recommended.
Step 5: Update Upstream Integrations
Upstream integrations are any system that writes data to a field (Connectors, Entities Management API, upload configurations).
Connectors
Rich Text (v2): Content must be supplied as a valid JSON AST. If importing HTML or Markdown, use the built-in Convert to Rich Text transform.
Markdown: Content is stored as provided with no conversion applied. Any data, including plain text or HTML, will be preserved as-is.
To update a connector, edit the Mapping step: remove the legacy field and replace it with the new field. For Rich Text (v2), map to the json subfield. For Markdown, map to the markdown subfield.
Entities Management API
Rich Text (v2): Supply content in JSON AST format. Use Lexical's library to convert: Markdown to AST or HTML to AST. Alternatively, route API requests through a Connector to use the built-in transforms.
Markdown: Change all instances where data is sent to the legacy field to reference the new Markdown field ID. No conversion is needed.
Upload Configurations
Navigate to Knowledge Graph > Configuration > Upload Configurations, select the relevant configuration, remove the legacy field, and replace it with the new field.
Step 6: Update Downstream Integrations
Downstream integrations are any system that reads data from a field (Search, Pages, Content API, other API integrations).
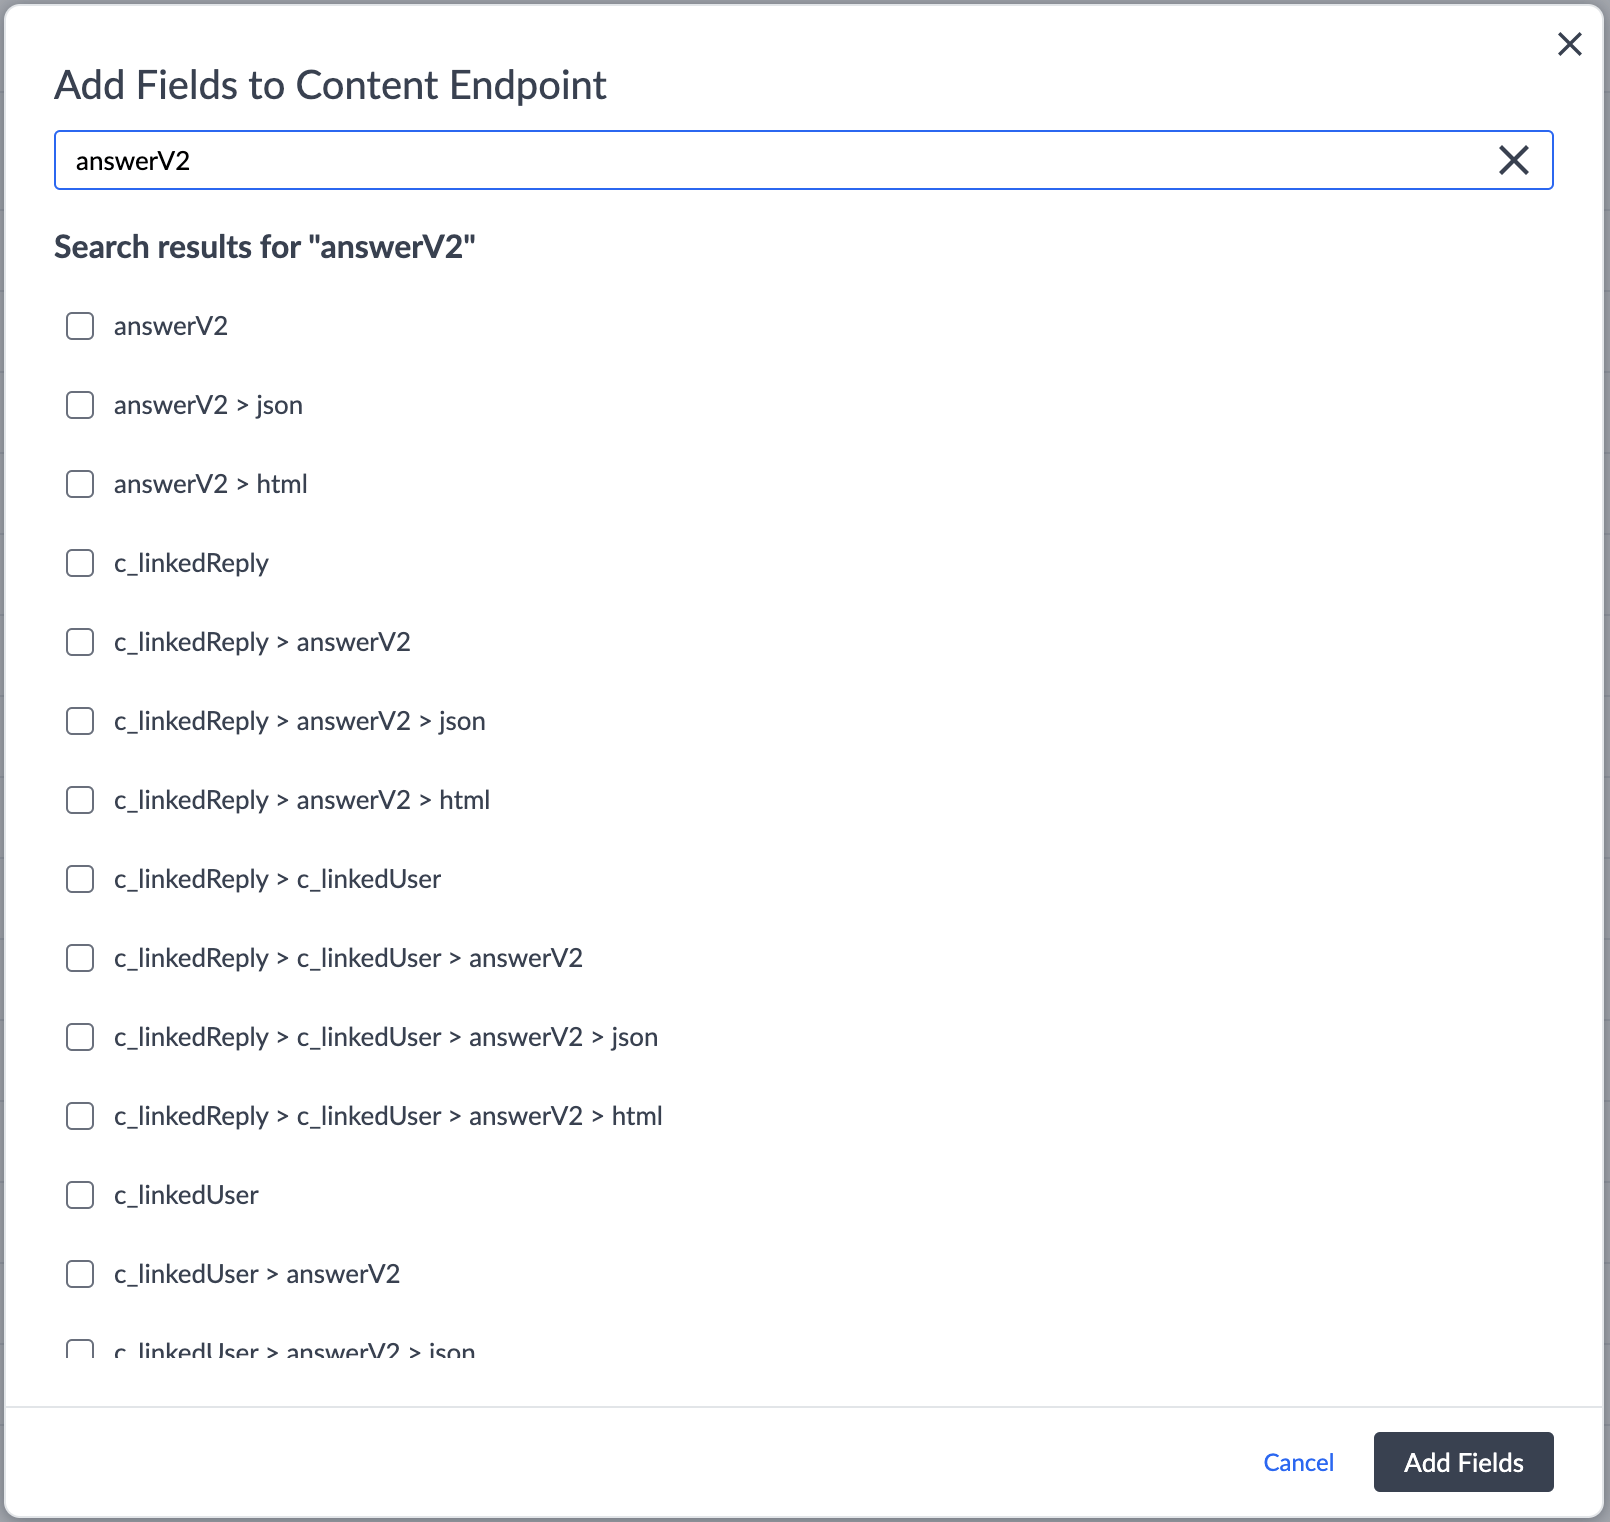
Content Delivery API / Content Endpoints
- Navigate to Developer > Content Endpoints.
- Click Configure on the relevant Stream and click Add Fields.
- For a Markdown field, select
{fieldID}.markdown(to receive Markdown) or{fieldID}.html(to receive HTML). - For a Rich Text (v2) field, select
{fieldID}.json(to process the AST directly) or{fieldID}.html(to receive HTML). - Click Add Fields, then Save.
Note: you cannot include both the top-level field and its subfields in the same stream.
For the Entities Management API or Entities Content Delivery API, use convertRichTextToHTML=true to receive HTML instead of the AST.
Pages
Rich Text (v2) — HTML subfield: Render using the html sub-property directly:
<div dangerouslySetInnerHTML={{ __html: c_lrt.html }} />
Rich Text (v2) — Lexical component:
- Update your Stream definition to include the new field.
- Install
@yext/pages-components(npm i @yext/pages-components) and import the component:
import { LexicalRichText } from "@yext/pages-components";
<LexicalRichText serializedAST={JSON.stringify(c_richTextDescriptionV2.json)} />
- Remove the reference to the old field.
If you see the following error, make sure to use JSON.stringify on the json subfield:
TypeError: editorState.isEmpty is not a function
Markdown — Handlebars:
- Update your Stream definition to include the new field.
- Add a transform to convert JSON AST to HTML.
- Replace the reference in your code to the new field and remove any helper that converts Yext-flavored Markdown to HTML.
{
  "transform": {
    "richTextToHTML": ["field3"]
  }
}
Search
Backend configuration:
- Navigate to Search > [Your Experience] > Edit as JSON.
- Add the following top-level config properties:
{
  "richTextV2ToHTML": true,
  "markdownToHTML": true
}
- If using the
displayFieldsproperty, add the new field to the array:
{
  "verticals": {
    "products": {
      "displayFields": [
        "photoGallery",
        "name",
        "c_testRTDescription",
        "c_testMarkdown"
      ]
    }
  },
  "richTextV2ToHTML": true,
  "markdownToHTML": true
}
Theme:
Note: To use Markdown or Rich Text (v2) fields, you must be on Hitchhiker Theme v1.32 or higher and Search UI SDK v1.16 or higher. See the Theme Upgrade guide for upgrade instructions.
In the Code Editor, use the html subfield when mapping profile fields in the card component.js file:
dataForRender(profile) {
  return {
    title: profile.name,
    details: profile.c_testRTDescription ? profile.c_testRTDescription['html'] : null
  }
}
React:
Reference the example cards in the search-ui-react repo:
- HTML Example Card for Rich Text and Markdown fields converted to HTML
- Markdown Example Card for Markdown fields not converted to HTML
For Markdown fields not converted to HTML, set "markdownToHTML": false in the backend config and run npm i @uiw/react-md-editor.
See the Update a Result Card to Support Rich Text help article for step-by-step instructions.