The Healthcare Taxonomy Solution is a set of 6,000+ pre-built healthcare entities that improve the accuracy of Find a Doctor (FAD) search experiences. The taxonomy includes five entity types:
- Specialty
- Subspecialty
- Procedure
- Condition Treated
- Reason for Visit
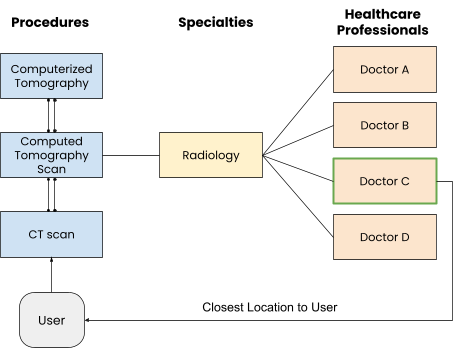
Each entity includes hundreds of synonyms, allowing patients to find doctors using the terms they actually use. For example, a search for "CT scan near me" maps to "Computed Tomography Scan," which maps to radiology as a specialty, returning radiologists in results.
The taxonomy supports use cases including Search (Find a Doctor), Pages, and apps/integrations.
You can also edit the taxonomy as you see fit. Keep in mind, however, that if you make changes, it may be more difficult to accommodate updates to the taxonomy as they are released. Implementing taxonomy updates will always be a choice, and your data will never be overwritten without your knowledge.
Use Cases
While the Healthcare Taxonomy Solution was primarily designed to improve FAD search experiences, there are a number of use cases across Yext products.
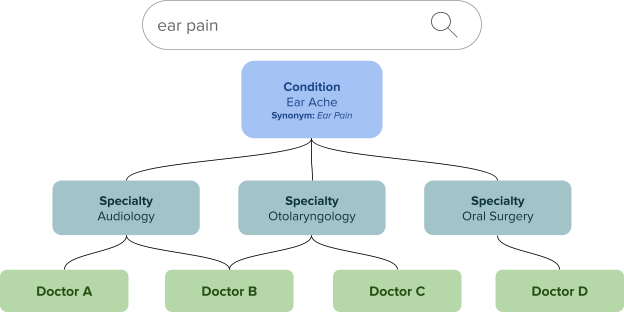
If you use Search, the Healthcare Taxonomy Solution will help our algorithms determine which doctors to show when a user searches for something like “ear pain”. The user shouldn’t have to know that he’s really looking for an otolaryngologist. This solves the problem that layman’s health vocabulary is very different from formal healthcare terminology.
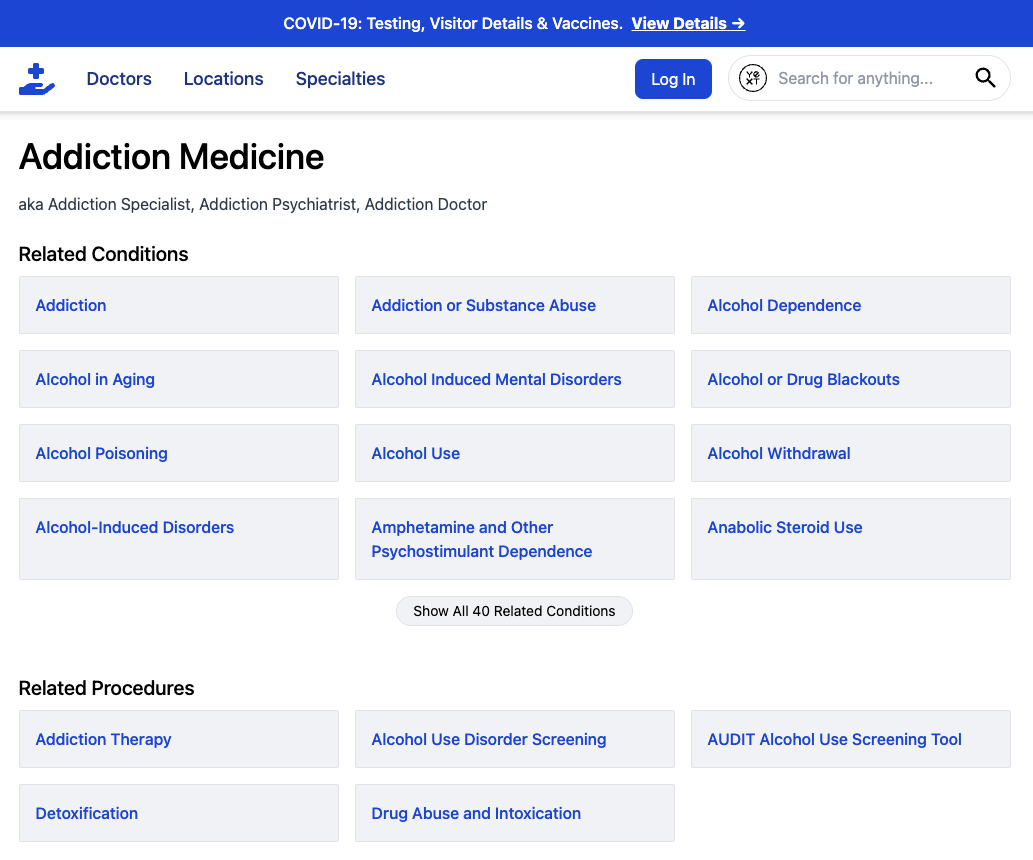
If you use Yext Pages, you can publish a page for a subset of (or all) entities in the taxonomy. You may want to create pages for each condition with a list of doctors that treat it, each specialty with a list of related conditions and relevant doctors, etc. You can see an example of pages using the taxonomy below.
Finally, you can even create or install an app or integration with your own system to push and pull taxonomy data as needed. For example, you may wish to export your doctors and their related specialties to a third-party analytics platform, where you can extract data-based insights on the most commonly searched procedures.
Install the taxonomy
Prerequisites
Retrieve your API key. Installing the taxonomy can add nearly 10,000 entities to your account. Before downloading the app, consult with your CSM to confirm your account has the capacity. Your CSM will share an API key required to complete the installation.
Yext recommends testing in a sandbox account before installing in production. You can create a sandbox by signing up for a playground account, which includes all necessary products and licenses. Note that playground accounts have a 30-day expiration — contact your CSM to extend the testing period.
Steps to install
- Navigate to Apps > Directory and search for Healthcare Taxonomy Solution. Click the app.
- Click Install, then select Install on Yext.
- Review the API endpoints the app will be granted permission to and click Authorize.
- Input the API key provided by your CSM and click Continue.
- Check off the entity types you'd like to import and click Continue. The taxonomy includes: 64 Specialties, 224 Subspecialties, 2,006 Procedures, 3,560 Conditions Treated, and 422 Reasons for Visit. Yext recommends adding as many taxonomy entities as your capacity allows.
Choose your data model and click Continue:
- The Doctors-to-Specialties model requires a lighter initial lift.
- The Doctors-to-Terms model allows for more customized relationships.
See the FAQ section below for more detail on the differences between these models.
- On the next page, choose whether to add a Search experience backend and whether to install a function to maintain parity between your doctors' Listings categories and specialties. See Step 2 for more information on the function.
- After selecting your options, click Continue.
- Review your selections. If everything looks good, click Confirm.
- The app will now add resources to your account. Allow at least 30 minutes for all entities to be imported. Installation is complete when all taxonomy-related connectors in your account show a "Last Run" time on the Connectors overview page.
Integrate the taxonomy with your doctors
Once your account has been populated with taxonomy entities, associate your doctors with these entities using one of the methods below.
Automated specialty and term assignment
If your doctors have categories assigned for Listings or other purposes, you can use pre-built plugins to automatically assign a related specialty and/or terms. Note that if a doctor has multiple categories, only the primary category will be used to determine the associated specialty.
Prerequisites: This method requires the Yext CLI. If you have not set it up, ensure you have installed the Taxonomy.
- Navigate to Developer > Developer Console.
- Click + Add an App in the top right corner.
- Name your app (e.g., "Taxonomy API Key") and click Create App.
- Under the API Credentials tab, add an API Permission for Management API > Entities with Read-Only permissions. Click Save, then confirm by clicking Change Permissions.
- Click the eye symbol to view the API Key. Copy it — you will need it soon.
- Navigate to the appropriate GitHub repository based on your needs:
- To auto-populate specialties only: production / sandbox
- To auto-populate all terms: production / sandbox
- Click the green <> Code button and select Download ZIP. Unzip and save the folder on your computer.
- Open your command line interface (Command Prompt on Windows, Terminal on Mac).
- Run
yext init(for a production account) oryext init -u sandbox(for a sandbox account). - Select Use existing credential if you've connected to this account via CLI before, or Create new credentials and input your business ID. Your business ID appears in the URL of any Yext page:
https://www.yext.com/s/[business-id]/home. - If prompted, authorize your account in the browser window that opens, then click Authorize.
- Return to the CLI and select Yes.
- Run:
yext resources apply /filepath, replacingfilepathwith the path to the folder saved in step 7. Example:yext resources apply /Documents/categoryToSpecialtyConverter-prod-main. - When prompted to confirm adding resources to your account, select Yes.
- Paste the API Key from step 5 when prompted and press Return.
- Close the CLI and open your Yext account.
- Navigate to Knowledge Graph > Connectors, where a new connector named Category to Specialty Converter (or Category to Specialty Converter With Terms) will appear.
- Click View on the connector.
- Click Run Connector in the top right corner.
- Wait for the connector to finish. Your doctors' related taxonomy fields will be populated on your entities.
Manual assignment in the Knowledge Graph
If your doctors do not use categories, you can manually assign taxonomy terms in the Knowledge Graph. This works best for smaller sets of providers.
Prerequisites: This method requires the Yext CLI. If you have not set it up, ensure you have installed the Taxonomy.
- Navigate to Knowledge Graph > Connectors and confirm all taxonomy entities have been added by checking that each taxonomy connector has a "Last Run" date.
- Go to Knowledge Graph > Entities and filter by the Healthcare Professional entity type.
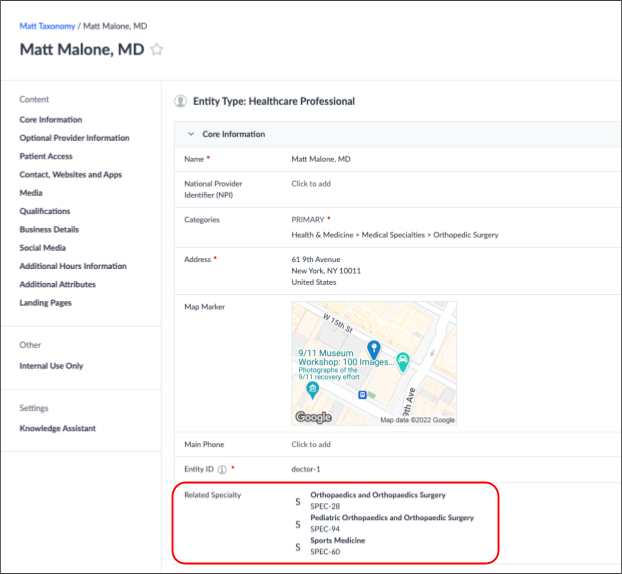
- Select an entity and scroll down to the taxonomy solution fields (e.g., Related Specialties, Related Procedures).
- Populate the fields for the healthcare professional. If you selected the doctors-to-specialties model, only Related Specialties will be available. If you selected the doctors-to-terms model, also fill out Related Conditions, Related Procedures, etc.
- Repeat for all doctors.
Manual assignment via data upload
Recommended for larger sets of providers:
- Navigate to Knowledge Graph > Entities and filter by entity type:
- Doctors-to-specialties model: include Healthcare Professional and Specialty.
- Doctors-to-terms model: include Healthcare Professional and all other entity types you installed (e.g., Specialty, Procedure, Condition Treated).
- Check off all entities — use the dropdown at the top of the list and click Select All in Active Filter.
- Click More Actions > Export Entities.
- Click Continue.
- On the left, select the fields to include in the export:
- Always include Entity ID, Entity Type, and Name.
- Doctors-to-specialties model: also select Related Specialty > Entity ID.
- Doctors-to-terms model: also select all "related" fields available on the Healthcare Professional entity type.
- Click Continue. An export file will download automatically. Open the file.
- For each doctor row, add a comma-separated list of every specialty and/or term entity ID associated with that doctor in the relevant column. Use the exported specialty/term entities as a reference — a VLOOKUP can help cross-reference names and IDs. Save the file periodically.
- Once complete, save the file.
- In Yext, go to Knowledge Graph > Entities and click +Add Data.
- Under Other Options, select Upload File.
- Choose the saved file and go through the upload flow to add related specialties and/or terms to your doctor entities.
Set up your Find a Doctor search frontend
If you chose to include a Find a Doctor Search backend during installation, you'll want to build out a frontend with your brand's desired styling. See the Search frontend documentation for more information.
Maintain your taxonomy using a plugin
Prerequisites: This method requires the Yext CLI. If you have not set it up, ensure you have installed the Taxonomy.
Once your doctors have specialties assigned, you may want to automatically maintain parity between your doctors' Listings categories and taxonomy specialties. A plugin can do this automatically whenever a healthcare professional entity is created or edited.
The plugin includes three functions — choose based on your use case:
- Category to Specialty: When you update a Listings category on a doctor profile, the corresponding taxonomy specialty updates automatically.
- Specialty to Category: When you update a taxonomy specialty on a doctor profile, the corresponding Listings category updates automatically.
- Bidirectional: Updating either field automatically updates the other.
To install the plugin, follow these steps:
- Navigate to Developer > Developer Console.
- Click + Add an App in the top right corner.
- Name your app (e.g., "Maintaining Taxonomy Specialties") and click Create App.
- Under the API Credentials tab, add an API Permission for Management API > Entities with Read/Write permissions. Click Save, then confirm by clicking Change Permissions.
- Click the eye symbol to view the API Key. Copy it.
- Navigate to this GitHub repository.
- Click the green <> Code button and select Download ZIP. Unzip and save the folder on your computer.
- Open your command line interface.
- Run
yext init. - Select Use existing credential if you've connected to this account before, or Create new credentials and input the business ID for the account with taxonomy data.
- If prompted, authorize your account in the browser window that opens.
- Return to the CLI and select Yes.
- Run:
yext resources apply /filepath, replacingfilepathwith the path to the saved folder. Example:yext resources apply /Documents/maintainingTaxonomySpecialties-main. - When prompted to confirm, select Yes.
- Paste the API Key from step 5 and press Return.
- Close the CLI and open your Yext account.
- Navigate back to the app created in step 3 and select the Webhooks tab. Click + Add a Webhook.
- Under Select Webhook Type, choose Entities. Click Next.
- Give your webhook a name (e.g., "Taxonomy Updates") and add a description if desired.
- Under URL, click … or invoke a function. From the dropdown, select maintainingTaxonomy, then choose the function you'd like (Category to Specialty, Specialty to Category, or Bidirectional).
- Click Finish and Add.
- Test by changing a specialty or Listings category on a doctor entity. Refresh the page and confirm the corresponding field has updated.
Maintain your taxonomy using entity templates
You can install a set of entity templates to apply taxonomy terms to new healthcare professional entities as you create them.
Prerequisites: This method requires the Yext CLI. If you have not set it up, ensure you have installed the Taxonomy.
- Navigate to this GitHub repository.
- Click the green <> Code button and select Download ZIP. Unzip and save the folder on your computer.
- Open your command line interface.
- Run
yext init. - Select Use existing credential if you've connected to this account before, or Create new credentials and input the business ID for the account with taxonomy data.
- If prompted, authorize your account in the browser window that opens.
- Return to the CLI and select Yes.
- Run:
yext resources apply /filepath, replacingfilepathwith the path to the saved folder. Example:yext resources apply /Documents/taxonomyEntityTemplates. - When prompted to confirm, select Yes.
- Close the CLI and open your Yext account.
- View your newly installed templates by navigating to Knowledge Graph > Configuration > Templates. When you add a new doctor, apply the corresponding entity template to get all taxonomy terms.
Taxonomy FAQs
How much does the taxonomy cost?
There is no extra cost associated with the taxonomy data itself. However, like your brand's own data, the taxonomy is priced according to content capacity (per entity). Check with your CSM if you're unsure whether your account has capacity to add the healthcare taxonomy data.
Will I automatically receive updates to the taxonomy entities I imported?
Installing the taxonomy solution adds pre-configured connectors that are designed to run just once — you will not automatically receive updates. However, the Yext healthcare team proactively shares major entity updates with customers using the Taxonomy app.
I made changes to the taxonomy after downloading. Can I still receive updates?
Yes. Whenever updates are made, Yext will produce a comprehensive list of changes that makes it clear how to integrate them with your account, taking any changes you've already made into consideration. You can also pick and choose which updates to apply.
Can I use the taxonomy for my healthcare facilities?
While the taxonomy was built for doctors, you can apply relevant specialties, procedures, etc. to locations as well. However, the pre-built functions and plugins won't apply to facilities, as those rely on Listings categories specifically for the Healthcare Professional entity type.
What is the difference between the Specialties and Terms data models?
During installation, you can select one of two data models. Both yield the same number of entities.
Doctors-to-Specialties model: Each doctor is mapped to a specialty. The conditions, procedures, and reasons for visit are inferred from that specialty. This model is simpler to implement and manage. The tradeoff: doctors with the same specialty are treated as functionally identical in Search — if two doctors both have "oncology" as their specialty, both will appear for any cancer-related queries.
Doctors-to-Terms model: Each doctor is associated with all relevant terms based on the care they provide. This is more laborious to set up but offers more granularity. For example, if Dr. A's Related Procedures includes "bypass surgery" and Dr. B's includes "pacemaker implantation," a search for "consultation for pacemaker" returns Dr. B but not Dr. A.
Is there a hybrid option between the two models?
Yes. If your doctors have Listings categories assigned, you can use the "Category to Specialty With Terms" plugin (described in Step 2) to create a hybrid: terms are pre-selected according to the taxonomy's relationships, and you can then update individual doctors' terms based on their specific procedures, conditions, and reasons for visit.