This article covers how to add and edit entities in your account in bulk by uploading a spreadsheet with the Entity Upload flow.
Note: Entity Upload is one way of uploading spreadsheets of entity data to the Knowledge Graph. You can also upload entity data in .CSV, .XLSX, or JSON format using the Connectors framework, which is a separate process from Entity Upload. To learn how to create a file upload connector to upload data, see the Create a File Upload Connector guide.
Before You Start
Make sure your spreadsheet is formatted correctly before starting your upload:
- Ensure your file is in .XLS, .XLSX, or .CSV format.
- Include columns for Entity ID and Country/Region, as well as any other required fields for the entity type you are uploading.
- To see all required fields by entity type and download example upload templates, see Required Fields and Templates below.
Upload Entities
To add or edit entities through spreadsheet upload:
- Navigate to Entity Search (Knowledge Graph > Entities) and click Add Data.
- Choose Entity Upload from the Add Data modal.
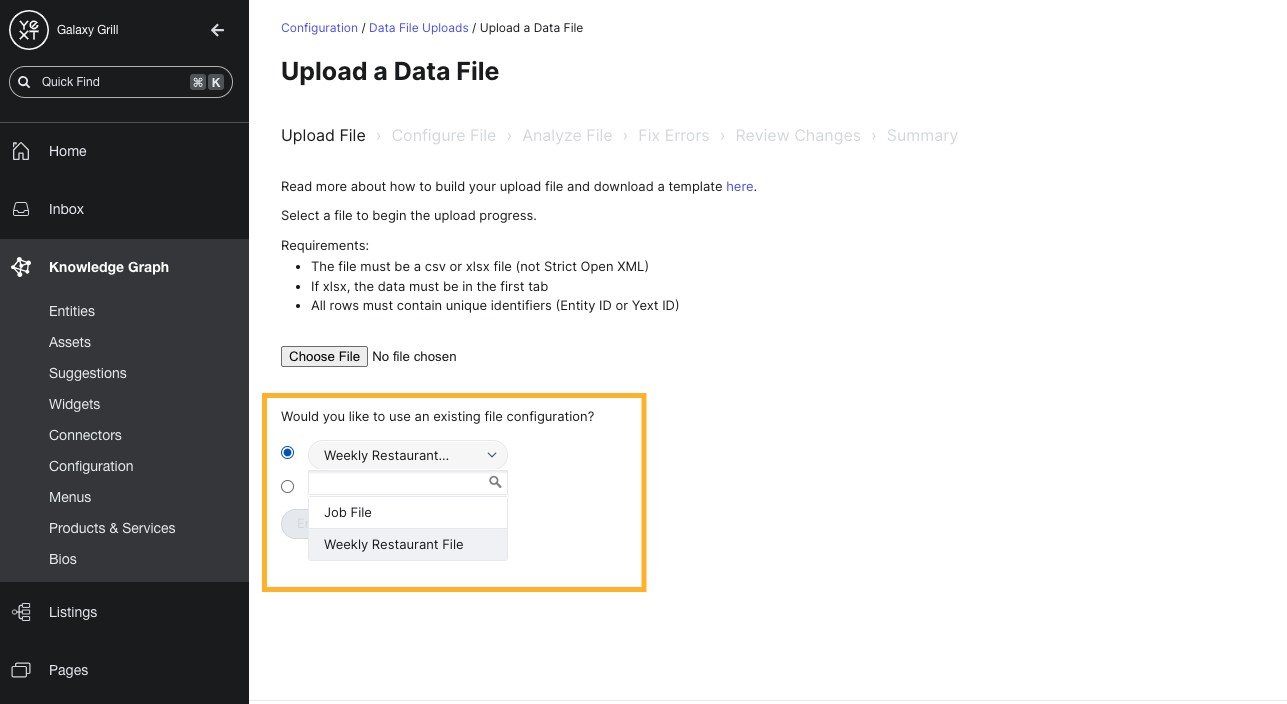
- This will open the Upload File step of the Entity Upload flow. Set the following options:
- Click Choose File to select your spreadsheet.
- If you are using a saved upload configuration to upload data in a specified format, choose your saved upload configuration from the dropdown menu.
- If you are not using an upload configuration, leave the option selected for No, this is a new spreadsheet.
- If you are uploading data in a language other than your account's default language, select the language from the dropdown menu.
- Click Continue.
- On the Configure File step, map the columns in your spreadsheet to fields in Yext. The system will map columns automatically whenever possible, but you may need to select the appropriate field mapping for some columns.
- To map a column to a field, click the Map this Column dropdown menu, type the name of the field to map to, and select it from the menu.
- If you do not wish to upload field values for any of the unmapped columns in your spreadsheet, click Ignore All Unmapped Columns to skip mapping these columns to fields.
- To change the field mapping for any columns that were automatically mapped, click the dropdown menu containing the mapped field name and select a different field.
- By default, each mapped column will have the following data cleansing rules set:
- Trim Whitespace: Trims trailing or leading spaces from the beginning or end of the column's value
-
Ignore Blank Values: Entity Upload will skip uploading any blank cells (so that existing field values in Yext are not removed).
- To change any of the data cleansing rules, click Edit next to the column you want to edit.
- Depending on the type of field being edited, different data cleansing rules may be available to choose from.
-
When you're finished, click Close.
- Use the Additional Fields to set any additional field values that you have not included in your spreadsheet. To set an additional field value, click Add Field.
- Note that this setting will set the same field value for all entities (e.g., setting an additional field value for the "Accepts Reservations" field will set all entities to either "Yes" or "No").
- If you want to set different field values for different entities in your upload, you should upload a new file with that field included. To do this, revise your spreadsheet, and then click More Actions in the upper right. Select Upload Revised File.
- If you're adding an additional field, choose the field you want to set from the Map This Column dropdown.
- Enter the desired field value for all entities in the Field Value text box.
- Apply any data cleansing rules, if desired.
- Choose the scope of entities to apply the field: any new entities, any entities that already exist in the Knowledge Graph, or all entities in the file.
-
Click Save when finished. Repeat for any other additional fields you'd like to add.
- Use the Additional Actions section to add the entities in your upload to a folder, apply labels, or apply an entity template.
- Click Add Action next to the action you'd like to perform.
- Under the Select Entity Type dropdown, choose the scope of your action: any new entities, any missing entities (entities already in your Knowledge Graph that are not part of this upload), all the entities in your file, or all the entities in your account (including this current upload).
- Depending on the action you chose, select the folder, label, or template you'd like to apply.
-
For more information on these actions, see Create a Folder, Manage and Apply Entity Labels, or Create an Entity Template.
- After mapping all your columns and setting any additional fields or actions, click Continue in the lower right.
- On the Analyze File step, the system will process your upload.
- If there were no issues with your upload, you will be brought to the Review Changes step.
- If there were issues with your upload, you will be brought to the Fix Errors step.
Fix Upload Errors
If the system detects errors in your data, you can resolve them before applying changes:
- On the Fix Errors step, review and resolve any issues with the data in your spreadsheet. The table will display the columns with errors and the number of rows affected by each error.
- Choose one of the following ways to resolve errors:
- To download a spreadsheet of errors, fix them in your file, and reupload the file: click Download Errors.
- To edit all errors directly from in the Entity Upload flow, click Fix All Errors.
- To fix just one type of error at a time in the Entity Upload flow, click Fix Errors in Spreadsheet View next to the chosen error.
- To skip uploading any field values with errors, click the dropdown arrow on the chosen error and select Ignore These Values.
- If you choose to Fix All Errors or to fix a single error in Spreadsheet View, you will see the rows with errors and an explanation of the error. Enter the corrected field value for each row in the New Value column.
Review and Apply Changes
- On the Review Changes step, you will see a breakdown of all the entities in your upload by category: new entities, updated entities, unchanged entities (present in your upload, but no data was added or changed), and missing entities (entities in your account that were not present in your upload).
- Click each hero number for more details on the individual entities in each category.
- Click Download Entire Summary to download the breakdown for all entity categories
- Click the individual Download buttons on each category to download the summary for each category.
- Click through each category in the Review Changes step. Select the checkbox at the bottom to acknowledge the change (e.g., "I acknowledge that I am adding [x] entities"), and click Next in the bottom left to go to the next category.
- This needs to be done for each category, even if there are 0 entities in the category.
- This needs to be done for each category, even if there are 0 entities in the category.
- After confirming the last category, click Submit Changes to confirm all changes.
- On the Summary step, the system will process and apply the changes in your upload. You can monitor these changes in the progress bar at the top of the screen.
- If you want to save this upload configuration to upload more data using the same formatting options in the future, enter a name for the configuration next to the Configuration Name option and click Save.
-
Otherwise, click Done or Back to Uploads to exit the Entity Upload flow.
Note: If you upload a file that drastically differs from the content you have stored inside your account, the file may be manually reviewed and approved by Yext to ensure all updates are correct and intentional.
Saved Upload Configurations
Saved upload configurations are like templates for entity uploads that you plan to repeat over time. You can use an upload configuration to save your settings for a certain file upload process (including your field mappings, data cleansing rules, additional fields/actions, etc.) and apply the same settings to future uploads of similar data.
You can save an upload configuration during the Summary step of the Entity Upload flow. Enter a name for your configuration and click Save.
Applying a saved upload configuration
To use a saved upload configuration in a future upload, select it in the Upload File step of the Entity Upload flow.
View Past Uploads
Required Fields
- Entity ID and Country are required fields for all entity types.
- The Country field should be formatted as the two-letter ISO country code (also called the ISO alpha-2 code), which is an international reference standard. For a full list of ISO country codes, see the ISO browsing resource.
Note: Any URLs present in your upload sheet must be valid (i.e., if you were to copy and paste them from your sheet into a web browser, they would function). If your URLs contain any encoded special characters that prevent the URL from resolving properly when entered into a web browser, they should be decoded before uploading to the Knowledge Graph (with the exception of spaces encoded as %20).
Required Fields By Entity Type
| Entity Type | Required Fields |
| Location |
|
| Restaurant |
|
| ATM |
|
| Financial Professional |
|
|
Healthcare Professional There is a specific upload format for Healthcare Facilities and Practitioners. Visit Get Started: Yext for Healthcare to learn more about best practices for Healthcare entities. |
Note: You can use the NEPPES NPI Registry to find a provider’s NPI number. |
|
Healthcare Facility There is a specific upload format for Healthcare Facilities and Practitioners. Visit Get Started: Yext for Healthcare to learn more about best practices for Healthcare entities. |
|
| Event |
|
| Hotel |
|
| FAQ |
|
| Job |
|
Data Cleansing Rules for Entity Upload
| Rule | Description | Applicable Field Types |
|---|---|---|
| Trim Whitespace | Removes extraneous spaces at the beginning or end of a string, similar to the TRIM() function in Excel. |
Strings |
| Ignore vs. Clear Blank Values | Ignore Blank Values: If no data is provided, the system will make no change. This is the default setting. Clear Blank Values: If a field value is left blank, the system will clear the field's values. | All |
| Capitalization | Capitalize: Capitalizes the first letter of every word that is separated by a space. Capitalize Fully: Capitalizes the first letter of every word (separated by a space). Remaining letters in a word will be formatted in lowercase. | Strings |
| Delimiter | Allows user to specify the delimiter for list-type fields. Options: comma, tab. Defaults to comma. | List-type fields |
| Add to Existing | Appends a list item to any existing items in the field. If unselected ("Replace Existing"), uploading will override any existing list items with the value in the spreadsheet. Defaults to Replace Existing. | List-type fields |
| Convert Letters to Numbers | Converts letters in branded phone numbers (e.g., 1-800-555-YEXT) to the appropriate number. Enabled by default. |
Phone Number fields |
| Infer Country Code | System will infer the country code for a phone number (based on the entity's existing Country field) if a country code is not provided. Enabled by default. | Phone Number fields |
| Rich Text Detection | Allows user to choose how the system should ingest rich text. Choose between Interpret as Markdown or Interpret as HTML. | Rich Text fields |